

If you have a serious sweet tooth and a soft spot for creamy, dreamy desserts, then the Butterfinger Cheesecake Recipe is about to become your new obsession. This cheesecake combines the rich, velvety texture of classic cheesecake with the irresistible crunch and unique peanut butter and chocolate flavor of Butterfinger candy bars. Every bite is a perfect balance of buttery crust, smooth filling, and crunchy candy pieces, making it ideal for celebrations or whenever you need a special treat that wows. Trust me, once you try this, you’ll be eager to share it with friends and family, or simply keep it all to yourself!

Ingredients You’ll Need
These ingredients are straightforward yet essential to creating the perfect blend of textures and flavors in your Butterfinger cheesecake. Every component plays a role, whether building a buttery crust, a creamy cheesecake body, or that signature candy crunch that makes this dessert truly unforgettable.
- 1 ½ cups graham cracker crumbs: Provides a sturdy and slightly sweet base that holds everything together perfectly.
- ¼ cup granulated sugar: Adds a touch of sweetness to the crust for balance.
- 6 tablespoons unsalted butter (melted): Binds the crust crumbs and adds richness without overpowering.
- 3 (8-ounce) packages cream cheese (softened): The star ingredient for that dense, luscious cheesecake texture.
- 1 cup granulated sugar: Sweetens the creamy filling beautifully, ensuring each bite is just right.
- 3 large eggs: Helps the filling set firmly while keeping it silky smooth.
- 1 teaspoon vanilla extract: Adds depth and enhances the overall flavor of the cheesecake.
- ½ cup sour cream: Provides a subtle tang and extra creaminess for a more balanced taste.
- 1 ½ cups chopped Butterfinger candy bars (divided): The secret star giving that fantastic crunch and flavor throughout and on top.
- Whipped cream and extra Butterfinger pieces for topping (optional): Perfect for a luscious finish and an extra candy crunch layer.
How to Make Butterfinger Cheesecake Recipe
Step 1: Prepare the Crust
Start by preheating your oven to 325°F. Mix the graham cracker crumbs with sugar and melted butter until everything is combined and looks like wet sand. Press this mixture evenly and firmly into the bottom of a 9-inch springform pan; this will give your cheesecake that classic buttery and slightly crunchy foundation. Bake for 10 minutes, then let it cool slightly as you prepare the filling.
Step 2: Make the Cream Cheese Filling
In a large mixing bowl, beat the softened cream cheese until it’s completely smooth and free from lumps—this is key to that creamy texture everyone loves. Gradually add the sugar and continue beating until well combined. Next, add the eggs one at a time, mixing gently after each to avoid incorporating too much air that could cause cracks. Stir in vanilla extract and sour cream until the mixture is silky and deliciously rich.
Step 3: Add Butterfinger Pieces and Bake
Fold in 1 cup of the chopped Butterfinger candy bars gently into the cream cheese batter; these candy pieces are what make the Butterfinger Cheesecake Recipe stand out with bursts of peanut butter and chocolate flavor throughout. Pour the filling over your baked crust and smooth the top with a spatula. Bake for about 55 to 65 minutes—until the edges are set, but the center slightly jiggles when gently shaken. This ensures the perfect creamy consistency.
Step 4: Cool and Chill
Turn off the oven and crack the door open. Leave your cheesecake inside to cool gradually for about an hour; this helps prevent cracks. After that, pop it in the refrigerator and let it chill for at least 4 hours, or overnight if you can wait that long. This chilling transforms the cheesecake into a dense, sliceable masterpiece.
Step 5: Final Touches
Just before serving, scatter the remaining chopped Butterfinger pieces over the top and add dollops of whipped cream if you like a fluffy, creamy contrast. This final touch makes your Butterfinger Cheesecake Recipe not only taste amazing but look breathtaking, too.
How to Serve Butterfinger Cheesecake Recipe

Garnishes
A sprinkle of extra Butterfinger pieces is a must for that unbeatable crunch and flavor pop when you take a bite. Whipped cream adds a soft, airy complement to the dense cheesecake, making each mouthful feel balanced and indulgent.
Side Dishes
If you want to elevate your dessert experience, serve slices of this cheesecake with fresh berries like raspberries or strawberries. Their natural tartness cuts through the sweetness and adds a refreshing brightness. A simple espresso or a glass of cold milk also pairs incredibly well, creating a complete, satisfying dessert experience.
Creative Ways to Present
For parties or special occasions, serve your Butterfinger Cheesecake Recipe in individual mason jars or clear cups layered with extra crumbled candy and whipped cream on top. This not only looks gorgeous but lets everyone enjoy a personalized portion of this rich dessert. You could also drizzle some caramel or chocolate sauce for added decadence.
Make Ahead and Storage
Storing Leftovers
Keep your cheesecake covered tightly with plastic wrap or in an airtight container and store it in the refrigerator. This will keep it fresh and creamy for up to 5 days. The texture and flavor actually deepen, so leftovers are just as delightful as freshly made slices.
Freezing
Butterfinger cheesecake freezes beautifully! Wrap it well in plastic wrap and then foil before placing in the freezer to prevent ice crystals from forming. It will keep for up to 2 months frozen. When you’re ready to enjoy, thaw it overnight in the fridge for best results.
Reheating
Cheesecake is best enjoyed cold, so reheating isn’t necessary. If you prefer it slightly less chilled, let a slice sit at room temperature for 10 to 15 minutes before serving. This softens the texture and accentuates the flavors perfectly.
FAQs
Can I use other candy bars instead of Butterfinger?
Absolutely! While Butterfinger bars give a unique peanut butter and chocolate crunch, you can experiment with other favorites like Heath bars or Twix for different flavors and textures.
Do I need a water bath to bake this cheesecake?
A water bath isn’t necessary but it helps create a super smooth, crack-free surface by baking the cheesecake gently. If you want a classic look with perfect texture, a water bath is a helpful step.
Can I make this cheesecake gluten-free?
Yes! Just substitute the graham cracker crumbs with gluten-free crumbs or crushed gluten-free cookies, and make sure your Butterfinger candies are gluten-free as some versions may contain gluten.
What’s the best way to chop Butterfinger bars for the cheesecake?
Use a sharp knife to chop them into small, uniform pieces. This ensures even distribution throughout the filling and a consistent crunch in every bite without large chunks overwhelming the texture.
How long should I let the cheesecake chill before serving?
For the best texture and flavor, chill the cheesecake for at least 4 hours, though overnight chilling allows the flavors to meld beautifully and makes slicing much cleaner.
Final Thoughts
If you want to wow anyone who tries your dessert, the Butterfinger Cheesecake Recipe is your secret weapon. It masterfully combines creamy cheesecake with the nostalgic flavors of Butterfinger candy bars, creating an unforgettable treat that’s perfect for any occasion. Give it a try—you’ll be thrilled at how easy it is to make and how quickly it disappears from the table!
Print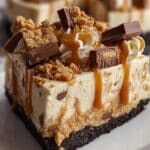
Butterfinger Cheesecake Recipe
- Prep Time: 25 minutes
- Cook Time: 1 hour
- Total Time: 6 hours
- Yield: 12 slices
- Category: Dessert
- Method: Baking
- Cuisine: American
- Diet: Vegetarian
Description
This decadent Butterfinger Cheesecake combines a creamy, smooth cream cheese filling with the crunchy, peanut buttery flavor of Butterfinger candy bars. The graham cracker crust adds a buttery base, while the rich filling is studded with chopped Butterfinger pieces for a delightful texture contrast. Perfect for holiday celebrations or any special occasion, this American-style dessert is both visually impressive and irresistibly delicious.
Ingredients
Crust
- 1 ½ cups graham cracker crumbs
- ¼ cup granulated sugar
- 6 tablespoons unsalted butter, melted
Filling
- 3 (8-ounce) packages cream cheese, softened
- 1 cup granulated sugar
- 3 large eggs
- 1 teaspoon vanilla extract
- ½ cup sour cream
- 1 ½ cups chopped Butterfinger candy bars, divided
Topping (optional)
- Whipped cream
- Extra Butterfinger pieces
Instructions
- Prepare the crust: Preheat your oven to 325°F. In a medium bowl, combine the graham cracker crumbs, ¼ cup sugar, and melted butter. Press the mixture firmly and evenly into the bottom of a 9-inch springform pan, creating a compact crust layer. Bake for 10 minutes, then remove and let it cool slightly.
- Mix the cream cheese batter: In a large bowl, beat the softened cream cheese until smooth and creamy using a mixer. Gradually add 1 cup granulated sugar and continue beating until fully combined and smooth. Add the eggs one at a time, mixing well after each addition. Stir in the vanilla extract and sour cream until the batter is smooth and homogenous.
- Add Butterfinger pieces: Gently fold in 1 cup of the chopped Butterfinger candy bars into the cream cheese mixture, spreading them evenly throughout the batter.
- Assemble and bake: Pour the batter over the pre-baked crust in the springform pan, smoothing the top evenly with a spatula. Bake at 325°F for 55 to 65 minutes, or until the edges appear set but the center still jiggles slightly when the pan is gently shaken.
- Cool the cheesecake: Turn off the oven, crack the oven door open, and allow the cheesecake to cool inside for 1 hour; this gradual cooling helps prevent cracks. Afterward, transfer the cheesecake to the refrigerator and chill for a minimum of 4 hours or overnight for best results.
- Serve: Before serving, optionally top the cheesecake with whipped cream and sprinkle the remaining chopped Butterfinger pieces on top for extra crunch and decoration. Slice into 12 pieces and enjoy.
Notes
- Use room-temperature ingredients for a smooth batter and to avoid lumps.
- Do not overmix the batter to minimize cracking and ensure a creamy texture.
- Gradual cooling inside the oven helps reduce cracks on the cheesecake surface.
- A water bath (bain-marie) is optional but can help achieve even baking and prevent cracks.


