

If you’re on the hunt for a dessert that’s chewy, buttery, and utterly unique, you’re going to fall head over heels with this Butter Mochi Recipe. This Hawaii-inspired treat brings together the luscious richness of butter and coconut milk with the delightfully sticky texture of glutinous rice flour, creating a bite that’s simultaneously satisfying and comforting. Trust me when I say that once you’ve made this Butter Mochi Recipe, it will quickly become your go-to sweet treat for any occasion.

Ingredients You’ll Need
This Butter Mochi Recipe calls for a handful of simple pantry staples, each playing an essential role in crafting the perfect chewy, tender texture and rich flavor. From the creamy coconut milk to the sweet rice flour, every component works in harmony to make this dessert shine.
- Sweet rice flour (glutinous rice flour): The key to the mochi’s characteristic chewy texture that’s totally addictive.
- Granulated sugar: Adds the perfect level of sweetness without overpowering the other flavors.
- Baking powder: Helps the mochi rise just enough to keep it light and tender.
- Salt: Balances the sweetness and enhances all the flavors.
- Coconut milk: Brings creamy richness and a subtle tropical flair.
- Unsalted butter, melted: Infuses the mochi with buttery goodness and moistness.
- Vanilla extract: Adds a warm, inviting aroma that makes the dessert irresistible.
- Large eggs: Provide structure and help bind the ingredients together.
- Whole milk: Lightens the batter and adds smoothness to each bite.
How to Make Butter Mochi Recipe
Step 1: Preheat the oven and prepare your pan
Start by heating your oven to 350°F (175°C). Grease an 8×8-inch square baking pan generously with butter or nonstick spray to prevent sticking and ensure a lovely crust forms on the mochi’s edges.
Step 2: Mix the dry ingredients
In a large mixing bowl, whisk together the sweet rice flour, granulated sugar, baking powder, and salt until they’re evenly combined. This dry mix is the foundation for the mochi’s chewy texture and balanced sweetness.
Step 3: Combine the wet ingredients
In a separate bowl, beat the eggs until smooth, then add the coconut milk, melted butter, vanilla extract, and whole milk. Mix well until everything is fully incorporated, creating a rich, creamy liquid that will transform the dry ingredients into that classic mochi batter.
Step 4: Mix wet and dry ingredients
Pour the wet ingredients into the bowl with the dry mix and stir gently until the batter is smooth and uniform. Expect the batter to be somewhat runny—that’s exactly how it should be to bake into the perfect gooey, chewy texture.
Step 5: Pour batter into the pan and bake
Transfer the batter to your prepared baking pan and spread it evenly with a spatula. Place it in the oven and bake for 45 to 50 minutes. You’ll know it’s done when the top turns a beautiful golden brown and a toothpick inserted in the center comes out clean. The mochi should feel slightly firm but remain soft and chewy inside.
Step 6: Cool and slice
Once baked, let your butter mochi cool in the pan for about 10 minutes. This step allows it to set enough for clean slices but keeps it warm and inviting. Cut into squares and get ready to dive into one of the most comforting textures you’ve ever tasted.
How to Serve Butter Mochi Recipe

Garnishes
While the Butter Mochi Recipe is delicious all on its own, adding a few simple garnishes can take it over the top. Try a light dusting of powdered sugar or a sprinkle of toasted coconut flakes for texture and a hint of extra flavor. A drizzle of honey or a scoop of vanilla ice cream also makes it feel like a special indulgence.
Side Dishes
Pair your mochi squares with fresh fruit like pineapple or mango to brighten the richness and add a refreshing contrast. A cup of green tea or a rich coffee works beautifully to balance the sweetness too, making it a perfect afternoon treat or after-dinner dessert.
Creative Ways to Present
If you want to wow your guests, serve Butter Mochi bites on a platter with colorful edible flowers or fresh berries. You can also cut the mochi into small squares, thread them onto skewers alternating with fruit, and serve as fun dessert kebabs. Presentation adds a playful twist without complicating this already straightforward recipe.
Make Ahead and Storage
Storing Leftovers
Butter mochi keeps beautifully for several days when stored in an airtight container at room temperature or in the fridge. The texture will stay soft and chewy, though chilling may firm it up slightly, which some folks really enjoy!
Freezing
You can freeze Butter Mochi squares by wrapping them individually in plastic wrap and placing them in a freezer-safe container or bag. They’ll keep well for up to 2 months. To thaw, simply leave them out on the counter or pop them in the fridge overnight.
Reheating
For warm, freshly baked vibes, reheat leftover mochi in the microwave for 15 to 20 seconds or in a preheated oven at 300°F (150°C) for about 10 minutes. This brings back that soft, chewy texture and buttery aroma you love.
FAQs
Can I use regular rice flour instead of sweet rice flour?
Regular rice flour won’t give you the same sticky, chewy texture that sweet rice flour provides. For the authentic experience of this Butter Mochi Recipe, sweet rice flour is strongly recommended.
Is this recipe gluten-free?
Yes! Since it uses sweet rice flour, which is naturally gluten-free, this Butter Mochi Recipe is safe for those avoiding gluten. Just double-check your baking powder brand to ensure it’s gluten-free too.
Can I substitute coconut milk with regular milk?
You can, but the coconut milk contributes both moisture and a subtle richness that defines the flavor profile. Using regular milk will change the taste slightly but the texture will remain similar.
Why is my mochi gummy or overly dense?
This can happen if the baking time is too short or the oven temperature is off. Make sure to bake fully so it sets correctly, and always use sweet rice flour, which gives the characteristic chewiness without being gummy.
Can I make this vegan?
Traditional butter mochi contains eggs and butter, but you could experiment with plant-based milk, vegan butter, and flax eggs to create a vegan version. Just keep in mind the texture and flavor might differ slightly from the classic.
Final Thoughts
This Butter Mochi Recipe is truly a crowd-pleaser that feels like a warm hug in dessert form. Its chewy, buttery texture paired with the tropical notes of coconut milk will have you coming back for more. Whether you’re baking for family, friends, or just yourself, this recipe is definitely worth trying soon—you’ll wonder what took you so long to discover it!
Print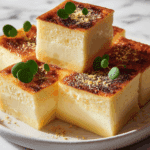
Butter Mochi Recipe
- Prep Time: 15 minutes
- Cook Time: 50 minutes
- Total Time: 1 hour 5 minutes
- Yield: 16 servings
- Category: Dessert
- Method: Baking
- Cuisine: Hawaiian
Description
Butter Mochi is a delightful and chewy Hawaiian dessert made with sweet rice flour and rich coconut milk, offering a unique texture that’s soft, slightly firm, and wonderfully flavorful. This easy-to-make baked treat combines simple pantry ingredients for a moist, tender mochi infused with buttery goodness and a subtle vanilla aroma. Perfect for gatherings or as a sweet snack, Butter Mochi is best enjoyed warm or at room temperature.
Ingredients
Dry Ingredients
- 2 cups sweet rice flour (glutinous rice flour)
- 1 cup granulated sugar
- 1 1/2 teaspoons baking powder
- 1/2 teaspoon salt
Wet Ingredients
- 1 can (13.5 oz) coconut milk
- 1/2 cup unsalted butter, melted
- 1 teaspoon vanilla extract
- 2 large eggs
- 1/4 cup whole milk
Instructions
- Preheat the oven: Preheat your oven to 350°F (175°C) and grease an 8×8-inch square baking pan with butter or nonstick spray to prevent sticking.
- Mix the dry ingredients: In a large bowl, whisk together the sweet rice flour, granulated sugar, baking powder, and salt until well combined and uniform.
- Combine the wet ingredients: In a separate bowl, beat the eggs thoroughly. Add the coconut milk, melted unsalted butter, vanilla extract, and whole milk, mixing until fully blended.
- Mix the wet and dry ingredients: Pour the wet mixture into the dry ingredients, stirring gently until the batter is smooth and uniform. Expect a runny consistency, which is normal for butter mochi batter.
- Pour into the pan: Transfer the batter into the prepared baking pan, spreading it out evenly to help it cook uniformly.
- Bake the mochi: Bake in the preheated oven for 45-50 minutes until the top is golden brown and a toothpick inserted into the center comes out clean. The mochi should feel slightly firm on top but remain soft and chewy inside.
- Cool and serve: Allow the butter mochi to cool in the pan for about 10 minutes before cutting it into squares. It can be served warm or at room temperature for optimal flavor and texture.
Notes
- The batter is runny but do not alter the consistency; this is expected for the perfect mochi texture.
- If you don’t have sweet rice flour, glutinous rice flour can be used as a direct substitute.
- Butter Mochi is best served the same day or within 2 days, stored at room temperature in an airtight container.
- For a dairy-free version, substitute whole milk with almond or coconut milk and use coconut oil instead of butter.
- Ensure the pan is well-greased to avoid sticking, as the mochi can be sticky due to its glutenous texture.


