
If you’re searching for a delightful treat that perfectly blends the sweet, juicy flavor of strawberries with the rich decadence of chocolate and a festive Halloween twist, then the Best Chocolate Covered Strawberry Pumpkins Recipe is exactly what you need. These adorable little pumpkins are as fun to make as they are to eat, turning simple strawberries into festive, show-stopping desserts that everyone will adore. With vibrant orange candy coating and just a hint of green for the stem, this recipe brings joy and a pop of color to any celebration or cozy night in.

Ingredients You’ll Need
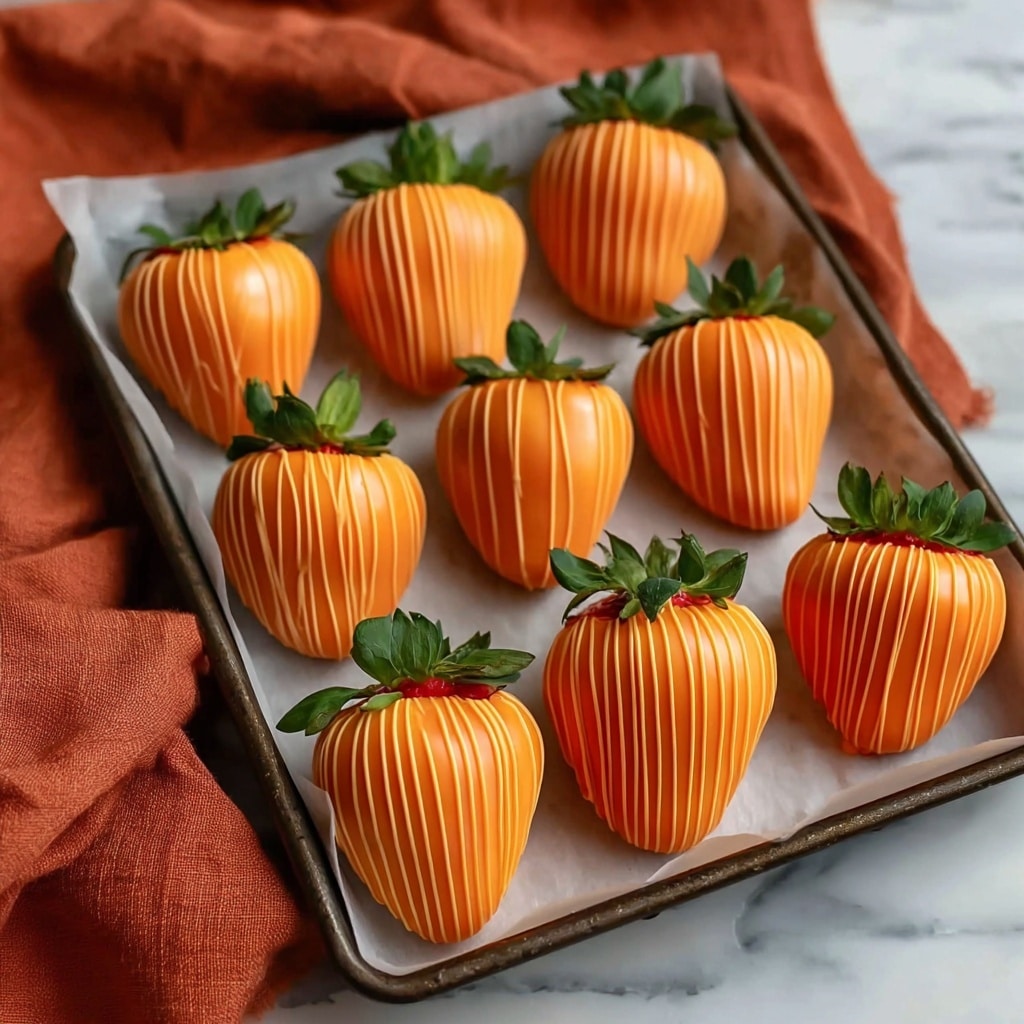
The magic of the Best Chocolate Covered Strawberry Pumpkins Recipe lies in its simplicity. Each ingredient plays a crucial role, from the juicy strawberries providing the fresh base, to the smooth, bright orange candy melts that give these pumpkins their eye-catching color and sweet crunch, and finally a touch of green gel coloring to create realistic stems and bring your edible pumpkins to life.
- 1 pint strawberries: Make sure they’re washed and dried completely so the coating adheres perfectly.
- 2.5 cups orange candy melts: Using Wilton Candy Melts ensures a smooth, glossy finish that’s easy to work with.
- 1-2 drops green gel food coloring (optional): Adds just the right shade of green to mimic pumpkin stems and takes these treats to the next level.
How to Make Best Chocolate Covered Strawberry Pumpkins Recipe
Step 1: Prepare Your Strawberries
Start by carefully washing your strawberries and drying them thoroughly. This step is crucial because any moisture left on the berries will prevent the candy melts from sticking properly, leading to a less beautiful finish. Choose strawberries that are firm and ripe for the best flavor and shape.
Step 2: Melt the Orange Candy Coating
Next, melt your orange candy melts according to package instructions, typically using short bursts in the microwave to avoid overheating. Stir frequently until you get a smooth, velvety texture that’s perfect for dipping. The bright orange color is essential for giving your strawberries that striking pumpkin look.
Step 3: Dip the Strawberries
Holding each strawberry by the stem or with a toothpick, dip it into the melted orange candy, covering it completely. Let any excess drip off, then place the dipped strawberries onto parchment paper. Don’t rush; a smooth, even coat is what makes these pumpkin strawberries stand out.
Step 4: Add the Pumpkin Stem Detail
While the coating is still soft, mix a small amount of the green gel food coloring with any leftover candy melts or use a tiny brush dipped in green candy to gently create pumpkin stems at the top of each strawberry. This little detail makes them instantly recognizable and adds charm.
Step 5: Let Them Set
Allow your chocolate covered strawberry pumpkins to set completely at room temperature or in the fridge. Once hardened, they’re ready to delight your taste buds and everyone lucky enough to try them.
How to Serve Best Chocolate Covered Strawberry Pumpkins Recipe
Garnishes
Sprinkle a touch of edible glitter or finely chopped nuts around your plate for a festive touch that enhances the look and texture. A dusting of cinnamon or pumpkin spice on the plate can also complement the flavor beautifully.
Side Dishes
Pair these sweet pumpkin strawberries with a warm mug of hot cocoa or a spiced fall latte. They also make a fantastic bedside companion to cream cheese frostings or a light whipped cream for added indulgence.
Creative Ways to Present
Elevate your presentation by arranging the strawberry pumpkins on a bed of fresh mint leaves or inside hollowed-out mini pumpkins for an autumnal centerpiece. Using rustic wooden platters or decorative trays can enhance their festive appeal and make your dessert table unforgettable.
Make Ahead and Storage
Storing Leftovers
To keep your Best Chocolate Covered Strawberry Pumpkins Recipe fresh, store them in an airtight container in the refrigerator. They’ll stay perfect for up to 2 days, but best enjoyed sooner as the strawberry freshness diminishes over time.
Freezing
Although you can freeze chocolate covered strawberries, the texture of the strawberries may become mushy once thawed. If you want to freeze, place them in a single layer on a baking sheet first, freeze solid, then transfer to a sealed container to protect their finish. Consume within a month for the best results.
Reheating
Since these treats are best served cold or at room temperature, avoid reheating. Instead, let them come to room temperature naturally if taken from the fridge to fully enjoy their flavor and texture.
FAQs
Can I use regular chocolate instead of candy melts?
Yes, you can substitute regular chocolate, but candy melts are preferred because they melt smoothly and hold their shape and color better when cooled, giving you that perfect pumpkin-orange shine.
What if my strawberries are not completely dry before dipping?
Any moisture left will cause the candy coating to seize up or not stick properly, leading to uneven coverage and a less polished look. Pat the strawberries dry carefully for the best results.
Can I make these without food coloring?
Absolutely. Omitting the green gel simply means your stems won’t have that bright green hue, but they’ll still look delicious and festive with just the orange coating.
How can I make the pumpkin stem if I don’t have green candy melts?
You can use colored icing, edible markers, or even small green candies piped or gently pressed onto the stem area to mimic the pumpkin stem effect.
How long do these chocolate covered strawberry pumpkins last?
Best enjoyed within 24 to 48 hours, as strawberries begin to release moisture that can affect the candy coating, but proper refrigeration extends their shelf life a bit.
Final Thoughts
There’s something truly special about crafting the Best Chocolate Covered Strawberry Pumpkins Recipe that feels like autumn magic in every bite. These treats are simple enough for a fun weekend project yet impressive enough to wow your friends and family at any gathering. I encourage you to give this recipe a whirl and watch it become a cherished favorite in your seasonal dessert lineup.
Print
Best Chocolate Covered Strawberry Pumpkins Recipe
- Prep Time: 20 minutes
- Cook Time: 0 minutes
- Total Time: 20 minutes
- Yield: 4 servings
- Category: Dessert
- Method: No-Cook
- Cuisine: American
- Diet: Vegetarian
Description
Delightfully festive and easy to make, these Best Chocolate Covered Strawberry Pumpkins transform fresh strawberries into charming pumpkin-shaped treats. Using orange candy melts for the pumpkin body and a hint of green gel food coloring for the stems, these no-bake desserts are perfect for Halloween and fall celebrations. With minimal prep and no cooking required, they offer a fun, creative, and delicious way to enjoy strawberries.
Ingredients
Strawberries
- 1 pint strawberries, washed and dried thoroughly
Candy Coating
- 2.5 cups orange candy melts (Wilton Candy Melts preferred for smooth finish)
- 1–2 drops green gel food coloring (optional, for pumpkin stems)
Instructions
- Prepare Strawberries: Gently wash and completely dry 1 pint of strawberries. Ensuring they are dry is crucial for the candy coating to stick properly.
- Melt Candy Melts: Melt 2.5 cups of orange candy melts according to package instructions, either in a microwave-safe bowl in short bursts or using a double boiler, stirring until smooth.
- Color Green Candy Coating: Optional – add 1-2 drops of green gel food coloring to a small portion of melted white candy melts to create stems.
- Dip Strawberries: Holding each strawberry by the stem, dip it fully into the melted orange candy melts, gently shaking off excess coating.
- Create Pumpkin Shape: Allow the coated strawberries to set slightly, then use a toothpick or the green colored candy melts to add thin lines vertically around the strawberry to resemble pumpkin grooves.
- Add Pumpkin Stem: Using a small brush or toothpick, apply the green candy melts at the top of the strawberry to mimic a pumpkin stem.
- Let Set: Place the decorated strawberries on wax or parchment paper to cool and harden completely at room temperature or in the refrigerator.
Notes
- Make sure strawberries are completely dry before dipping to ensure candy coating adherence.
- Use good quality candy melts for a smooth, professional finish.
- Green food coloring is optional but adds a realistic pumpkin stem effect.
- Store finished treats in a cool, dry place and consume within 2 days for best freshness.
- If candy melts harden during dipping, gently re-melt to maintain smoothness.


