

If you’re craving a dessert that feels like a cozy hug wrapped in layers of flaky pastry, creamy cheese, and luscious berries, you’re in for a treat. This Berry Cream Cheese Danish Recipe is the perfect blend of sweet and tangy, with a gorgeous presentation that’s sure to impress your family and friends. Whether you’re whipping it up for brunch, dessert, or a special occasion, it delivers on flavor and charm with every bite. Get ready to enjoy a delightful pastry that brings together fresh berries, smooth cream cheese, and buttery puff pastry in a way that will quickly become a favorite.

Ingredients You’ll Need
Each ingredient in this Berry Cream Cheese Danish Recipe plays a vital role in creating its irresistible taste and texture, from the juicy berries that bring natural sweetness and vibrant color to the buttery puff pastry that adds that signature flaky crunch.
- 3 cups mixed berries (frozen): A blend of berries gives a perfect balance of tart and sweet flavor and a beautiful burst of color.
- 3 tablespoons granulated white sugar: Adds just the right amount of sweetness to the berry compote without overpowering the natural fruit taste.
- 1 tablespoon cornstarch: Thickens the berry mixture so it holds nicely inside the pastry without leaking.
- 2 tablespoons water: Helps dissolve the cornstarch for a smooth compote texture.
- 8 oz cream cheese (softened): Provides a rich, creamy base that contrasts perfectly with the tart berries.
- 1/4 cup granulated white sugar: Sweetens the cream cheese filling to balance its tanginess.
- 1 sheet puff pastry: The star of the show, puff pastry creates those irresistible layers of crisp, buttery texture.
- 1 egg (beaten): Used for the egg wash, it gives the Danish a glossy, golden finish.
- 2 tablespoons granulated white sugar: Sprinkled on top to add a delicate crunch and an extra touch of sweetness.
How to Make Berry Cream Cheese Danish Recipe
Step 1: Make the Berry Compote
Start by combining the frozen mixed berries and 3 tablespoons of sugar in a small saucepan over medium heat. As the mixture comes to a simmer, gently mash the berries with a fork to release their juices. Let it cook over low heat for 10 more minutes, stirring occasionally, until the mixture reduces and thickens. Stir together the cornstarch and 2 tablespoons of water until smooth, then pour this into the compote, stirring until it thickens. Remove the compote from the heat and let it cool completely. This luscious berry filling is what makes the Berry Cream Cheese Danish Recipe truly shine.
Step 2: Preheat the Oven
While the compote is cooling, preheat your oven to 350 degrees Fahrenheit (180 degrees Celsius). Line a baking tray with parchment paper to ensure your Danish bakes evenly and doesn’t stick.
Step 3: Prepare the Cream Cheese Filling
In a medium bowl, beat the softened cream cheese with 1/4 cup granulated sugar on high speed for about two minutes until it becomes incredibly smooth and creamy. This filling will create a rich, velvety layer that pairs beautifully with the fruit topping.
Step 4: Shape the Puff Pastry
Take the puff pastry sheet and lay it out on a piece of parchment paper. Using a sharp knife, lightly score the pastry into three vertical sections. Then, cut 6 to 8 strips on each side of the center section, taking care not to cut all the way through the middle—these strips will fold over the filling, creating a stunning braid effect. (If you want to see exactly how it looks, feel free to check reference images; this technique really elevates the final presentation.)
Step 5: Assemble the Danish
Spread the cream cheese mixture evenly down the center section of the pastry. Next, spoon the cooled berry compote over the cream cheese layer. Carefully fold the pastry strips over the filling, alternating sides as you go to form a braid shape. Press the ends gently to seal everything inside so it stays neat while baking.
Step 6: Chill Before Baking
Place the assembled pastry braid in the refrigerator for about 20 minutes to chill. This step is crucial for helping the dough maintain its shape in the oven, ensuring the perfect flaky layers.
Step 7: Bake the Danish
Brush the chilled pastry with the beaten egg to give it a beautiful golden sheen once baked. Sprinkle the top with the remaining 2 tablespoons of granulated sugar for a lovely sparkle and subtle crunch. Bake the Danish for about 20 minutes, or until it is puffed up and deep golden brown.
How to Serve Berry Cream Cheese Danish Recipe
Garnishes
To really wow your guests, consider garnishing your Danish with a dusting of powdered sugar or a drizzle of honey for extra sweetness. Fresh whole berries scattered on top add a fresh, inviting look and a juicy pop with every bite.
Side Dishes
This Danish pairs wonderfully with a cup of freshly brewed coffee or a frothy latte, making it an ideal brunch feature. For a refreshing contrast, serve alongside a light fruit salad or a simple green salad with a citrus vinaigrette.
Creative Ways to Present
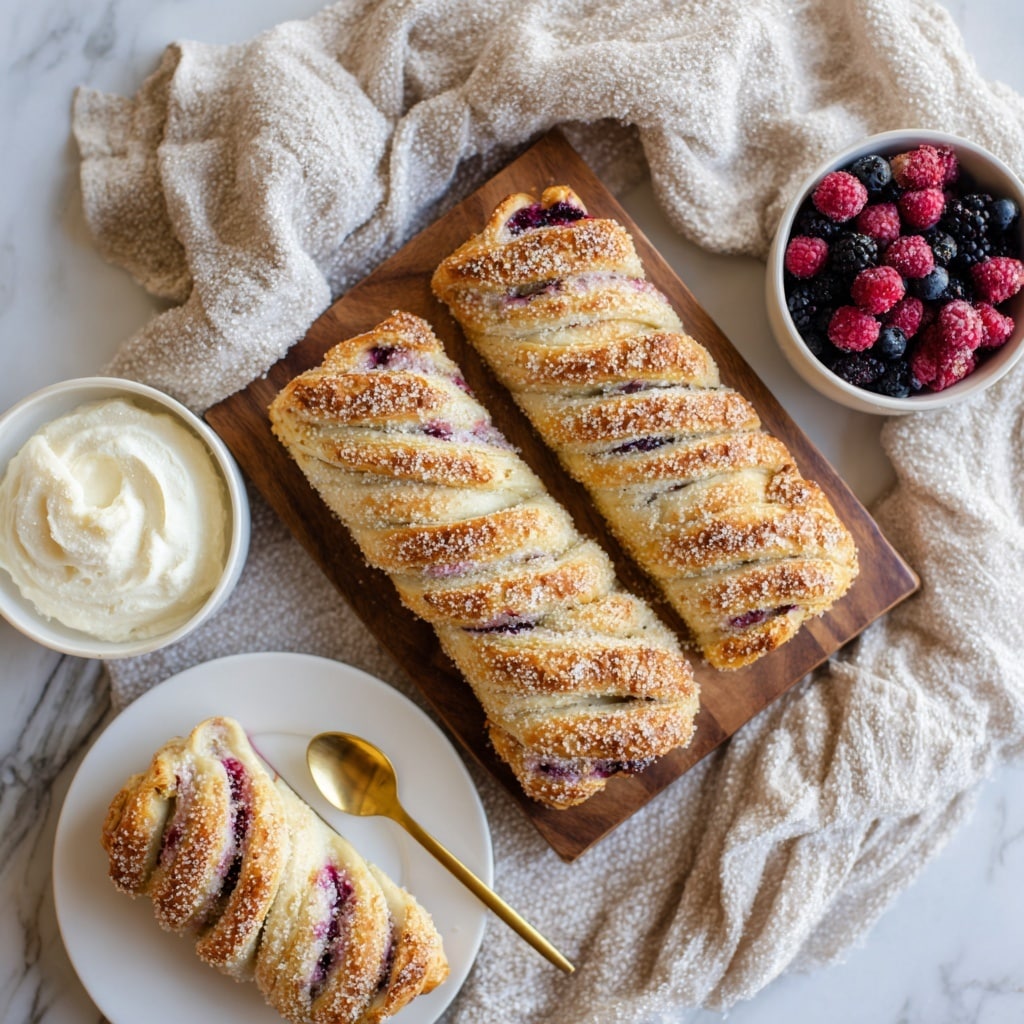
Looking to impress at your next gathering? Serve the Danish on a beautiful wooden board with small bowls of whipped cream or lemon curd on the side for dipping. Cutting it into rustic slices lets everyone enjoy all the creamy and fruity layers in every bite. This approach highlights the charming homemade nature of the recipe.
Make Ahead and Storage
Storing Leftovers
If you have any leftovers from your Berry Cream Cheese Danish Recipe, store them in an airtight container in the refrigerator. It will stay fresh for up to 3 days, making it an easy and delicious option for the next day’s breakfast or snack.
Freezing
You can freeze the Danish before baking. Just assemble it as instructed, then wrap it tightly in plastic wrap and place it in a freezer-safe bag or container. It will keep beautifully for up to 2 months. When you’re ready to enjoy, thaw it overnight in the refrigerator and bake as directed.
Reheating
To reheat leftover Danish, pop it in a preheated oven at 325 degrees Fahrenheit for about 10 minutes or until warmed through. This method helps revive the puff pastry’s flakiness and keeps the filling creamy and delicious.
FAQs
Can I use fresh berries instead of frozen for the Berry Cream Cheese Danish Recipe?
Absolutely! Fresh berries work wonderfully and might even add a brighter flavor to your compote. Make sure to gently crush them and cook just long enough to soften and thicken.
Is puff pastry the only option for this recipe?
Puff pastry is recommended because of its flaky texture, but you could try phyllo dough or even croissant dough for a different but still delicious take on this Berry Cream Cheese Danish Recipe.
How can I make this recipe dairy-free?
To make this Danish dairy-free, substitute the cream cheese with a plant-based cream cheese alternative and use vegan puff pastry that doesn’t contain butter. The berry compote remains naturally dairy-free.
Can I prepare the berry compote ahead of time?
Yes, the berry compote can be made a day or two in advance and stored in the refrigerator. Just make sure it’s fully cooled before assembling your Danish.
What’s the best way to serve leftovers?
Leftover Danish is delightful served slightly warmed with a dollop of whipped cream or even a scoop of vanilla ice cream for a decadent treat.
Final Thoughts
This Berry Cream Cheese Danish Recipe truly brings something special to your table with its balance of flaky pastry, creamy filling, and vibrant berry topping. It’s a recipe that feels both elegant and homey, perfect for sharing with loved ones or treating yourself to something sweet and satisfying. Don’t hesitate to try it out—you might just discover your new favorite go-to dessert or brunch masterpiece.
Print
Berry Cream Cheese Danish Recipe
- Prep Time: 20 minutes
- Cook Time: 30 minutes
- Total Time: 1 hour
- Yield: 8 servings
- Category: Dessert
- Method: Baking
- Cuisine: American
- Diet: Vegetarian
Description
This Berry Cream Cheese Danish is a delightful and elegant pastry featuring a flaky puff pastry braided around a luscious cream cheese filling and a sweet, tangy homemade mixed berry compote. Perfect for breakfast, brunch, or a special dessert, this recipe combines creamy, fruity, and buttery flavors with a golden, puffed finish from the oven.
Ingredients
Berry Compote
- 3 cups mixed berries (frozen)
- 3 tablespoons granulated white sugar
- 1 tablespoon cornstarch
- 2 tablespoons water
Cream Cheese Filling
- 8 oz cream cheese (softened)
- 1/4 cup granulated white sugar
Pastry
- 1 sheet puff pastry
- 1 egg (beaten)
- 2 tablespoons granulated white sugar
Instructions
- Make the berry compote: Place mixed berries and granulated sugar in a small saucepan over medium heat. Bring to a gentle simmer and mash berries with a fork. Cook for 10 more minutes on low heat until reduced. Mix cornstarch with water and stir into the berry mixture until thickened. Remove from heat and let cool.
- Preheat the oven: Set oven to 350°F (180°C). Line a large baking tray with parchment paper.
- Prepare cream cheese filling: In a mixing bowl, beat softened cream cheese with 1/4 cup sugar on high speed for about 2 minutes until smooth and creamy.
- Prepare the pastry: Lay cold puff pastry sheet on parchment paper. Score pastry into thirds lengthwise, then cut 6 to 8 strips on each side to create flaps for braiding.
- Fill the pastry: Spread the cream cheese mixture evenly down the center section of the pastry. Spoon the cooled berry compote over the cream cheese.
- Braid the pastry: Fold pastry strips over the filling alternately from each side, gently pressing edges to seal the braid.
- Chill the pastry: Place the braided pastry in the refrigerator for 20 minutes to firm up before baking.
- Brush and sugar: Remove pastry from fridge and brush entire surface with the beaten egg. Sprinkle 2 tablespoons granulated sugar on top for a sweet glaze.
- Bake: Transfer to preheated oven and bake for about 20 minutes, or until the pastry is golden brown and puffed.
Notes
- Frozen berries are used but fresh may be substituted when in season.
- Be sure the cream cheese is softened for easy mixing and smooth filling.
- Chilling the pastry before baking ensures the shape holds during cooking and the layers puff nicely.
- The braiding technique provides an attractive presentation and keeps the filling contained.
- Use parchment paper to prevent sticking and ease cleanup.
- Best served warm or at room temperature.


