

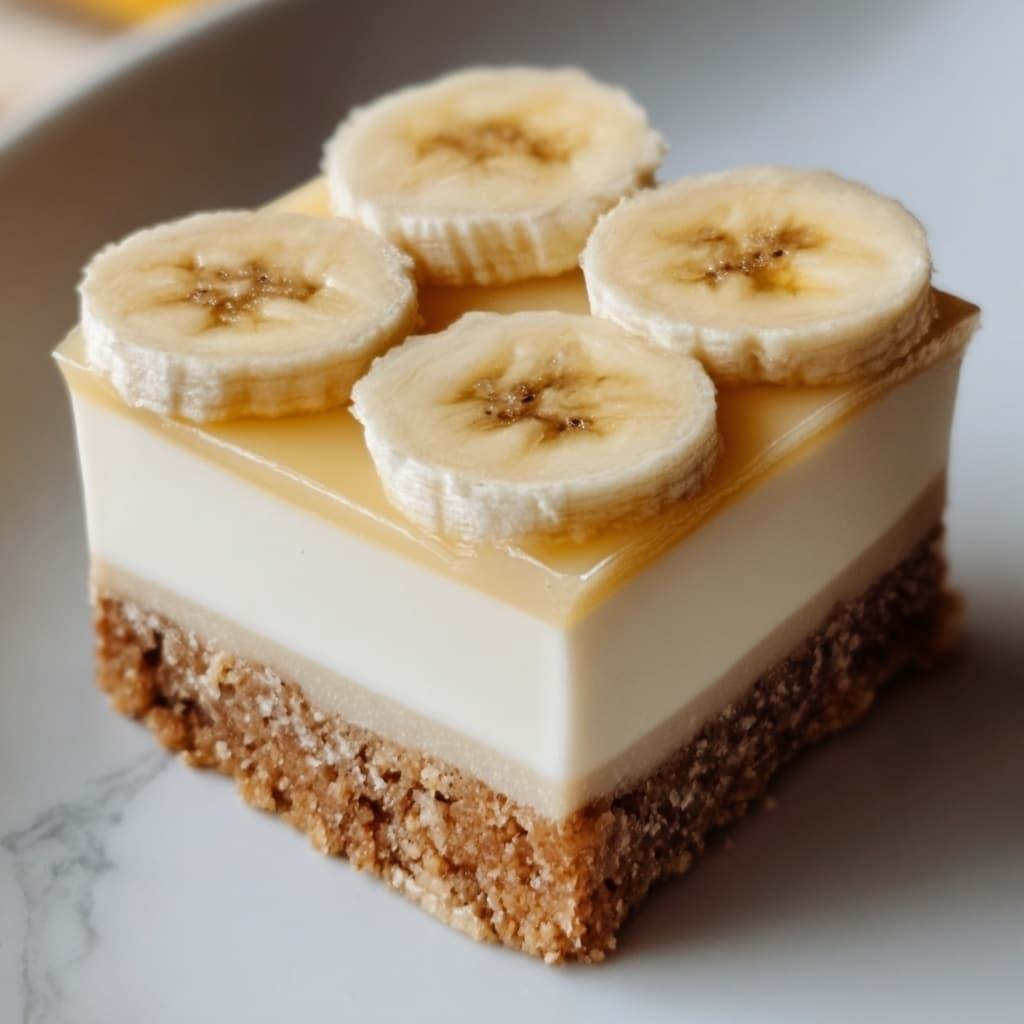
If you’re looking for a show-stopping dessert that combines all the best parts of banana pudding and cheesecake in one irresistible treat, then the Banana Pudding Cheesecake Squares Recipe is exactly what you need. These squares bring together a buttery vanilla wafer crust, a rich and creamy banana-infused cheesecake layer, and a luscious banana pudding topping, making every bite a perfect harmony of flavor and texture. It’s the kind of dessert that feels both comforting and fancy — an absolute crowd-pleaser for family dinners, potlucks, or any time you want to treat yourself to something truly special.

Ingredients You’ll Need
Gathering the right ingredients is key to making this dessert unforgettable. Each item in the Banana Pudding Cheesecake Squares Recipe plays a crucial role, from the buttery, crispy crust to the smooth, fruity filling, and the silky pudding topping.
- Vanilla wafer cookies: Crushed to form the perfect sweet and crunchy base for the crust.
- Butter: Melted to bind the crust ingredients together and add richness.
- Cream cheese: Softened for a smooth, creamy cheesecake layer that melts in your mouth.
- Granulated sugar: Adds just the right amount of sweetness to the filling.
- Eggs: Provide structure and help the cheesecake set perfectly.
- Sour cream: Gives a slight tang and adds moisture to the cheesecake layer.
- Vanilla extract: Enhances the overall flavor with warm vanilla notes.
- Ripe bananas: Mashed to infuse the cheesecake with natural banana flavor.
- Instant banana pudding mix: For the creamy, dreamy pudding layer atop the cheesecake.
- Cold milk: Needed to whisk the pudding mix into a thick, luscious consistency.
- Banana slices: Layered inside and used for garnish to keep that fresh fruit vibe.
- Whipped cream: Optional but highly recommended as a light, fluffy garnish finish.
How to Make Banana Pudding Cheesecake Squares Recipe
Step 1: Prepare the Crust
Start by preheating your oven to 350°F (175°C) and lining a 9×13 inch baking pan with parchment paper or giving it a light grease. Combine the crushed vanilla wafer cookies with melted butter until the mixture holds together. Press this evenly into the pan to create a buttery, crispy base and bake for 8 to 10 minutes. Let it cool while you prepare the next layer for that perfect crunchy foundation.
Step 2: Make the Cheesecake Filling
In a large mixing bowl, beat the softened cream cheese and granulated sugar until the texture is smooth and creamy. Then, add the eggs one at a time, mixing well after each addition to keep everything silky and well incorporated. Stir in sour cream, vanilla extract, and the mashed ripe bananas, combining everything until perfectly blended. This banana-infused cheesecake batter is what elevates the dessert from ordinary to extraordinary.
Step 3: Bake the Cheesecake Layer
Pour the cheesecake batter over your cooled crust, smoothing the top with a spatula so it bakes evenly. Slide it into the oven and bake for 25 to 30 minutes until the cheesecake layer is set but still slightly jiggly in the center. Once baked, pull it out and let it cool completely — patience here means the best texture.
Step 4: Prepare the Banana Pudding Layer
While the cheesecake cools, whisk the instant banana pudding mix with cold milk in a medium bowl for 2 to 3 minutes, until thick and creamy. This pudding layer is what adds that extra burst of banana flavor with a velvety touch. Spread it evenly over the cooled cheesecake, then layer with fresh banana slices for added sweetness and texture contrast.
Step 5: Chill and Garnish
Refrigerate the assembled Banana Pudding Cheesecake Squares Recipe for at least 4 hours or overnight to let the layers set beautifully. When you’re ready to impress, top with a generous dollop of whipped cream, more vanilla wafers, and fresh banana slices. These garnishes not only add to the flavor but also make your dessert picture-perfect!
How to Serve Banana Pudding Cheesecake Squares Recipe
Garnishes
A simple swirl of whipped cream on each square brings a light, airy contrast to the dense and creamy layers. Adding a few vanilla wafers and several banana slices on top creates a charming presentation and enhances the nostalgic banana pudding vibe your guests will love.
Side Dishes
Serve these cheesecake squares alongside a fresh fruit salad or a scoop of vanilla bean ice cream for a delightful balance of flavors and temperatures. A hot cup of coffee or tea also pairs wonderfully, making it a cozy dessert experience any time of day.
Creative Ways to Present
For a fun twist, try serving Banana Pudding Cheesecake Squares Recipe in mini mason jars or individual dessert cups layered with extra pudding and bananas. You can also drizzle caramel sauce on top or sprinkle crushed walnuts for a tasty crunch that adds complexity and charm to your display.
Make Ahead and Storage
Storing Leftovers
Leftover banana pudding cheesecake squares keep beautifully in an airtight container in the refrigerator for up to 4 days. Keeping them chilled helps maintain their creamy texture and fresh fruit flavor, so you can enjoy this treat even a few days later without losing any of its magic.
Freezing
To freeze, wrap individual squares tightly with plastic wrap and place them in a freezer-safe container or zip-top bag. They freeze well for up to 2 months. When you’re ready to indulge, thaw in the refrigerator overnight for the best texture — no microwave necessary!
Reheating
Banana Pudding Cheesecake Squares Recipe is best enjoyed cold or at room temperature to preserve its creamy consistency. If you prefer them slightly warmer, just let them sit out for about 20 minutes. Avoid microwaving as it can change the texture negatively and melt the pudding layer.
FAQs
Can I use fresh bananas instead of instant pudding?
While fresh bananas are fantastic, the instant banana pudding mix gives that signature creamy, thick texture and consistent flavor that balances perfectly with the cheesecake layer. Feel free to add extra fresh bananas for more banana goodness, but the pudding mix is key for structure.
How ripe should the bananas be for this recipe?
For the best flavor and natural sweetness, choose bananas that are very ripe with some brown spots. They mash easily and add more intense banana flavor without extra sugar.
Can I make this recipe gluten-free?
Absolutely! Just swap the vanilla wafer cookies for a gluten-free option, and ensure your pudding mix is labeled gluten-free. The rest of the ingredients are naturally gluten-free.
Is it necessary to bake the crust and cheesecake layers separately?
Baking the crust first helps it firm up and stay crunchy under the cheesecake. Baking the cheesecake layer next ensures it sets properly. Combining the steps would risk an uneven texture, so it’s best to bake separately as instructed.
How long does it take for the cheesecake squares to set properly in the fridge?
You want at least 4 hours of chilling time, though overnight is ideal. This allows the cheesecake and pudding layers to fully firm up, making slicing clean and serving easier.
Final Thoughts
The Banana Pudding Cheesecake Squares Recipe is a delightful blend of textures and flavors that comes together with surprisingly simple steps. Once you try it, you’ll see why it’s one of those recipes you’ll want to make again and again, especially when you want to impress without stress. Trust me, your friends and family will be asking for seconds and that’s a sweet victory worth aiming for!
Print
Banana Pudding Cheesecake Squares Recipe
- Prep Time: 20 minutes
- Cook Time: 35 minutes
- Total Time: 5 hours 55 minutes
- Yield: 12 servings
- Category: Dessert
- Method: Baking
- Cuisine: American
Description
Banana Pudding Cheesecake Squares combine a creamy cheesecake base infused with ripe bananas and a luscious banana pudding layer, all resting on a crunchy vanilla wafer crust. This delightful dessert is perfect for gatherings, offering a harmonious blend of flavors and textures that satisfy any sweet tooth.
Ingredients
Crust
- 2 cups vanilla wafer cookies, crushed
- 1/2 cup (1 stick) butter, melted
Cheesecake Filling
- 16 oz (2 packages) cream cheese, softened
- 3/4 cup granulated sugar
- 2 large eggs
- 1/2 cup sour cream
- 1 tsp vanilla extract
- 2 ripe bananas, mashed
Banana Pudding Layer
- 1 package (3.4 oz) instant banana pudding mix
- 2 cups cold milk
- 1–2 bananas, sliced (for layering)
Topping
- Whipped cream (for garnish)
- Vanilla wafers (for garnish)
- Banana slices (for garnish)
Instructions
- Make the Crust: Preheat the oven to 350°F (175°C). Line a 9×13 inch baking pan with parchment paper or lightly grease it. In a medium bowl, combine the crushed vanilla wafer cookies and melted butter until well mixed. Press the mixture into the bottom of the prepared pan to form an even crust. Bake for 8-10 minutes, then set aside to cool.
- Make the Cheesecake Layer: In a large bowl, beat the cream cheese and sugar until smooth and creamy. Add the eggs one at a time, beating well after each addition. Mix in the sour cream, vanilla extract, and mashed bananas until fully combined. Pour the cheesecake batter over the cooled crust and smooth the top. Bake for 25-30 minutes or until the cheesecake is set. Remove from the oven and allow it to cool completely.
- Prepare the Banana Pudding Layer: In a medium bowl, whisk together the banana pudding mix and cold milk for 2-3 minutes until thickened. Spread a layer of the pudding mixture over the cooled cheesecake. Add a layer of sliced bananas on top of the pudding.
- Chill and Serve: Refrigerate the cheesecake squares for at least 4 hours, or overnight, to allow the layers to set. Before serving, garnish with whipped cream, additional vanilla wafers, and fresh banana slices.
Notes
- Make sure the cream cheese is softened to room temperature to ensure a smooth cheesecake batter.
- You can use fresh bananas for mashing and layering, but avoid overly ripe bananas for the slices to prevent browning.
- Chilling the cheesecake for several hours helps the layers set properly and improves the texture.
- For a firmer crust, press the crust mixture firmly and bake thoroughly before adding the cheesecake layer.
- Store leftovers covered in the refrigerator for up to 3 days.


