

If you’re looking for a hearty, comforting bread that feels like a warm hug from the Emerald Isle, look no further than this Amazingly Easy Irish Soda Bread Recipe. It’s the perfect blend of simple ingredients coming together to create a golden crust with a tender, slightly crumbly interior that’s bursting with rustic charm. Whether you’re new to baking or a seasoned kitchen maestro, this bread is not only quick to make but also endlessly satisfying. It embodies the wonderful tradition of Irish baking and brings a little wholesome magic right to your table.

Ingredients You’ll Need
Don’t let the simplicity of the ingredient list fool you; each element plays a crucial role in making this bread special. From the soft tang of buttermilk to the leavening power of baking soda, every ingredient works in harmony to give the bread its unique texture and flavor.
- 4 cups all-purpose flour: Provides the structure and body of the bread, offering a tender crumb.
- 1 teaspoon baking soda: Acts as the leavening agent, reacting with buttermilk to give the bread its signature rise.
- 1 teaspoon salt: Enhances the flavor and balances the tanginess from the buttermilk.
- 1 ¾ cups buttermilk: Adds moisture, a slight tang, and activates the baking soda, making the bread rise beautifully.
How to Make Amazingly Easy Irish Soda Bread Recipe
Step 1: Preheat Your Oven
Begin by setting your oven to 425°F (220°C). This high heat is essential to achieving that perfect golden crust. While it warms, lightly grease your baking sheet or line it with parchment paper to prevent sticking and make cleanup a breeze.
Step 2: Mix Dry Ingredients
In a large bowl, whisk together the flour, baking soda, and salt. This step is key to evenly distributing the leavening and seasoning throughout the dough so every bite is consistent and flavorful.
Step 3: Add Buttermilk
Slowly pour in the buttermilk while stirring. You’ll notice the mixture beginning to come together into a soft dough. The acidity in the buttermilk is what interacts with the baking soda, helping the bread rise without the need for yeast.
Step 4: Knead the Dough
Turn the dough out onto a lightly floured surface and gently knead it for about 30 seconds. The goal here is just to bring the dough together into a smooth ball without overworking it, which can make the bread tough.
Step 5: Shape and Score
Shape the dough into a round loaf and place it on your prepared baking sheet. Now, here’s a critical traditional touch: score a deep “X” on top of the dough. This not only helps the heat reach the center while baking but also adds a bit of rustic charm to your bread.
Step 6: Bake to Perfection
Bake your creation for 30 to 40 minutes until the crust is beautifully golden brown. A good test is to tap the bottom of the loaf; it should sound hollow, telling you the inside is fully cooked and ready to enjoy.
Step 7: Cool and Serve
Allow the bread to cool slightly before slicing to let the crumb set. Serve it warm with a smear of creamy butter or your favorite jam to truly appreciate why this Amazingly Easy Irish Soda Bread Recipe has captured hearts across kitchens worldwide.
How to Serve Amazingly Easy Irish Soda Bread Recipe

Garnishes
While simplicity is the soul of this bread, a little embellishment doesn’t hurt. Fresh pats of salted butter melting on warm slices, a generous dollop of fruity jam, or even a drizzle of honey can take your serving experience to the next level. Fresh herbs like chives or parsley sprinkled on a buttery slice add a lovely fresh note too.
Side Dishes
This bread pairs beautifully with hearty soups and stews. Think of a rich Irish stew or a bowl of creamy potato and leek soup. It’s also wonderful alongside smoked salmon, sharp cheeses, or a vibrant salad for a lighter meal. The versatility of this recipe makes it a staple on your dining table.
Creative Ways to Present
For a fun twist, slice the bread thick, toast it, and top with avocado and poached eggs for an irresistible brunch. Or cut into chunks and use it as a base for a savory bread pudding. Its dense texture holds up well to creative adaptations, making this Amazingly Easy Irish Soda Bread Recipe a fantastic starting point for countless delicious ideas.
Make Ahead and Storage
Storing Leftovers
If you have any leftovers, wrap the bread tightly in plastic wrap or store it in an airtight container at room temperature. It will stay fresh for up to 2 days, though it’s always tempting to eat it all in one go!
Freezing
This soda bread freezes beautifully. Simply wrap it well in foil or plastic wrap and place it in a freezer bag. When you’re ready to enjoy, thaw at room temperature or warm it gently in the oven to revive that fresh-baked feeling.
Reheating
To bring your bread back to life, pop slices in a toaster or refresh a whole loaf in the oven at 350°F (175°C) for about 10 minutes. The heat will restore the crust’s crispness and soften the inside, making it taste just as delightful as the day you baked it.
FAQs
Can I substitute regular milk for buttermilk?
While regular milk won’t provide the same tang or acidity needed to activate the baking soda, you can make a quick buttermilk substitute by mixing 1 ¾ cups of milk with 1 tablespoon of lemon juice or white vinegar. Let it sit for 5 minutes before using.
Why do I need to score an “X” on the bread?
Scoring the top helps the bread expand as it bakes, allowing steam to escape and preventing it from cracking unpredictably. It also gives the bread its traditional look, making it instantly recognizable.
Can I add raisins or other mix-ins?
Absolutely! Adding raisins, currants, or even caraway seeds can add a delightful twist to this classic recipe. Just fold them into the dough after you add the buttermilk for evenly distributed flavor.
Is this bread gluten-free?
This particular Amazingly Easy Irish Soda Bread Recipe uses all-purpose flour, which contains gluten, so it’s not suitable for gluten-free diets. However, there are gluten-free flour blends available that might work with some adjustments.
How do I know when the bread is fully baked?
A good indicator is the hollow sound when you tap the bottom of the loaf. Additionally, the crust should be a deep golden brown, and the loaf will feel firm to the touch.
Final Thoughts
There’s something incredibly satisfying about pulling a freshly baked loaf of soda bread from the oven—the amazing aroma, the golden crust, and the tender crumb inside. This Amazingly Easy Irish Soda Bread Recipe is a wonderful way to bring a piece of Irish tradition into your home kitchen without complicated ingredients or techniques. Give it a try and watch how quickly it becomes a beloved staple on your table, perfect for sharing with family and friends on cozy days. Happy baking!
Print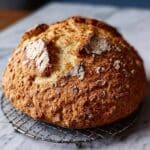
Amazingly Easy Irish Soda Bread Recipe
- Prep Time: 10 minutes
- Cook Time: 35 minutes
- Total Time: 45 minutes
- Yield: 8 servings
- Category: Bread
- Method: Baking
- Cuisine: Irish
Description
Amazingly Easy Irish Soda Bread is a traditional, quick bread made with simple ingredients and no yeast, perfect for a cozy homemade treat. This rustic bread is soft on the inside with a crunchy crust, scored with a classic ‘X’ on top, and ready in under an hour.
Ingredients
Dry Ingredients
- 4 cups all-purpose flour
- 1 teaspoon baking soda
- 1 teaspoon salt
Wet Ingredients
- 1 ¾ cups buttermilk
Instructions
- Preheat Oven: Set your oven to 425°F (220°C). Lightly grease a baking sheet or line it with parchment paper to prevent the bread from sticking.
- Mix Dry Ingredients: In a large bowl, whisk together the all-purpose flour, baking soda, and salt until well combined to ensure even distribution of the leavening agent and seasoning.
- Add Buttermilk: Gradually pour in the buttermilk while stirring continuously until the mixture forms a soft dough that sticks together but is not too wet.
- Knead Dough: Transfer the dough onto a lightly floured surface and knead gently for about 30 seconds. Be careful not to over-knead; just enough to create a smooth dough.
- Shape & Score: Form the dough into a round loaf and place it on the prepared baking sheet. Using a sharp knife, score a deep ‘X’ on the top of the loaf, which helps the bread expand while baking.
- Bake: Bake the bread in the preheated oven for 30-40 minutes until the crust is golden brown and the loaf sounds hollow when tapped on the bottom, indicating it is fully cooked.
- Cool & Serve: Allow the bread to cool slightly on a wire rack before slicing. Serve warm, optionally with butter or jam for added flavor.
Notes
- Use cold buttermilk straight from the fridge for best results.
- Do not over-knead the dough to maintain a tender crumb.
- If you don’t have buttermilk, you can substitute by adding 1 ¾ cups of milk mixed with 1 tablespoon of lemon juice or vinegar, let it sit for 5 minutes before using.
- Be sure to score the dough deeply to ensure proper oven spring and traditional appearance.
- Store leftovers wrapped in a clean kitchen towel or in an airtight container to maintain freshness.
- This bread is best eaten the day it’s baked but can be toasted the next day for freshness.


