

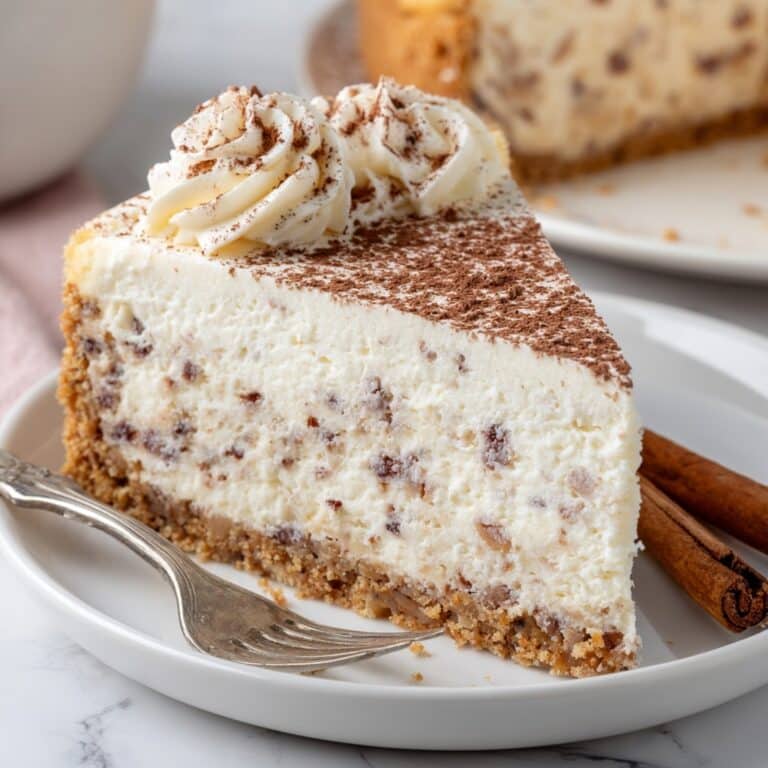
If you love desserts that are as indulgent as they are effortless, No Bake Biscoff Cheesecake is about to become your new favorite showstopper. Imagine a buttery Biscoff cookie crust topped with the silkiest, creamiest cheesecake filling—all crowned with a dreamy layer of Biscoff spread. This is one of those desserts that disappears fast at gatherings, and believe it or not, it comes together without ever turning on the oven. Whether you’re a die-hard Biscoff fan or new to the magic of cookie butter, this treat is guaranteed to win hearts and spark cravings every single time.
Ingredients You’ll Need

Ingredients You’ll Need
One of the reasons I adore this No Bake Biscoff Cheesecake is because the ingredients list is refreshingly short yet impactful. Every component brings something special—whether it’s melt-in-your-mouth texture, rich flavor, or a touch of golden color that makes the whole dessert shine.
- Biscoff cookies: These spiced caramel biscuits are the secret to a perfectly crunchy and flavorful crust.
- Butter: Melted butter binds the cookie crumbs and gives the base a luscious richness.
- Cream cheese: Use full-fat cream cheese for a truly creamy, tangy filling that sets beautifully.
- Powdered sugar: Adds sweetness and blends seamlessly into the cheesecake mixture.
- Biscoff spread: This tasty cookie butter is folded into the filling for flavor and slathered on top as an irresistible finishing touch.
- Heavy cream: Gently whipped, it lightens the filling and gives every bite a cloudlike softness.
- Vanilla extract: Just a splash, but it elevates the whole dessert with a warm, aromatic note.
- Pinch of salt: A small but crucial addition that balances all the sweet, spiced flavors.
How to Make No Bake Biscoff Cheesecake
Step 1: Prepare the Biscoff Cookie Crust
Start by crushing your Biscoff cookies—either in a food processor or by placing them in a zip-top bag and crushing with a rolling pin—until you have fine, sandy crumbs. Combine these in a bowl with melted butter and a small pinch of salt, mixing until every crumb is coated in buttery goodness. Press the mixture firmly and evenly into the base of a springform pan, then pop it in the fridge to set. This crust is the delicious foundation for your No Bake Biscoff Cheesecake.
Step 2: Whip the Cream
In a chilled mixing bowl, whip the heavy cream until just stiff peaks form. Be careful not to over-whip—you’re looking for pillowy clouds that will bring lightness to your cheesecake filling. Set aside in the fridge until you’re ready to fold it into the mixture later.
Step 3: Make the Cheesecake Filling
In a separate bowl, beat the cream cheese until it’s smooth and creamy. Add the powdered sugar, a generous dollop of Biscoff spread, and vanilla extract, then mix until totally blended and luscious. Gently fold in the whipped cream, being careful not to deflate it. The result is a filling that’s light yet decadent, flecked with the warm, caramelized flavor of Biscoff.
Step 4: Assemble the Cheesecake
Spoon the cheesecake filling over your chilled cookie crust, spreading it evenly and smoothing the top. Return the pan to the fridge for at least 6 hours, or overnight if you can—this helps everything firm up perfectly and lets the flavors meld beautifully.
Step 5: Add the Biscoff Topping
Just before serving, gently warm some Biscoff spread in the microwave until it’s pourable. Drizzle or spread this glossy layer over the set cheesecake for that signature finishing touch. You can even sprinkle extra crushed cookies or crumbs on top for a little extra flair—the more Biscoff, the better!
How to Serve No Bake Biscoff Cheesecake

Garnishes
The best part about serving No Bake Biscoff Cheesecake is decking it out with fun, flavorful touches. Try a crown of crushed Biscoff cookies, a swirl of whipped cream around the edges, or even a delicate dusting of cinnamon for extra warmth. A drizzle of melted white chocolate is decadent if you’re feeling fancy, too. The key is to keep things playful and extra inviting!
Side Dishes
Because this cheesecake is quite rich on its own, I love pairing it with something light and fresh—think a bowl of ripe strawberries, a medley of juicy berries, or slices of sweet pear. For coffee lovers, a little espresso or hot coffee is the perfect counterbalance to the caramel and spice notes of the cheesecake. If you’re hosting, a tangy berry coulis alongside each slice is always a hit.
Creative Ways to Present
If you want to add a wow-factor, consider making individual mini cheesecakes in mason jars or ramekins—perfect for parties and easy for guests to grab. You can also create pretty cheesecake bars by using a square pan and cutting into bite-sized pieces. For a special occasion, decorate the top with stripes of melted dark and white chocolate, alternating with the Biscoff spread. Presentation is all about showing off those gorgeous caramel colors and making every guest swoon!
Make Ahead and Storage
Storing Leftovers
Leftover No Bake Biscoff Cheesecake will keep beautifully in the fridge, covered tightly in plastic wrap or a container, for up to 4 days. The crust stays pleasantly firm, and the flavors deepen even more after a day or two. Just be sure to keep it chilled so the filling holds its dreamy, creamy texture.
Freezing
Need to plan even further ahead? You’re in luck: No Bake Biscoff Cheesecake freezes quite well! Simply wrap slices (or the whole cheesecake) tightly in plastic wrap and then foil before tucking it away for up to a month. Thaw slices overnight in the fridge for best results—the crust will stay crisp, and the filling remains creamy and delicious.
Reheating
No need to reheat this one—just bring the cheesecake to fridge temperature before serving! If you’ve frozen it, be patient and let it defrost overnight in the refrigerator. Serve chilled for the perfect texture and flavor.
FAQs
Can I use another cookie instead of Biscoff for the crust?
Absolutely—while Biscoff adds a distinct caramel-spice flavor that makes this cheesecake unique, you can substitute with graham crackers, gingersnaps, or digestive biscuits in a pinch. Just note that the flavor will change a bit, but it’ll still be tasty!
Do I have to use full-fat cream cheese?
Full-fat cream cheese gives No Bake Biscoff Cheesecake that classic creamy, rich texture. Reduced-fat versions will work, but the final dessert may be a bit softer and less tangy—still delicious, just a tad lighter.
How do I know when the cheesecake is set?
After at least 6 hours in the fridge (preferably overnight), the cheesecake will feel firm to the touch and won’t jiggle much in the center. If it still looks loose, give it extra time—sometimes the anticipation is the hardest part!
Can I make this ahead for a party?
No Bake Biscoff Cheesecake is a host’s dream: you can make it a full day ahead, then just add the Biscoff topping and garnishes right before serving. It means less last-minute stress and more time to wow your guests.
What’s the best way to get neat slices?
For picture-perfect slices, dip your knife in hot water and wipe dry before each cut—this lets you glide through the rich layers cleanly, and your slices will look bakery-worthy!
Final Thoughts
If you’re seeking a dessert that’s easy to make but destined to impress, don’t wait another second to try No Bake Biscoff Cheesecake. It’s the kind of crowd-pleaser that guarantees empty plates and happy smiles. Give it a whirl—your friends and family will thank you, and you might just find yourself making it again and again!
Print
No Bake Biscoff Cheesecake Recipe
- Prep Time: 25 minutes
- Cook Time: undefined
- Total Time: 6 hours 25 minutes
- Yield: 8–10 servings
- Category: Dessert
- Method: No Bake
- Cuisine: American/European Fusion
Description
This indulgent, no-bake dessert features a buttery Biscoff cookie crust, a lusciously creamy cheesecake filling, and a glossy cookie butter topping. It’s rich, spiced, and stunningly simple to make.
Ingredients
200g Biscoff cookies (about 1 ¾ cups crushed),90g unsalted butter, melted (about 6 tbsp),Pinch of salt,500g full-fat cream cheese, softened (about 2 cups),100g powdered sugar (about ¾ cup),200g Biscoff spread, divided (about ¾ cup for filling + ¼ cup for topping),240ml heavy cream (1 cup), whipped to stiff peaks,1 tsp vanilla extract
Instructions
Step 1 – Make the crust: Crush Biscoff cookies into fine crumbs using a food processor or rolling pin. Mix with melted butter and salt until fully combined. Press firmly into the base of a springform pan. Chill in the fridge while preparing the filling.,Step 2 – Whip the cream: In a chilled bowl, whip heavy cream to stiff peaks. Set aside.,Step 3 – Prepare the filling: In a separate bowl, beat cream cheese until smooth. Add powdered sugar, vanilla, and ¾ cup of Biscoff spread. Mix until fully combined. Gently fold in whipped cream until incorporated.,Step 4 – Assemble the cheesecake: Spread filling over chilled crust and smooth the top. Refrigerate for at least 6 hours or overnight to set.,Step 5 – Add topping: Microwave remaining Biscoff spread until pourable. Pour over set cheesecake and smooth with a spatula. Garnish with crushed cookies or whipped cream if desired.
Notes
VARIATIONS: Substitute graham crackers or digestive biscuits for the crust if Biscoff cookies are unavailable.,PRESENTATION: Make individual servings in mason jars or ramekins for a party-friendly twist.,STORAGE: Keeps in the fridge for up to 4 days; freezes well for up to a month.,SLICE CLEANLY: Dip your knife in hot water and wipe dry before each cut for neat slices.


