

If you’re ready to jump into a delightful baking adventure that marries charm with flavor, you’re going to love this Tasty Red Velvet Bear Cookies Recipe. These adorable bear-shaped cookies bring the rich, vibrant hues of classic red velvet alongside tender, chocolatey warmth that melt in your mouth. Perfect for sharing with friends, gifting during holidays, or simply indulging in a sweet moment, this recipe blends familiar ingredients into a truly special treat that brightens any occasion.

Ingredients You’ll Need
To make these lovable cookies, the ingredients are wonderfully straightforward yet carefully chosen to give you that perfect balance of flavor, texture, and visual appeal. Each component plays a key role: from the cocoa powder adding depth to the red velvet color to the vanilla and vinegar heightening that classic tang and richness.
- 1.75 cups all-purpose flour: The sturdy base that gives structure to your cookies while keeping them tender.
- 3 tablespoons cocoa powder: Infuses subtle chocolate flavor essential for red velvet’s signature taste.
- 0.5 teaspoon baking soda: Helps the cookies rise just the right amount, giving them a light texture.
- 0.5 teaspoon baking powder: Works alongside baking soda to provide balance in leavening.
- 0.75 teaspoon salt: Enhances the flavors and balances the sweetness.
- 0.5 cup unsalted butter: Adds richness and ensures a soft, melt-in-your-mouth bite.
- 0.25 cup sugar: Sweetens the dough while helping with the perfect cookie texture.
- 0.25 cup brown sugar: Brings a slight molasses note that deepens flavor complexity.
- 1.25 teaspoons vanilla essence: Adds warmth and fragrance that complements the cocoa.
- 1 teaspoon white vinegar: Reacts with baking soda to keep the cookies tender with a subtle tang.
- 1 large egg: Binds everything together and lends moisture.
- Red food coloring: The magic behind that unmistakable red velvet appearance.
- 2 tablespoons semi-sweet chocolate: For small melted accents that add bursts of chocolaty goodness.
- 4 tablespoons white chocolate: For sweet, creamy decoration canvases on the bear faces.
- Oil-based food coloring: Ideal for decorating and adding vibrant details that won’t smudge.
How to Make Tasty Red Velvet Bear Cookies Recipe
Step 1: Prepare the Dry Ingredients
Start by sifting together the all-purpose flour, cocoa powder, baking soda, baking powder, and salt into a large bowl. This ensures everything is well combined and free of lumps, creating an even flavor base for your dough.
Step 2: Cream Butter and Sugars
In a separate bowl, beat the unsalted butter, sugar, and brown sugar until the mixture is smooth and fluffy. This step is crucial for that tender, melt-in-your-mouth texture that these cookies are known for.
Step 3: Add Wet Ingredients and Color
Beat in the egg, vanilla essence, and white vinegar into the creamed butter and sugars. Once blended, add several drops of red food coloring to achieve that rich red velvet hue. Mix until the color is uniformly vibrant.
Step 4: Combine Wet and Dry Mixtures
Gradually add the dry ingredients to the wet mixture, folding gently but thoroughly. The dough should come together into a soft, slightly sticky mass that holds its shape well for cutting.
Step 5: Chill the Dough
Wrap the dough in plastic and chill for at least 30 minutes. Chilling firms up the dough, making it easier to roll and cut into precise bear shapes.
Step 6: Shape and Bake
Roll out the chilled dough on a lightly floured surface to about 1/4 inch thick. Use a bear-shaped cookie cutter to cut out your cookies. Place them onto a baking sheet lined with parchment paper and bake at 350°F (175°C) for 10-12 minutes until edges are just set but centers remain soft.
Step 7: Cool and Decorate
Let the cookies cool on the baking sheet for a few minutes before transferring to a wire rack. Melt the semi-sweet and white chocolates separately and use them with oil-based food coloring to artistically decorate those adorable bear faces, letting the little personalities shine through.
How to Serve Tasty Red Velvet Bear Cookies Recipe
Garnishes
Sprinkle some edible glitter or finely chopped nuts on top of the chocolate decorations to give your bears some extra sparkle and crunch. A light dusting of powdered sugar can also create a whimsical “snowy” effect if you’re serving these during colder months.
Side Dishes
Pair your bear cookies with a hot cup of cocoa, a creamy latte, or even a chilled glass of milk to create a cozy and satisfying snack experience. Fresh berries on the side can brighten the rich flavor while adding a bit of freshness.
Creative Ways to Present
Arrange your Tasty Red Velvet Bear Cookies Recipe on a rustic wooden platter with some sprigs of greenery or edible flowers for a charming look. You can also place a few in individual clear treat bags tied with colorful ribbons as delightful gifts or party favors.
Make Ahead and Storage
Storing Leftovers
Keep your baked and decorated bear cookies in an airtight container at room temperature. They will stay fresh and soft for up to a week, making it easy to enjoy a sweet moment anytime.
Freezing
If you want to keep these festive treats even longer, freeze them in a single layer on a baking sheet first, then transfer to a freezer-safe container. Frozen cookies can last up to three months and thaw quickly when ready to enjoy.
Reheating
To bring back that freshly-baked warmth, simply microwave your cookies for 10-15 seconds or warm them in a low oven for a few minutes. This revives their soft texture and aroma beautifully.
FAQs
Can I use natural food coloring instead of oil-based?
Natural colorings can be used but may not provide that bright, vivid red essential for the classic red velvet look, and they may bleed when mixed with chocolate decorations.
What can I substitute for unsalted butter?
You can use salted butter but reduce the additional salt in the recipe slightly to avoid overpowering the flavor.
Are these cookies gluten-free?
This recipe calls for all-purpose flour, which contains gluten. You can try substituting a gluten-free flour blend designed for baking, but results may vary.
How do I prevent the red velvet cookies from turning brown?
Keeping the baking time just until edges are set and using red food coloring helps maintain that bright red color. Avoiding overbaking is key.
Can I make these cookies vegan?
With some ingredient swaps like vegan butter and egg replacer, you can adapt this recipe, but the texture and flavor may differ slightly from the original.
Final Thoughts
Baking your own batch of these wonderful Tasty Red Velvet Bear Cookies Recipe is not only a joyful experience but a truly heartwarming one. They bring smiles to faces and happiness in every bite, making all the time spent absolutely worth it. I encourage you to try this recipe and share the magic of these sweet, charming treats with those you care about.
Print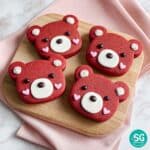
Tasty Red Velvet Bear Cookies Recipe
- Prep Time: 20 minutes
- Cook Time: 15 minutes
- Total Time: 55 minutes
- Yield: 4 servings (about 12-16 cookies depending on size)
- Category: Dessert
- Method: Baking
- Cuisine: American
Description
These Tasty Red Velvet Bear Cookies are a delightful twist on classic red velvet flavor, shaped into adorable bear forms perfect for a fun baking project or a charming gift. Rich with cocoa and a subtle tang from vinegar, these cookies are both visually appealing and irresistibly delicious.
Ingredients
Dry Ingredients
- 1.75 cups all-purpose flour
- 3 tbsp cocoa powder
- 0.5 tsp baking soda
- 0.5 tsp baking powder
- 0.75 tsp salt
Wet Ingredients
- 0.5 cup unsalted butter, softened
- 0.25 cup sugar
- 0.25 cup brown sugar
- 1.25 tsp vanilla essence
- 1 tsp white vinegar
- 1 large egg
- red food coloring (as needed)
Decoration
- 2 tbsp semi-sweet chocolate (for detailing)
- 4 tbsp white chocolate (for detailing)
- oil-based food coloring (for coloring chocolate or decoration)
Instructions
- Prepare Dry Ingredients: In a medium bowl, sift together the all-purpose flour, cocoa powder, baking soda, baking powder, and salt. Set aside to ensure even mixing and avoid lumps.
- Cream Butter and Sugars: In a large mixing bowl, cream the unsalted butter, sugar, and brown sugar together until the mixture is light and fluffy. This enhances the texture and helps the cookies rise evenly.
- Add Wet Ingredients: Beat in the vanilla essence, white vinegar, and the large egg into the creamed butter and sugar mixture until fully combined and smooth.
- Incorporate Food Coloring: Add red food coloring gradually to the wet mixture until the desired deep red color is achieved, typical for red velvet treats.
- Combine Dry and Wet Mixtures: Gradually fold the sifted dry ingredients into the wet mixture, mixing gently until a smooth cookie dough forms. Avoid overmixing to keep the cookies tender.
- Shape Cookies: Preheat your oven to 350°F (175°C). Form the dough into bear shapes by hand or using bear-shaped cookie cutters, placing them evenly spaced on a parchment-lined baking sheet.
- Bake: Bake the bear-shaped cookies in the preheated oven for about 12-15 minutes or until the edges are firm and the centers are set.
- Cool: Allow the cookies to cool completely on a wire rack before decoration to ensure the chocolate adheres properly.
- Decorate: Melt the semi-sweet and white chocolate separately. Use the chocolates combined with oil-based food coloring to paint or pipe facial features and details on the cooled bear cookies for a charming finish. Let the decorated cookies set until the chocolate hardens.
Notes
- Use soft unsalted butter to achieve the best creaming results.
- Add food coloring gradually to control the redness and avoid unnatural hues.
- Ensure cookies are fully cooled before decorating to prevent melting and smudging of chocolate details.
- Oil-based food coloring is essential for coloring chocolate without seizing it.
- Store cookies in an airtight container at room temperature for up to one week.


