

If you have ever wanted to experience a taste of Japan’s simple yet deeply satisfying comfort food, you are in for a treat with this Onigiri (Japanese Rice Balls): Discover Unique Flavors! Recipe. These delightful rice balls are more than just a snack; they are a charming blend of fluffy sushi rice, savory fillings, and the satisfying crunch of seaweed. Every bite bursts with a balance of flavors and textures that feels both fresh and nostalgic, perfect for sharing, lunch boxes, or even a quick picnic nibble. Let me walk you through the magic behind crafting these little masterpieces!

Ingredients You'll Need
Getting the basics right is crucial for onigiri, and this recipe’s ingredients list is wonderfully straightforward. Each component plays a vital role—from the perfectly cooked sushi rice that forms the base, to the vinegar mixture that adds a mild tang and glossy finish, to the savory fillings that make each bite exciting.
- 2 cups sushi rice: The heart of the dish, sushi rice gives onigiri its sticky, tender texture perfect for molding.
- 2 1/2 cups water: Used for perfectly cooking the rice to just the right softness without mushiness.
- 1/4 cup rice vinegar: Adds a subtle tang that lifts the flavor and prevents the rice from being bland.
- 2 tablespoons sugar: Balances the acidity of the vinegar with a touch of sweetness for harmony.
- 1 teaspoon salt: Essential for seasoning both the rice and enhancing the fillings.
- 1 sheet nori (seaweed), cut into strips: Provides a salty, crispy wrapping that’s iconic to onigiri.
- Fillings of choice (pickled plum, tuna, salmon, or vegetables): These bursts of flavor take your rice balls to the next level and let you experiment with textures.
How to Make Onigiri (Japanese Rice Balls): Discover Unique Flavors! Recipe
Step 1: Perfectly Rinse and Cook the Sushi Rice
Rinse your sushi rice under cold water until it runs clear. This step is essential to wash away excess starch, which ensures your rice will be sticky but not gummy. Then combine the rinsed rice and fresh water in a rice cooker, cooking it according to the manufacturer’s instructions for perfectly tender rice every time.
Step 2: Prepare the Vinegar Seasoning
While the rice cooks, mix the rice vinegar, sugar, and salt in a small bowl. Stir until everything dissolves completely, creating that iconic sushi rice seasoning that gives onigiri its distinctive flavor and sheen.
Step 3: Fold the Seasoning into the Rice
Once your rice is cooked, transfer it to a large bowl and gently fold in the vinegar mixture. The key here is gentle mixing to avoid smashing the grains — preserving the fluffy texture is what makes onigiri so delightful.
Step 4: Shape the Onigiri with Love
Wait for the rice to cool just enough to handle comfortably. Wet your hands to keep the rice from sticking easily, take a handful, and flatten it slightly in your palm. Place your chosen filling in the center, then carefully mold the rice around it, shaping it into a triangle or classic ball shape. This shaping step is where the art and fun come alive!
Step 5: Wrap with Nori and Serve
The final touch is wrapping your onigiri with a strip of nori seaweed. This not only adds a savory crunch and umami-rich flavor but also makes the onigiri easier to handle and eat. Now you’re ready to enjoy a dish that’s delightful, portable, and packed with taste.
How to Serve Onigiri (Japanese Rice Balls): Discover Unique Flavors! Recipe
Garnishes
Simple garnishes like a sprinkle of toasted sesame seeds or a sprinkle of furikake seasoning can elevate your onigiri beautifully. These little additions add color, a hint of nutty flavor, and an inviting aroma that make the eating experience even more exciting.
Side Dishes
Onigiri pairs wonderfully with light and fresh sides such as a crisp seaweed salad, pickled vegetables, or a bowl of miso soup. These accompaniments create a balanced meal that complements the rice balls perfectly, enhancing your overall dining experience.
Creative Ways to Present
Bring extra flair to your table by arranging onigiri in bento boxes with colorful dividers, or by skewering small onigiri balls alongside grilled vegetables for an engaging party platter. You could also try wrapping onigiri in decorative edible flowers or herbs for an Instagram-worthy presentation!
Make Ahead and Storage
Storing Leftovers
If you happen to have leftovers, keep them wrapped tightly in plastic wrap and store in an airtight container in the fridge. Because the rice can harden quickly, it’s best to eat them within a day for optimum freshness and texture.
Freezing
Onigiri freeze quite well! Wrap each rice ball individually in plastic wrap and place them in a freezer-safe bag. When you want to enjoy them later, thaw overnight in the fridge to maintain their shape and flavor.
Reheating
Reheat your onigiri gently in a microwave with a damp paper towel over them to keep the rice moist. Avoid overheating, which can dry them out, and enjoy almost like fresh-made rice balls with all their comforting flavors restored.
FAQs
Can I use regular rice instead of sushi rice for onigiri?
While you can use regular short-grain rice, sushi rice is preferred because of its stickiness, which helps the rice hold together when molded. Long-grain or less sticky rice may fall apart easily.
What are some popular fillings for onigiri?
Classic fillings include pickled plum (umeboshi), salted salmon, tuna mixed with mayo, and seasoned vegetables. Feel free to get creative with leftovers or whatever you love!
Do I have to use nori to wrap onigiri?
Wrapping with nori is traditional and adds flavor, but it’s not mandatory. Sometimes onigiri are served plain or wrapped in plastic for convenience. Just keep in mind that nori adds that savory punch and texture contrast.
How can I shape onigiri without it sticking to my hands?
Wet your hands with water mixed with a pinch of salt before shaping. This prevents the rice from sticking and seasons the rice balls lightly as you shape them.
Is onigiri gluten-free?
Onigiri is naturally gluten-free if you use plain sushi rice and fillings without soy sauce or additives containing gluten. Always check your fillings and seasoning ingredients to be sure if you have gluten sensitivity.
Final Thoughts
There is something truly heartwarming about making and enjoying Onigiri (Japanese Rice Balls): Discover Unique Flavors! Recipe. It’s a dish that invites creativity, comfort, and connection all wrapped up in satisfying bites. Could there be a better little culinary adventure for your kitchen? I encourage you to give this recipe a try, savor the process, and discover your own unique flavors to share with loved ones.
Print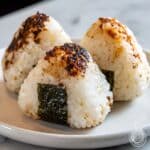
Onigiri (Japanese Rice Balls): Discover Unique Flavors! Recipe
- Prep Time: 10 minutes
- Cook Time: 30 minutes
- Total Time: 40 minutes
- Yield: 4 servings (4 onigiri)
- Category: Snack
- Method: Stovetop
- Cuisine: Japanese
- Diet: Gluten Free
Description
Onigiri, or Japanese rice balls, are a simple and versatile snack made with seasoned sushi rice and a variety of fillings. This recipe guides you through making perfectly cooked rice, seasoning it with a sweet and tangy vinegar mix, then shaping and filling the onigiri for a delicious, portable treat wrapped in nori seaweed.
Ingredients
Rice and Seasoning
- 2 cups sushi rice
- 2 1/2 cups water
- 1/4 cup rice vinegar
- 2 tablespoons sugar
- 1 teaspoon salt
Additional
- 1 sheet nori (seaweed), cut into strips
- Fillings of choice (e.g., pickled plum, tuna, salmon, or vegetables)
Instructions
- Rinse Rice: Rinse the sushi rice under cold water until the water runs clear to remove excess starch, ensuring the rice cooks to a perfect sticky texture.
- Cook Rice: Combine the rinsed rice and 2 1/2 cups water in a rice cooker and cook according to the manufacturer’s instructions. This ensures evenly cooked fluffy rice essential for onigiri.
- Prepare Vinegar Mixture: In a small bowl, mix 1/4 cup rice vinegar, 2 tablespoons sugar, and 1 teaspoon salt until fully dissolved to create the classic sushi rice seasoning.
- Season Rice: Once the rice is cooked, transfer it to a large bowl and gently fold in the vinegar mixture with a spatula or wooden spoon. This adds a tangy and slightly sweet flavor while cooling the rice.
- Cool Rice: Allow the rice to cool slightly until it can be handled comfortably, which is important to keep your hands from burning and to maintain proper texture.
- Shape Rice: Wet your hands with water to prevent sticking, take a handful of rice, and flatten it in your palm to prepare for filling.
- Add Filling and Form: Place your desired filling (such as pickled plum, tuna, salmon, or vegetables) in the center of the rice and mold the rice around it to form a triangle or ball shape, sealing the filling inside.
- Wrap with Nori: Wrap the onigiri with a strip of nori seaweed. This adds flavor and provides a handy way to hold the rice ball without it sticking to your fingers.
Notes
- Use sushi rice or short-grain rice for best texture; long-grain rice is too dry and will not hold shape.
- Keep hands wet while shaping onigiri to prevent sticking.
- Fillings can be customized to your preference—try cooked salmon flakes, seasoned tuna mayo, or pickled vegetables.
- Onigiri is best eaten fresh but can be stored in the refrigerator and gently reheated covered with a damp paper towel to retain moisture.
- Be careful to not over-mix rice with vinegar to avoid mushy texture.


