
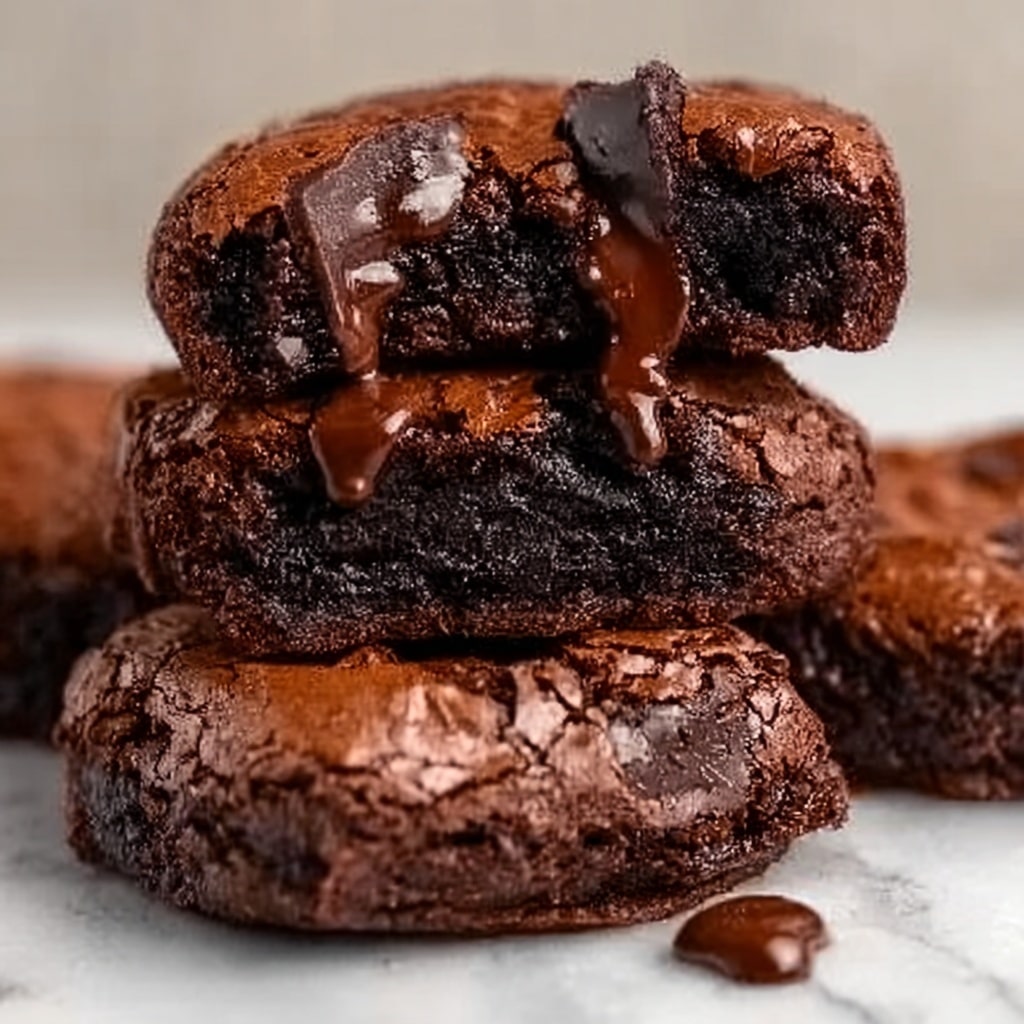
If you are ready to indulge in a chocolate lover’s dream, this Chocolate Lava Brownie Cookies Recipe is exactly what you need. Imagine the fudgy richness of a brownie combined with the gooey, molten chocolate center of a lava cake, all baked into a perfectly handheld cookie. These cookies are wonderfully soft, deeply chocolatey, and have a magical molten surprise inside that melts in your mouth with each bite. Whether you’re making them for a party, a cozy night in, or just because, this recipe brings pure joy with every warm, decadent bite.

Ingredients You’ll Need
The magic of this dessert lies in a handful of simple ingredients that come together to build an irresistible harmony of flavor and texture. Each component is essential to achieving that perfect balance of fudgy, soft, and molten delights in every cookie.
- Unsalted butter: Adds richness and helps melt the chocolate smoothly for a luscious texture.
- Semi-sweet chocolate chips: Provide the deep chocolate flavor and the gooey lava center.
- Granulated sugar: Lends sweetness and aids in creating a soft, chewy texture.
- Brown sugar, packed: Adds moisture and a hint of caramel flavor for depth.
- Large eggs: Bind the ingredients together and help with the cookie’s tender crumb.
- Vanilla extract: Enhances all the chocolate flavors with a warm undertone.
- All-purpose flour: Provides structure while keeping the cookies soft.
- Unsweetened cocoa powder: Intensifies the chocolate goodness without added sweetness.
- Baking powder: Just enough to lift the cookies slightly without losing their fudgy texture.
- Salt: Balances the sweetness and boosts all the flavors.
- Extra chocolate chips or chunks: Used to create that luscious molten lava center for a gooey surprise.
How to Make Chocolate Lava Brownie Cookies Recipe
Step 1: Melt Chocolate and Butter
Start by melting the unsalted butter and semi-sweet chocolate chips together in a microwave-safe bowl. Use 30-second intervals to avoid burning, stirring in between until it’s a silky smooth mixture. This rich blend is the heart of your cookie dough, infusing every bite with deep chocolate flavor.
Step 2: Mix Sugars and Eggs
In a large mixing bowl, whisk together granulated sugar, brown sugar, eggs, and vanilla extract until the mixture is smooth and well combined. This step ensures your cookies will be delightfully sweet and tender.
Step 3: Combine Wet and Dry Ingredients
Pour the cooled melted chocolate mixture into your sugar and egg mixture, stirring gently until everything is fully combined. This creates a luscious base perfect for the rich brownie-cookie hybrid you’re about to bake.
Step 4: Add Dry Ingredients
Whisk together all-purpose flour, cocoa powder, baking powder, and salt in a separate bowl. Gradually add this to your wet ingredients, mixing just until it comes together. Avoid overmixing to keep your cookies tender and fudgy.
Step 5: Chill Dough
Cover your dough and let it chill in the refrigerator for 30 minutes. This helps the dough firm up, making it easier to shape and enhances the final texture after baking.
Step 6: Shape and Fill Cookies
Preheat the oven to 350°F (175°C) and line a baking sheet with parchment paper. Scoop tablespoon-sized portions of dough, flatten them slightly, then place a few chocolate chips or a small chocolate chunk into the center. Carefully fold the dough around to seal the chocolate inside, creating that irresistible molten lava center.
Step 7: Bake to Perfection
Arrange your shaped cookies on the baking sheet, spacing them at least 2 inches apart. Bake for 9 to 11 minutes, until the edges are set but the centers stay soft. This timing is crucial to keep the lava center delightfully gooey.
Step 8: Cool and Enjoy
Let your cookies cool just for a few minutes before transferring them to a wire rack or enjoying them warm right from the tray. That warm, molten center is the ultimate payoff, offering pure chocolate bliss with each bite.
How to Serve Chocolate Lava Brownie Cookies Recipe

Garnishes
Add a sprinkle of powdered sugar over the top or a dollop of whipped cream to bring out the cookies’ decadence even more. A few fresh raspberries or a drizzle of caramel sauce can also make the presentation pop, creating an elegant look for any occasion.
Side Dishes
These cookies are incredible alone, but if you want to turn them into a dessert feast, serve with vanilla ice cream or a scoop of rich chocolate gelato. A cup of freshly brewed coffee or a creamy latte complements the intense chocolate flavor perfectly, rounding out a beautiful pairing.
Creative Ways to Present
For an unforgettable dessert experience, serve the cookies warm in small ramekins topped with extra chocolate chunks so guests can break into the molten center. Alternatively, sandwich two cookies with a layer of chocolate ganache or marshmallow fluff for a fun twist that doubles the indulgence.
Make Ahead and Storage
Storing Leftovers
Keep any leftover cookies in an airtight container at room temperature for up to three days to maintain their soft, fudge-like texture. If you want to extend their life, refrigeration is possible but may dry out the cookies slightly.
Freezing
You can freeze the shaped cookie dough balls on a baking sheet, then transfer them to a freezer-safe container or bag once solid. They keep well for up to three months. Bake straight from frozen, adding a minute or two to the baking time for perfect fresh-from-the-oven cookies.
Reheating
Gently reheat your cookies in the microwave for 10 to 15 seconds or in a warm oven to restore their gooey center magic. Just be sure not to overheat or you might lose that soft, molten texture that makes these cookies so special.
FAQs
Can I use dark chocolate instead of semi-sweet chocolate chips?
Absolutely! Dark chocolate will give your recipe a richer, slightly more intense flavor. Keep in mind the bitterness level might increase, so adjusting sugar slightly could be helpful if you prefer a sweeter cookie.
What if I don’t have cocoa powder on hand?
Cocoa powder is key for that deep chocolate flavor and color, but if you’re out, you could use extra melted chocolate. Just be aware it can change the texture slightly, making the dough wetter and potentially thicker.
How do I know when the cookies are done?
The edges should look set and slightly crisp, but the centers will still look soft and a bit underbaked. This is what keeps the inside molten and gooey, which is the hallmark of the Chocolate Lava Brownie Cookies Recipe.
Can I make these cookies gluten-free?
Yes! Replace the all-purpose flour with a gluten-free flour blend that’s suitable for baking. Make sure it contains xanthan gum or a similar binder to get the best texture.
Why do I need to chill the dough before baking?
Chilling the dough firms it up, making it easier to handle and shape around the chocolate chunks. It also helps prevent spreading during baking, giving you thicker cookies with that stunning molten center.
Final Thoughts
This Chocolate Lava Brownie Cookies Recipe is truly a comfort dessert that feels both luxurious and homey at once. Every step, from melting the chocolate to biting into that molten center, is filled with joy. Make sure to try it soon and turn your cookie game into an unforgettable chocolate experience that friends and family will rave about.
Print
Chocolate Lava Brownie Cookies Recipe
- Prep Time: 15 minutes
- Cook Time: 11 minutes
- Total Time: 55 minutes
- Yield: 20 servings
- Category: Dessert
- Method: Baking
- Cuisine: American
Description
Indulge in these decadent Chocolate Lava Brownie Cookies featuring a rich, gooey molten chocolate center encased in a fudgy brownie-like cookie exterior. Perfectly balanced with a blend of semi-sweet chocolate, cocoa powder, and a touch of vanilla, these cookies offer a deliciously warm and melty surprise that’s easy to make and sure to impress.
Ingredients
Chocolate Mixture
- 1/2 cup unsalted butter
- 1 cup semi-sweet chocolate chips
Cookie Dough
- 3/4 cup granulated sugar
- 1/2 cup brown sugar, packed
- 2 large eggs
- 1 teaspoon vanilla extract
- 1 cup all-purpose flour
- 1/4 cup unsweetened cocoa powder
- 1/2 teaspoon baking powder
- 1/4 teaspoon salt
For Filling
- Extra chocolate chips or chocolate chunks for the lava center (about 1-2 chocolate chips/chunks per cookie)
Instructions
- Melt Chocolate and Butter: In a microwave-safe bowl, melt the butter and 1 cup of semi-sweet chocolate chips together in 30-second intervals, stirring between each session until completely smooth. Set the mixture aside to cool slightly.
- Mix Sugars and Eggs: In a large mixing bowl, beat together the granulated sugar, brown sugar, eggs, and vanilla extract until the mixture is smooth and creamy, ensuring it’s well combined.
- Combine Wet Ingredients: Stir the cooled melted chocolate mixture into the sugar and egg mixture until the batter is uniform and fully blended.
- Add Dry Ingredients: In a separate bowl, whisk together the all-purpose flour, cocoa powder, baking powder, and salt. Gradually fold the dry ingredients into the wet chocolate batter until just combined, being careful not to overmix to maintain a tender texture.
- Chill Dough: Cover the cookie dough with plastic wrap or a lid, and refrigerate for 30 minutes to allow it to firm up, which helps in shaping and containing the lava center.
- Shape and Fill Cookies: Preheat your oven to 350°F (175°C) and line a baking sheet with parchment paper. Scoop tablespoon-sized portions of the chilled dough and slightly flatten each portion. Place a few chocolate chips or a small chunk of chocolate in the center, then carefully fold the dough around the chocolate to fully encase it, forming a ball.
- Bake: Arrange the prepared cookie dough balls spaced about 2 inches apart on the baking sheet. Bake in the preheated oven for 9 to 11 minutes, or until the edges of the cookies are set while the centers remain soft to ensure a gooey lava middle.
- Cool and Serve: Allow the cookies to cool on the baking sheet for a few minutes before transferring them to a wire rack. Serve warm to enjoy the molten lava chocolate center at its best.
Notes
- For the gooey lava center, seal the chocolate chips or chunks well inside the dough to prevent them from leaking during baking.
- Do not overbake; the centers should remain soft to preserve the lava effect.
- Use parchment paper or a silicone baking mat to prevent sticking and promote even baking.
- You can customize the lava center with different types of chocolate—dark, milk, or even white chocolate chunks.
- The dough can be stored in the refrigerator for up to 2 days before baking, or frozen for up to 1 month.


