
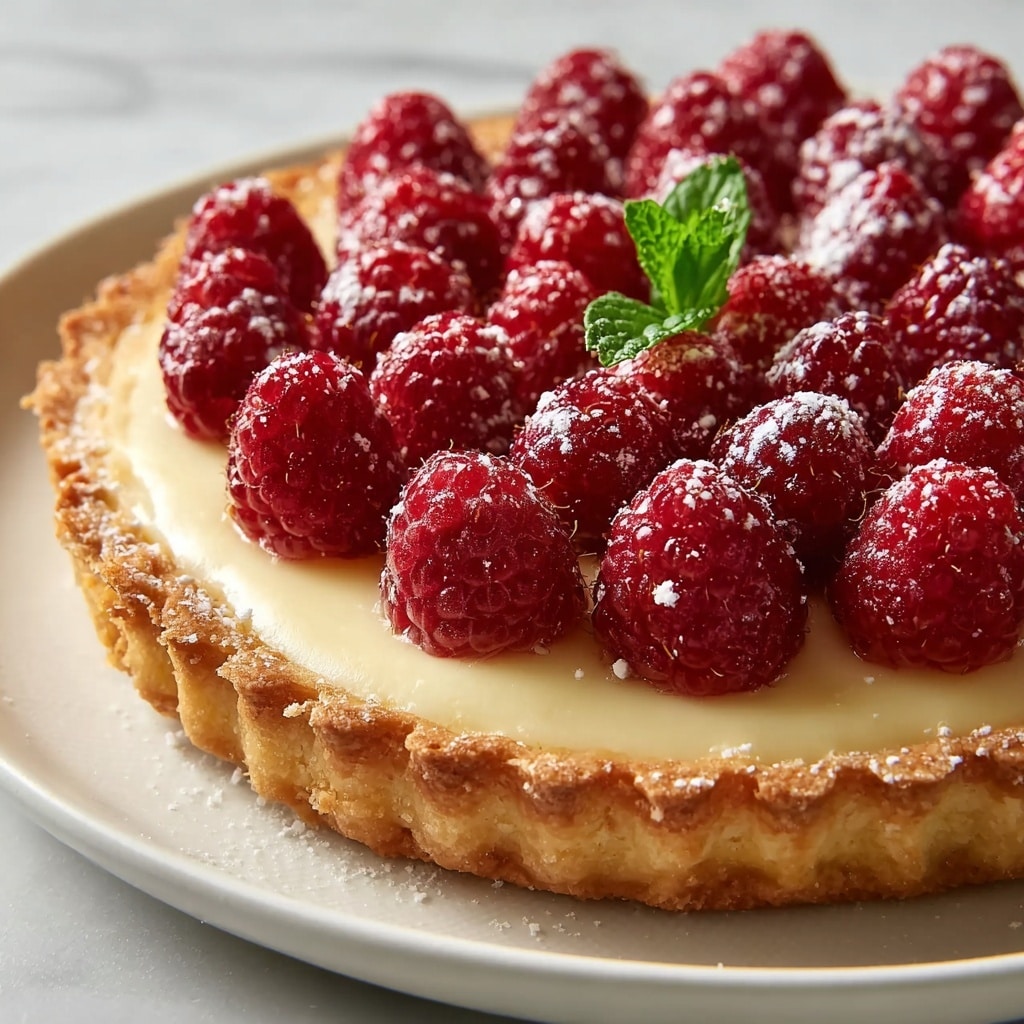
If you’re on the hunt for a dessert that effortlessly combines elegance, richness, and a burst of fresh fruit flavor, this Raspberry White Chocolate Tart Recipe is exactly what you need. It’s a decadent yet surprisingly approachable tart that balances the creamy sweetness of white chocolate with the vibrant tartness of fresh raspberries. Every bite feels like a little celebration, and trust me, once you make this tart, it will quickly become a favorite in your dessert rotation. The crisp, buttery crust, silky filling, and jewel-like raspberry topping come together to create a dessert that looks as stunning as it tastes.

Ingredients You’ll Need
Gathering the right ingredients for this tart is simpler than you might think, but every component plays an essential role in achieving that perfect taste and texture. From the buttery crust to the luscious white chocolate filling and the bright, fresh raspberries on top, each ingredient contributes to a balanced and irresistible dessert experience.
- All-purpose flour: The foundation for a tender, flaky crust that holds everything beautifully.
- Powdered sugar: Adds subtle sweetness while helping with a delicate texture in the crust.
- Cold unsalted butter: Key for that rich, flaky crust texture when properly cut into the flour.
- Salt: Enhances all the flavors and balances the sweetness throughout the tart.
- Egg yolk: Acts as a glue in the dough, making it easier to handle while keeping it tender.
- Ice water: Helps bring the dough together without melting the butter, ensuring flakiness.
- White chocolate: Provides the creamy, luscious base of the filling with a luxurious sweetness.
- Heavy cream: Gives the filling its smooth, rich consistency and velvety mouthfeel.
- Eggs: Give the filling structure so it sets just right in the oven.
- Vanilla extract: Enhances the white chocolate flavor with warm, aromatic notes.
- Fresh raspberries: The star of the topping, adding freshness, color, and a perfect tart contrast.
- Sugar for macerating: Sweetens the raspberries slightly, coaxing out their natural juice and intensifying their flavor.
- Mint leaves (optional): Adds a bright, herbal finish that lifts the whole presentation.
How to Make Raspberry White Chocolate Tart Recipe
Step 1: Prepare the Tart Crust
Start by mixing the flour, powdered sugar, and salt to create a perfectly balanced base for the crust. Then, cut in the cold butter until the mixture resembles coarse crumbs—this step is crucial for flaky layers. Slowly add the egg yolk and ice water to bring the dough together, but be careful not to overwork it. Shape the dough into a disk, wrap it tightly, and chill it; this resting period helps the gluten relax and keeps the crust tender when baked.
Step 2: Blind Bake Your Crust
After chilling, roll out the dough to fit your tart pan, then press and trim the edges neatly. Pricking the crust with a fork prevents unwanted bubbles, and using parchment paper and pie weights during baking ensures your crust holds its shape and comes out beautifully crisp. The blind baking creates a sturdy shell to hold the rich filling without getting soggy.
Step 3: Make the White Chocolate Filling
Use a double boiler to gently melt the chopped white chocolate with heavy cream. The slow, indirect heat prevents the chocolate from seizing, resulting in a smooth, glossy mixture that’s pure indulgence. Whisk eggs, vanilla, and salt in a separate bowl, then combine with the warm chocolate mixture bit by bit, whisking continuously to avoid cooking the eggs. This technique gives your filling a silky texture that will set just right.
Step 4: Bake the Tart
Pour the velvety white chocolate filling into your cooled crust and smooth the top for a flawless finish. Bake until the filling is set around the edges but still slightly jiggly in the center—this ensures a creamy texture once chilled. Patience here is key because an overbaked filling can become dry, but a perfectly baked one melts in your mouth.
Step 5: Prepare the Raspberry Topping and Finish
Macerate fresh raspberries in granulated sugar to release their juices and intensify their natural tartness. Once your tart is fully chilled, top it generously with these luscious berries, arranging them artfully for the most inviting look. A few fresh mint leaves can be added to brighten the colors and add a refreshing twist, making the tart as delightful to the eyes as it is to the taste buds.
How to Serve Raspberry White Chocolate Tart Recipe
Garnishes
While the macerated raspberries are the star garnish here, you can also sprinkle a light dusting of powdered sugar over the top for an elegant finish. Fresh mint leaves not only add a beautiful pop of green but also infuse a subtle herbal note that complements the tart perfectly. For a decadent touch, consider drizzling a little melted white or dark chocolate on top in a delicate pattern.
Side Dishes
This tart pairs wonderfully with a scoop of vanilla bean ice cream or a dollop of freshly whipped cream to add cool creaminess alongside the rich white chocolate filling. For a refreshing contrast, serve with a simple side of lemon sorbet or a small bowl of fresh berries. A lightly brewed cup of green tea or a glass of sparkling rosé also makes a lovely accompaniment, enhancing the tart’s flavors without overpowering them.
Creative Ways to Present
Presentation always makes a difference, especially with desserts as beautiful as this one. Try serving individual slices perched on delicate dessert plates with a few extra raspberries nestled at the side. You can also create mini tarts using the same recipe for an impressive dessert platter. For a festive occasion, top with edible flowers or shimmering sugar crystals to really wow your guests.
Make Ahead and Storage
Storing Leftovers
This Raspberry White Chocolate Tart Recipe holds up well when stored properly. Keep any leftovers refrigerated in an airtight container for up to three days to maintain freshness and texture. The flavors actually deepen with a little time, making the next day’s slice even better. Just be sure to cover it well so the tart doesn’t absorb other fridge odors.
Freezing
If you want to prepare this tart in advance, it freezes nicely, too. Wrap it securely in plastic wrap and then in aluminum foil before placing it in the freezer for up to a month. When you’re ready to enjoy, thaw it overnight in the refrigerator. The texture may soften slightly but remains delicious, making it a great option for special occasions planned ahead.
Reheating
This tart is best enjoyed cold or at room temperature, so reheating is generally not recommended as it can alter the creamy texture of the white chocolate filling. If you prefer a slightly warmer slice, let it sit at room temperature for about 20 minutes before serving to take the chill off without heating it directly.
FAQs
Can I use frozen raspberries for the topping?
While fresh raspberries are recommended for their texture and brightness, you can use frozen raspberries if needed. Just make sure to thaw and drain any excess liquid before macerating them with sugar to avoid a soggy tart.
Is it possible to make the tart gluten-free?
Absolutely! Substitute the all-purpose flour for a gluten-free baking blend that measures like regular flour. Keep in mind texture might be slightly different but the flavor will still shine through beautifully.
Can I substitute white chocolate with another type of chocolate?
You can, but it will change the flavor profile quite a bit. White chocolate offers a creamy, sweet base that pairs perfectly with raspberries. Dark or milk chocolate will make it richer and less sweet, which can be delicious but is a different experience altogether.
How long does the tart need to chill before serving?
Chill the tart for at least 2 hours to ensure the filling sets fully. Longer chilling up to overnight actually enhances the flavors and makes slicing easier.
What can I do if my crust cracks when rolling it out?
If your dough cracks, it might be too dry. Add a teaspoon of ice water at a time to bring it together gently. Also, chilling the dough before rolling helps prevent cracks and makes the dough easier to handle.
Final Thoughts
Making this Raspberry White Chocolate Tart Recipe is like treating yourself and your loved ones to a slice of pure joy. It’s elegant without being intimidating, rich yet perfectly balanced with fresh fruit brightness. If you’re looking for a dessert that’s sure to impress but feels like a warm hug at the same time, this tart is your new go-to. I can’t wait for you to try it and fall in love, just like I did.
Print
Raspberry White Chocolate Tart Recipe
- Prep Time: 30 minutes
- Cook Time: 35 minutes
- Total Time: 2 hours 65 minutes
- Yield: 8 servings
- Category: Dessert
- Method: Baking
- Cuisine: French
Description
This Raspberry White Chocolate Tart combines a crisp, buttery crust with a smooth, creamy white chocolate filling topped with fresh, sweetened raspberries. Perfectly balanced between rich and fruity, this elegant dessert is ideal for special occasions or a delightful treat any day.
Ingredients
For the Tart Crust:
- 1 1/2 cups all-purpose flour
- 1/4 cup powdered sugar
- 1/2 cup unsalted butter (cold and cubed)
- 1/4 teaspoon salt
- 1 large egg yolk
- 2–3 tablespoons ice water
For the White Chocolate Filling:
- 8 oz white chocolate (chopped)
- 1 cup heavy cream
- 2 large eggs
- 1 teaspoon vanilla extract
- 1/4 teaspoon salt
For the Raspberry Topping:
- 2 cups fresh raspberries
- 2 tablespoons granulated sugar (for macerating)
- Mint leaves (for garnish, optional)
Instructions
- Mix dry ingredients for crust: In a medium bowl, combine 1 1/2 cups of all-purpose flour, 1/4 cup of powdered sugar, and 1/4 teaspoon of salt. Mix well to evenly distribute all dry ingredients.
- Cut in butter: Add the cold, cubed unsalted butter to the flour mixture. Using a pastry cutter or your fingers, work the butter into the flour until the mixture looks like coarse crumbs, which will ensure a flaky crust.
- Add egg mixture: Whisk together 1 large egg yolk and 2-3 tablespoons of ice water in a small bowl. Gradually add this liquid to the flour and butter mixture, stirring gently until the dough just comes together without overworking it.
- Chill dough: Form the dough into a disk, wrap it tightly with plastic wrap, and refrigerate for at least 30 minutes. This resting step helps make the crust easier to roll out and creates flakiness.
- Prepare tart shell: Preheat oven to 350°F (175°C). On a lightly floured surface, roll out the chilled dough to fit a 9-inch tart pan. Press the dough into the pan, trim excess dough, and prick the bottom with a fork to prevent air bubbles during baking.
- Blind bake crust: Line the crust with parchment paper and fill with pie weights or dried beans to weigh it down. Bake in the preheated oven for 15 minutes. Remove parchment and weights, then bake for another 5-10 minutes until the crust is lightly golden. Remove from oven and let cool completely.
- Prepare white chocolate filling: In a heatproof bowl over simmering water (double boiler), combine 8 oz chopped white chocolate and 1 cup heavy cream. Stir gently until the chocolate melts and mixture is smooth and shiny.
- Mix eggs and flavorings: In a separate bowl, whisk together 2 large eggs, 1 teaspoon vanilla extract, and 1/4 teaspoon salt. Slowly pour the warm chocolate mixture into the egg mixture while whisking constantly to prevent curdling.
- Fill tart shell: Pour the white chocolate filling into the cooled tart crust and smooth the surface with a spatula.
- Bake filling: Bake the filled tart in the preheated oven for 20-25 minutes, or until the filling is set but still has a slight jiggle in the center when gently shaken.
- Cool and chill tart: Remove the tart from the oven and allow it to cool to room temperature. Then refrigerate for at least 2 hours to allow the filling to firm up completely.
- Macerate raspberries: In a bowl, toss 2 cups fresh raspberries with 2 tablespoons granulated sugar. Let sit for 15-20 minutes to draw out the juices and enhance the flavor.
- Add topping: Once the tart is fully set, arrange the macerated raspberries evenly over the top of the tart for a fresh burst of fruitiness.
- Garnish: Optionally, add fresh mint leaves on top as a colorful and aromatic garnish.
- Serve: Slice the tart and serve chilled for a refreshing and elegant dessert experience.
Notes
- Make sure the butter is very cold for the crust to achieve a flaky texture.
- Be careful not to overmix the dough to prevent it from becoming tough.
- When tempering the eggs with the chocolate, add the chocolate mixture slowly to avoid scrambling the eggs.
- Blind baking the crust is essential to prevent sogginess from the filling.
- For best flavor, use fresh, ripe raspberries and allow them to macerate properly.
- Tart can be stored covered in the refrigerator for up to 2 days.


