
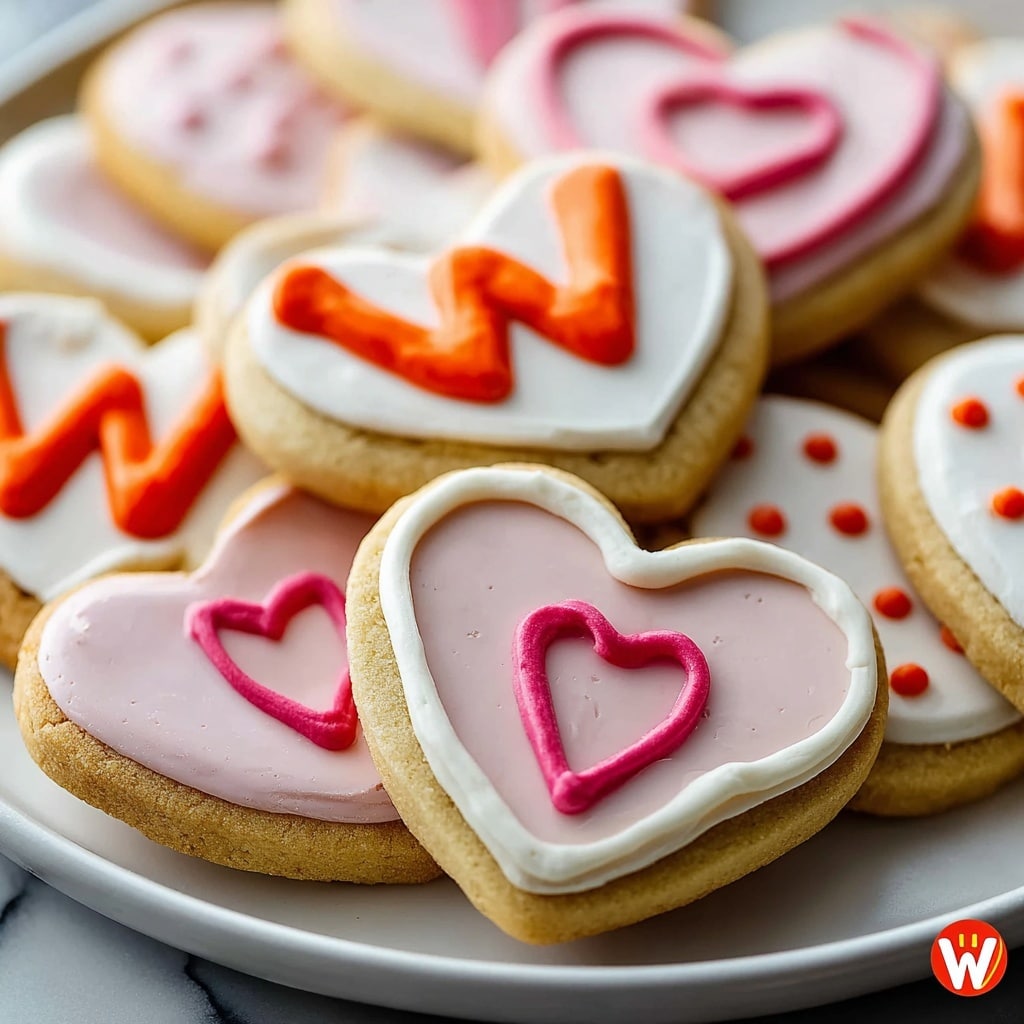
If you’re looking to spread some extra sweetness this February, this Valentine’s Day Cookies Recipe is an absolute must-try. Soft, chewy, and studded with melty chocolate chips, these cookies strike the perfect balance between rich flavor and tender texture. Whether you’re baking for a special someone or simply treating yourself, these cookies will bring a cozy warmth and a festive touch to your day. Let me walk you through making a batch of these delightful Valentine’s Day cookies that are as charming as they are delicious.

Ingredients You’ll Need
Every successful bake starts with a handful of simple, well-chosen ingredients. Each component in this Valentine’s Day Cookies Recipe plays a crucial role—from the fluffiness given by the baking powder to the rich sweetness from the brown sugar, culminating with the luscious chocolate chips that make every bite irresistible.
- 2 1/4 cups all-purpose flour: This is the foundation, providing structure and softness for the cookies.
- 1 tsp baking powder: Adds the needed lift for cookies that aren’t flat and dense.
- 1/2 tsp salt: Balances the sweetness and enhances all other flavors beautifully.
- 3/4 cup unsalted butter, softened: Brings richness and moisture, ensuring tender, melt-in-your-mouth texture.
- 1 cup granulated sugar: Adds crispness around the edges and classic sweetness.
- 1/2 cup brown sugar, packed: Offers chewy texture and deep caramel undertones.
- 2 large eggs: Bind everything together while adding moisture and softness.
- 2 tsp vanilla extract: Introduces warm, aromatic notes that make each cookie feel homemade.
- 1 cup semi-sweet chocolate chips: The star ingredient, providing gooey pockets of chocolate in every bite.
How to Make Valentine’s Day Cookies Recipe
Step 1: Preparing Your Baking Environment
Preheat your oven to 350°F (175°C) and line two baking sheets with parchment paper. This setup ensures even baking and prevents your cookies from sticking or burning on the bottom. Getting this ready first helps keep the process smooth and stress-free.
Step 2: Mixing the Dry Ingredients
In a medium bowl, whisk together the all-purpose flour, baking powder, and salt until fully combined. This dry mixture will make sure your cookies rise evenly and have a clean, balanced flavor — no surprises here, just the perfect base.
Step 3: Creaming Butter and Sugars
Using a large bowl, cream your softened butter with granulated sugar and brown sugar until the mixture turns light and fluffy. This step is critical—it incorporates air into the dough to create that perfect crumb and tenderness in your cookies.
Step 4: Adding the Eggs and Vanilla
Beat in the eggs one at a time, making sure each is fully blended before adding the next. Then add the vanilla extract. Together, these ingredients bring moisture and a lovely aroma that deepens the cookie’s flavor.
Step 5: Combining Wet and Dry Ingredients
Slowly add the flour mixture into the wet ingredients, mixing just until everything comes together. Over-mixing here will toughen your cookies, so gentle folding is the way to go.
Step 6: Stirring in the Chocolate Chips
Gently fold in the chocolate chips, distributing them evenly throughout the dough so each cookie has delightful pockets of melted chocolate.
Step 7: Baking
Scoop tablespoons of dough onto your prepared baking sheets, spacing them approximately two inches apart to allow for spreading. Bake for 10 to 12 minutes, or until the edges are golden but the centers still look soft. This balance gives you a slightly chewy and tender cookie rather than a crispy crunch.
Step 8: Cooling
Allow the cookies to cool on the baking sheets for a few minutes before transferring them to a wire rack. This helps them firm up perfectly without losing their softness.
How to Serve Valentine’s Day Cookies Recipe
Garnishes
These cookies shine on their own, but for an extra festive touch, consider sprinkling coarse sugar or tiny red and pink heart-shaped sprinkles on the top before baking. A light dusting of powdered sugar after cooling can also add a pretty, elegant finish that feels especially celebratory.
Side Dishes
Serve your Valentine’s Day cookies with a cold glass of milk or a cup of steaming hot cocoa to complement the chocolate’s richness. For an adult twist, pairing with coffee or a splash of flavored liqueur can create a delightful dessert experience.
Creative Ways to Present
Present these cookies in a charming gift box lined with parchment paper, tied with a ribbon in red or pink to up the Valentine’s Day vibes. You could also arrange them on a pretty plate shaped like a heart or alongside fresh strawberries to amplify the romantic mood.
Make Ahead and Storage
Storing Leftovers
Keep your leftover Valentine’s Day cookies in an airtight container at room temperature for up to 5 days. This will maintain their chewy texture and preserve the fresh-baked flavors so you can enjoy them a little later without any hassle.
Freezing
If you want to make these cookies ahead of time, the dough freezes wonderfully. Shape the dough into balls and freeze on a tray until solid, then transfer to a freezer bag. Bake directly from frozen, adding a couple of extra minutes to the cooking time. Finished cookies can also be frozen for up to 3 months.
Reheating
To bring your cookies back to that freshly-baked feeling, warm them in the microwave for about 10 seconds or pop them in a low temperature oven for 5 minutes. This revives the softness and makes the chocolate chips gooey all over again.
FAQs
Can I substitute the chocolate chips with something else?
Absolutely! Feel free to swap chocolate chips with white chocolate chunks, chopped nuts, or even dried fruit like cherries to create a unique twist on this Valentine’s Day Cookies Recipe.
Why do my cookies sometimes turn out flat?
Flat cookies usually result from too much butter or not enough flour, or butter that’s too melted. Using softened (not melted) butter and measuring your flour accurately helps keep the structure perfect and ensures they’re tender rather than flat.
Can I make these cookies gluten-free?
Yes, you can replace the all-purpose flour with a gluten-free blend. Just make sure the blend contains xanthan gum or another binder to mimic the elasticity of gluten, so your cookies keep their shape and texture.
How long should I bake if I prefer softer cookies?
For softer cookies, aim for the lower end of the baking time, around 10 minutes, and remove them as soon as the edges begin to turn golden while the centers still look slightly underbaked. They will finish cooking as they cool.
Is it okay to use salted butter instead of unsalted?
You can, but omit or reduce the extra salt (the 1/2 tsp) in the recipe to avoid making the cookies too salty. Unsalted butter offers more control over the salt levels, but salted butter still works fine in a pinch.
Final Thoughts
There’s something incredibly satisfying about making homemade Valentine’s Day cookies, and this recipe truly delivers that cozy, heartwarming feeling with every bite. Baking these cookies offers a fun, rewarding experience that helps you create sweetness both in the kitchen and in your connections. So go ahead, try this Valentine’s Day Cookies Recipe, and enjoy sharing the love baked right in!
Print
Valentine’s Day Cookies Recipe
- Prep Time: 15 minutes
- Cook Time: 12 minutes
- Total Time: 27 minutes
- Yield: 24 cookies
- Category: Dessert
- Method: Baking
- Cuisine: American
Description
These Valentine’s Day Cookies are a delightful treat featuring soft, buttery dough packed with semi-sweet chocolate chips. Perfectly baked to golden edges with tender centers, these cookies make an ideal gift or sweet snack to celebrate the season of love.
Ingredients
Dry Ingredients
- 2 1/4 cups all-purpose flour
- 1 tsp baking powder
- 1/2 tsp salt
Wet Ingredients
- 3/4 cup unsalted butter, softened
- 1 cup granulated sugar
- 1/2 cup brown sugar, packed
- 2 large eggs
- 2 tsp vanilla extract
Add-ins
- 1 cup semi-sweet chocolate chips
Instructions
- Preheat Oven: Preheat your oven to 350°F (175°C) and line two baking sheets with parchment paper to prevent sticking and ensure even baking.
- Mix Dry Ingredients: In a bowl, whisk together the all-purpose flour, baking powder, and salt to evenly distribute the leavening agent and salt throughout the flour mixture.
- Cream Butter and Sugars: In a large mixing bowl, cream the softened unsalted butter with granulated and brown sugars until the mixture is light and fluffy, which helps create a tender cookie texture.
- Add Eggs and Vanilla: Beat in the eggs one at a time to incorporate air and moisture, followed by the vanilla extract for flavor.
- Combine Wet and Dry Mixtures: Gradually add the dry flour mixture to the wet ingredients, mixing just until combined to avoid overworking the dough and developing gluten.
- Fold in Chocolate Chips: Gently fold in the semi-sweet chocolate chips evenly throughout the dough to ensure chocolate in every bite.
- Portion Cookies: Drop tablespoons of cookie dough onto the prepared baking sheets, spacing them about two inches apart to allow for spreading.
- Bake: Bake in the preheated oven for 10-12 minutes until the edges turn golden brown while the centers stay soft and chewy.
- Cool: Remove from oven and allow cookies to cool on the baking sheets for a few minutes before transferring them to a wire rack to cool completely and set.
Notes
- For softer cookies, slightly underbake by removing them at around 10 minutes.
- You can substitute semi-sweet chocolate chips with milk or dark chocolate chips based on preference.
- Ensure butter is softened, not melted, for optimal creaming and cookie texture.
- Store cooled cookies in an airtight container for up to 5 days to keep them fresh.
- For extra festive flair, add red or pink sprinkles before baking.


