
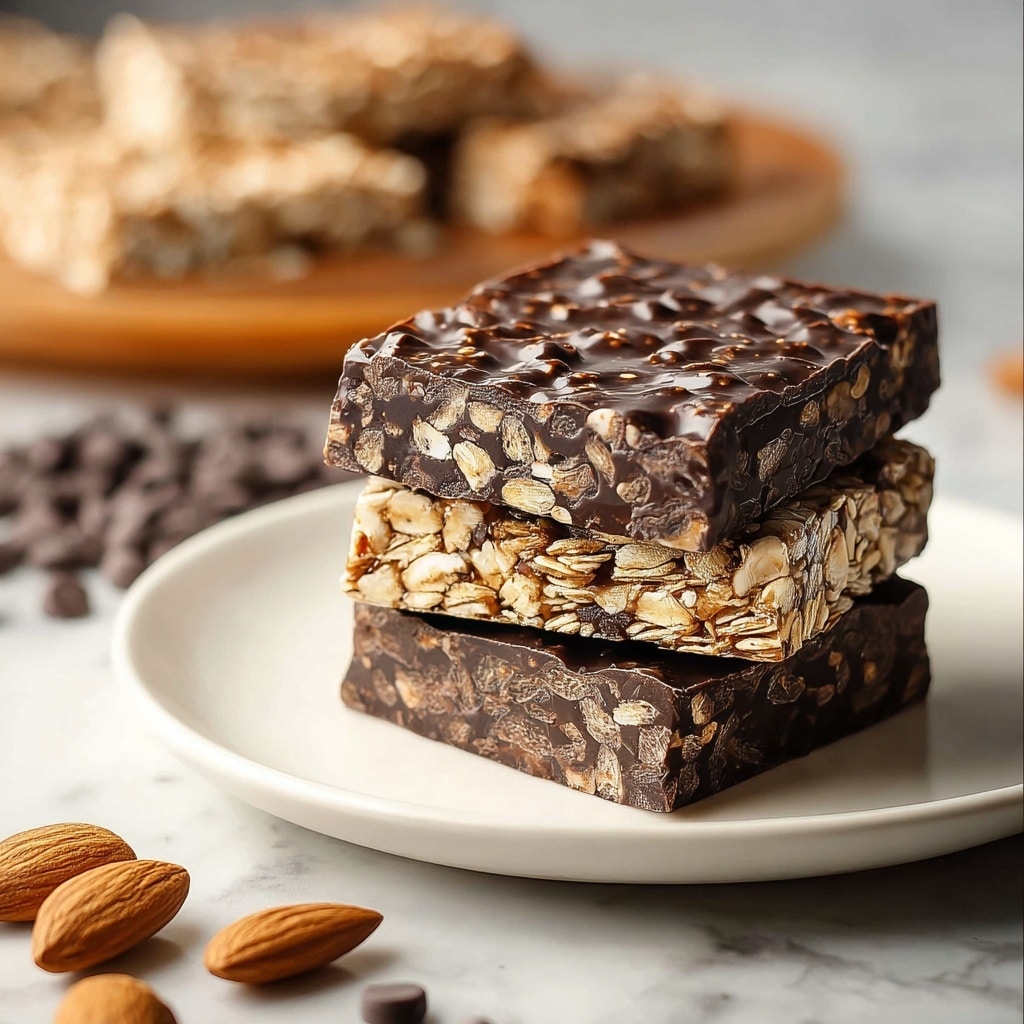
If you are looking for a delightfully simple treat that packs rich flavor, satisfying texture, and a delightful chocolate punch, these No-Bake Chocolate Oat Bars: An Amazing Ultimate Recipe are your new best friend in the kitchen. Perfect for those moments when you crave something sweet but don’t want to turn on the oven, these bars combine wholesome oats, creamy peanut butter, and the deepest chocolate for a snack that feels both indulgent and wholesome. Whether for a quick breakfast, a post-workout boost, or a mid-afternoon pick-me-up, these bars are as versatile as they are delicious.

Ingredients You’ll Need
Gathering just a handful of pantry staples, this recipe shows you that great flavor often starts with simple ingredients. Each one plays a key role, contributing texture, sweetness, and that unmistakable chocolate goodness.
- 2 cups rolled oats: The chewy base that adds hearty texture and fiber.
- 1 cup creamy peanut butter (or nut butter of choice): Creamy richness that binds everything together and adds healthy fats.
- ½ cup honey (or maple syrup for a vegan option): Natural sweetness that complements the cocoa and helps the bars set.
- ½ cup unsweetened cocoa powder: Provides intense chocolate flavor without extra sugar.
- ½ cup chocolate chips (semi-sweet or dark): Melts into pockets of gooey chocolate delight inside each bite.
- 1 teaspoon vanilla extract: Adds a warm aroma and rounds out the flavor profile.
- ¼ teaspoon salt: Balances sweetness and enhances the chocolate notes.
- Optional toppings (shredded coconut, crushed nuts, or extra chocolate chips): For added texture and a personal touch in presentation.
How to Make No-Bake Chocolate Oat Bars: An Amazing Ultimate Recipe
Step 1: Prepare the Dry Ingredients
Start by placing the rolled oats, unsweetened cocoa powder, and salt into a large mixing bowl. Gently whisk them together to ensure an even distribution of the cocoa powder so every bite sparkles with chocolate.
Step 2: Combine Wet Ingredients
In a separate microwave-safe bowl, warm the peanut butter and honey just until soft but not hot—about 20-30 seconds—then stir in the vanilla extract. This mixture will serve as the luscious glue holding your bars together.
Step 3: Mix Wet and Dry Together
Pour the warm peanut butter and honey mixture into the bowl with the oats and cocoa. Mix thoroughly, using a sturdy spoon or spatula, until every oat is coated and the mixture starts to come together as a thick, chocolatey dough.
Step 4: Add Chocolate Chips
Fold in half of the chocolate chips gently—this ensures some melt into the bars while others provide delightful little bursts of chocolate in the final texture.
Step 5: Press into Pan
Line an 8-inch square pan with parchment paper, then firmly press the mixture into the pan. The key here is to compact the bars well so they hold together once chilled, giving you that perfect chewy bite every time.
Step 6: Add Optional Toppings and Chill
Sprinkle any optional toppings like shredded coconut, crushed nuts, or extra chocolate chips evenly over the surface, pressing them lightly into the bars for adhesion. Refrigerate for at least two hours until firm.
Step 7: Slice and Enjoy
Once set, lift the bars out using the parchment paper edges, and slice into squares or rectangles. Enjoy your luscious No-Bake Chocolate Oat Bars: An Amazing Ultimate Recipe as a guilt-free snack!
How to Serve No-Bake Chocolate Oat Bars: An Amazing Ultimate Recipe
Garnishes
Enhance the presentation with a dusting of cocoa powder or a drizzle of melted nut butter. For a festive touch, add some colorful fresh berries or a sprinkle of sea salt to brighten the flavor complexity.
Side Dishes
Pair these bars with a tall glass of milk, a creamy latte, or a refreshing smoothie to make a satisfying combo that balances richness with hydration and freshness, perfect anytime of the day.
Creative Ways to Present
Arrange the bars on a decorative platter interspersed with nuts and dried fruits for a snack board, or individually wrap them in parchment and twine for delightful portable treats to share with friends and family.
Make Ahead and Storage
Storing Leftovers
Keep leftover bars in an airtight container in the refrigerator for up to a week. This helps maintain their chewy texture and prevents the chocolate from melting or the bars becoming overly sticky.
Freezing
For longer storage, wrap each bar individually and place them in a freezer-safe container or bag. They freeze beautifully for up to three months, making these bars an easy grab-and-go treat anytime.
Reheating
Because these are no-bake bars, reheating isn’t necessary, but if you prefer them a little softer, warm for 10-15 seconds in the microwave and enjoy a gooier texture that melts in your mouth.
FAQs
Can I use different nut butters in this recipe?
Absolutely! Almond butter, cashew butter, or even sunflower seed butter all work wonderfully and bring their own unique flavors to the No-Bake Chocolate Oat Bars: An Amazing Ultimate Recipe.
Are these bars gluten-free?
They can be, as long as you use certified gluten-free rolled oats. Regular oats are often processed in facilities that handle gluten, so double-check the packaging if you have a sensitivity.
How do I make these bars vegan?
Simply substitute the honey with maple syrup or agave nectar and ensure your chocolate chips are dairy-free. This keeps the recipe fully plant-based without sacrificing flavor.
Can I add protein powder to these bars?
Yes, adding a scoop of your favorite protein powder can boost nutrition. Mix it in with the dry ingredients, but be mindful of how it affects the texture—sometimes a bit more peanut butter or honey is needed to keep the bars from drying out.
What if the bars are too crumbly?
If your bars are not holding together well, try pressing the mixture more firmly into the pan or adding a little extra peanut butter or honey to increase stickiness before chilling.
Final Thoughts
I truly hope you give these No-Bake Chocolate Oat Bars: An Amazing Ultimate Recipe a try because they are an absolute game-changer for anyone who loves quick, tasty, and wholesome snacks. They’re super simple to make, amazingly delicious, and perfect for just about any occasion. Once you taste that perfect combination of chocolate and oats, you’ll keep coming back for more!
Print
No-Bake Chocolate Oat Bars: An Amazing Ultimate Recipe
- Prep Time: 10 minutes
- Cook Time: 0 minutes
- Total Time: 2 hours 10 minutes (including chilling time)
- Yield: 12 bars
- Category: Snack
- Method: No-Cook
- Cuisine: American
- Diet: Vegetarian
Description
These No-Bake Chocolate Oat Bars are a delicious, easy-to-make treat combining creamy peanut butter, rich cocoa, and wholesome oats. Perfect for a quick snack or dessert, they require no baking and come together in minutes with pantry staples. Enjoy a chewy, chocolatey bar that’s naturally sweetened with honey or maple syrup and customizable with your favorite toppings.
Ingredients
Main Ingredients
- 2 cups rolled oats
- 1 cup creamy peanut butter (or nut butter of choice)
- ½ cup honey (or maple syrup for a vegan option)
- ½ cup unsweetened cocoa powder
- ½ cup chocolate chips (semi-sweet or dark)
- 1 teaspoon vanilla extract
- ¼ teaspoon salt
Optional Toppings
- Shredded coconut
- Crushed nuts
- Extra chocolate chips
Instructions
- Mix Wet Ingredients: In a large mixing bowl, combine the creamy peanut butter, honey (or maple syrup), and vanilla extract. Stir well until the mixture is smooth and fully incorporated.
- Add Dry Ingredients: Add the rolled oats, unsweetened cocoa powder, salt, and chocolate chips to the wet mixture. Stir thoroughly until all ingredients are evenly combined into a thick, sticky batter.
- Prepare Pan and Transfer Mixture: Line an 8×8-inch baking pan with parchment paper or lightly grease it. Spread the oat mixture evenly into the pan, pressing down firmly to compact the mixture so the bars hold together.
- Optional Toppings: Sprinkle shredded coconut, crushed nuts, or extra chocolate chips on top and gently press them into the surface of the bars.
- Chill to Set: Place the pan in the refrigerator for at least 2 hours or until the bars are firm and set.
- Cut and Serve: Once set, remove from the refrigerator and lift the bars out of the pan using the parchment paper. Cut into squares or bars and enjoy immediately or store in an airtight container in the fridge.
Notes
- To keep these bars vegan, substitute honey with maple syrup.
- Use natural or crunchy peanut butter for added texture variations.
- Store bars in an airtight container in the refrigerator for up to one week.
- For a nut-free option, substitute the peanut butter with sunflower seed butter.
- You can customize the bars by adding dried fruit or seeds for additional nutrition and flavor.


