

If you have ever wanted to bake your own bread but felt overwhelmed by complicated techniques, then this Easy No Knead Bread Recipe is about to become your new best friend in the kitchen. With just a handful of simple ingredients and minimal effort, you can create a crusty, golden loaf boasting a chewy crumb that tastes like it came straight from a bakery. It’s perfect for anyone who loves fresh, homemade bread but doesn’t want to spend hours to get the perfect texture and flavor. Trust me, once you try this Easy No Knead Bread Recipe, you’ll wonder why you ever bought store-bought bread in the first place.

Ingredients You’ll Need
The magic of this Easy No Knead Bread Recipe is how straightforward the ingredient list is. Each component plays a key role—flour provides the structure, salt enhances the flavor, yeast is the workhorse that makes the bread rise, and warm water activates everything to bring your loaf to life.
- 3 cups All-purpose Flour: This forms the backbone of your bread and delivers the classic texture you love.
- 2 teaspoons Salt: A crucial ingredient to bring out the rich flavors and balance the yeast.
- 2 teaspoons Active Dry Yeast: The tiny powerhouse that ferments the dough to create a light and airy loaf.
- 1.5 cups Warm Water (between 100-110 degrees F): Just the right temperature to wake the yeast without killing it, ensuring a perfect rise.
How to Make Easy No Knead Bread Recipe
Step 1: Combine Dry Ingredients
Start by mixing flour, salt, and active dry yeast in a large bowl. This step distributes the yeast evenly throughout the flour and salt, setting the stage for a consistent rise. It’s amazing how three simple ingredients can come together to create such magic!
Step 2: Add Warm Water and Mix
Next, gently pour in the warm water, stirring until all the flour is absorbed. Using your hands here is a nice touch—it helps you connect with the dough and ensures everything gets fully incorporated. Stop as soon as the mixture forms a shaggy dough. There’s no need for heavy kneading; that’s the beauty of this Easy No Knead Bread Recipe.
Step 3: Let the Dough Rise
Cover your bowl with plastic wrap or a clean towel and place it somewhere warm. The dough will rest undisturbed for around two hours. During this time, the yeast works its magic, fermenting sugars and causing the dough to gently puff up and develop flavor.
Step 4: Preheat the Dutch Oven
About thirty minutes before your dough finishes rising, place the lid on your Dutch oven and put it inside your oven. Preheat the oven to 450 degrees F. This step is critical—the preheated Dutch oven mimics the environment of a traditional bread oven and helps develop that signature crispy crust.
Step 5: Shape the Dough
Turn your dough out onto a lightly floured surface. With gentle hands, shape it into a round loaf. Don’t stress over perfection; a rustic shape gives your bread character. Then lightly score the top with a sharp knife—this small cut lets steam escape during baking and prevents cracking in unwanted places.
Step 6: Transfer to Dutch Oven and Bake
Carefully lift your shaped dough on a piece of parchment paper and place it into the preheated Dutch oven. Cover with the lid and slide it back into the oven, letting it bake for 30 minutes. The enclosed space traps steam, helping the crust develop beautifully.
Step 7: Finish Baking Uncovered
After 30 minutes, remove the lid and continue baking the bread for another 15 minutes. This final stage allows the crust to brown deeply and turn perfectly crisp.
Step 8: Cool before Slicing
Remove the bread from the Dutch oven and let it cool completely on your countertop before slicing. This resting time lets the crumb set, ensuring each slice holds together without becoming gummy.
How to Serve Easy No Knead Bread Recipe
Garnishes
While this bread shines on its own, a little added flair can take it up a notch. Consider brushing the crust with olive oil and sprinkling flaky sea salt just after baking, or topping it with fresh herbs like rosemary for a fragrant touch. Seeds such as sesame or poppy can also add delightful texture when sprinkled on top before baking.
Side Dishes
This Easy No Knead Bread Recipe pairs wonderfully with so many dishes. Serve warm slices alongside a creamy bowl of tomato soup, use it to sop up rich stews, or accompany a fresh salad for a balanced meal. It’s the kind of bread that complements both hearty and light dishes effortlessly.
Creative Ways to Present
Want to impress guests? Turn your loaf into a delicious bruschetta by topping toasted slices with diced tomatoes, garlic, and basil. Or hollow out the center and create a warm dip bowl with spinach artichoke filling. The possibilities are endless when you have this versatile Easy No Knead Bread Recipe as your base.
Make Ahead and Storage
Storing Leftovers
If you don’t finish the bread in one sitting, wrap it in a clean kitchen towel or place it in a paper bag to keep the crust crisp for up to two days. Storing bread in plastic can trap moisture and make the crust soggy, and nobody wants that!
Freezing
To enjoy this bread later, slice it first, then wrap the slices tightly in plastic wrap followed by aluminum foil. Frozen bread stays fresh for about three months and can be toasted directly from the freezer for quick breakfasts or snacks.
Reheating
To revive the crisp crust and warm crumb, place leftovers in a preheated oven at 350 degrees F for 10 minutes. If reheating frozen bread, simply toast slices until golden. This brings back all that freshly baked goodness in just minutes.
FAQs
Do I really not have to knead the dough?
That’s right! This Easy No Knead Bread Recipe uses time instead of kneading to develop texture. The long rise allows gluten to form naturally, giving you that perfect loaf with minimal effort.
Can I use whole wheat flour instead of all-purpose?
You can substitute some or all of the all-purpose flour with whole wheat, but expect a denser loaf and potentially longer rising times. Try mixing half whole wheat and half all-purpose for a balanced result.
What if I don’t have a Dutch oven?
A heavy oven-safe pot with a lid works well too. Alternatively, you can bake the dough on a baking stone or sheet and add a pan of boiling water to the oven to create steam, though results may vary slightly.
Why is my bread dense instead of light and airy?
Dense bread usually means the dough didn’t have enough time to rise or the yeast was inactive. Make sure your water temperatures are correct and give the dough the full rising time in a warm spot.
Can I add flavors like garlic or herbs to this bread?
Absolutely! Stir finely chopped herbs or minced garlic into the dry ingredients for an herbed loaf. Just be careful not to add too much extra moisture which can alter the dough consistency.
Final Thoughts
Baking bread from scratch may sound intimidating, but this Easy No Knead Bread Recipe shows you just how accessible and rewarding it can be. With just a few simple ingredients and beginner-friendly steps, you’ll love the warm aroma and satisfying crunch of homemade bread anytime you want. Give it a try today—your kitchen and taste buds will thank you!
Print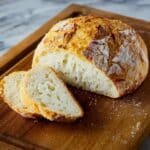
Easy No Knead Bread Recipe
- Prep Time: 10 minutes
- Cook Time: 45 minutes
- Total Time: 2 hours 55 minutes
- Yield: 12 servings (slices)
- Category: Bread
- Method: Baking
- Cuisine: American
Description
This Easy No Knead Bread recipe delivers a simple yet delicious homemade loaf that requires minimal effort. With just a few basic ingredients and no kneading, the dough is mixed, left to rise, and baked in a Dutch oven to create a crusty, golden-brown bread with a soft interior. Perfect for beginners and bread lovers alike, this method combines convenience with classic bread flavors.
Ingredients
Dry Ingredients
- 3 cups all-purpose flour
- 2 teaspoons salt
- 2 teaspoons active dry yeast
Wet Ingredients
- 1.5 cups warm water (between 100–110 degrees F)
Instructions
- Combine dry ingredients: In a large bowl, mix together the flour, salt, and active dry yeast until evenly distributed.
- Add warm water: Heat water to about 100-110 degrees Fahrenheit and pour into the flour mixture. Stir until all the flour is incorporated, using your hands gently to bring the dough together without kneading.
- Let dough rise: Cover the bowl with plastic wrap or a clean towel and place it in a warm spot for 2 hours to allow the dough to rise and ferment.
- Preheat oven and Dutch oven: Thirty minutes before the dough finishes rising, place the lid on your Dutch oven and put it in the oven. Preheat the oven to 450 degrees Fahrenheit to ensure it’s hot when ready for baking.
- Shape the dough: Once risen, lightly flour a surface and transfer the dough onto it. Gently shape it into a round loaf and score the top with a sharp knife to allow steam to escape.
- Prepare for baking: Place the shaped dough onto a large piece of parchment paper for easy transfer.
- Bake covered: Carefully remove the hot Dutch oven from the oven, lift the dough with parchment paper into it, cover with the lid, and bake for 30 minutes. This traps steam for a beautiful crust.
- Bake uncovered: After 30 minutes, remove the lid and continue baking for an additional 15 minutes to brown the crust.
- Cool before slicing: Remove the bread from the Dutch oven and place on the counter to cool completely before slicing to ensure the best texture.
Notes
- Use warm water to activate the yeast properly; water that’s too hot can kill the yeast.
- Do not knead the dough; mixing is sufficient for gluten development in this recipe.
- Preheating the Dutch oven is crucial for creating steam and a crispy crust.
- You can store leftover bread wrapped in a cloth at room temperature for up to 2 days.
- For variations, try adding herbs or garlic to the dough before rising.


