
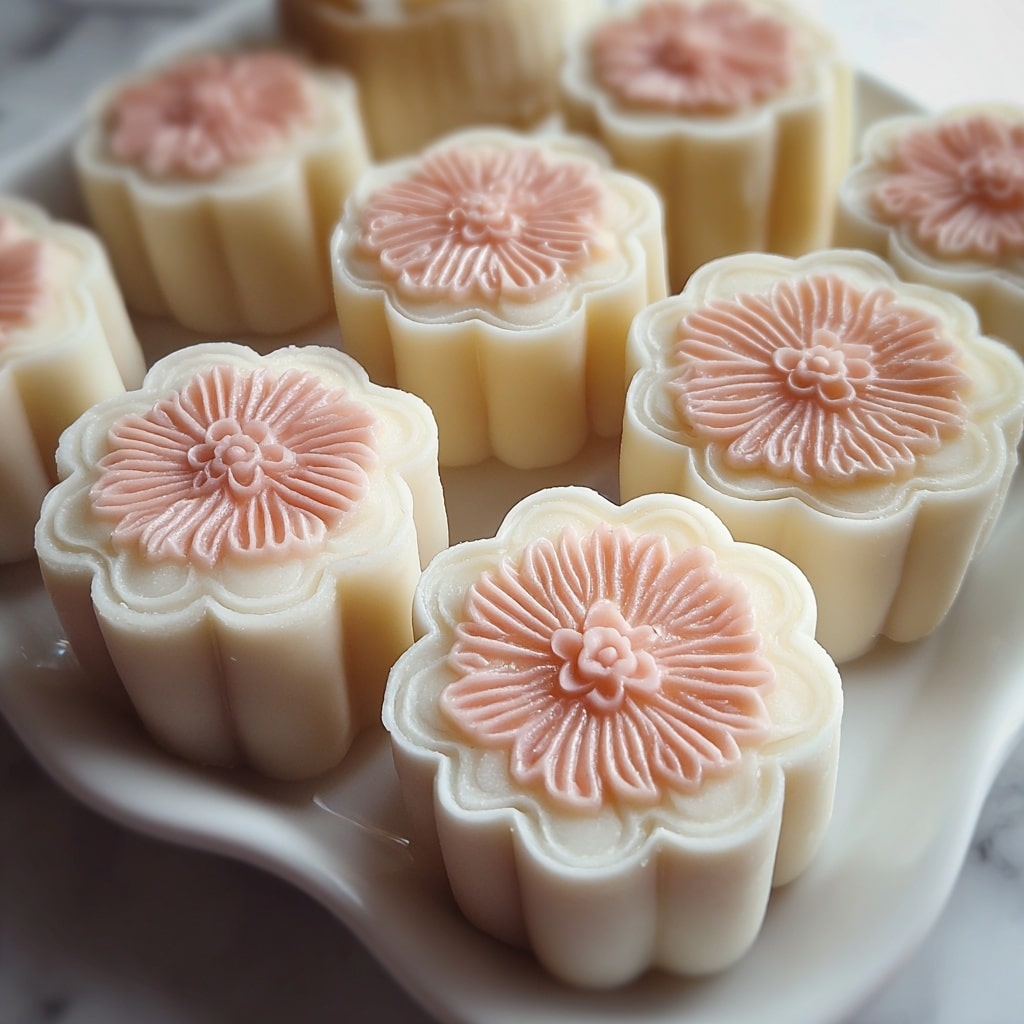
If you have ever wanted to try a delightful twist on traditional mooncakes, this Snow Skin Mooncakes Recipe is exactly what you need. These chilled mooncakes have a soft, chewy exterior made from glutinous rice flour that gives them a mochi-like texture, making them utterly irresistible. Filled with your choice of luscious lotus seed paste, red bean paste, or creamy custard, they are perfect for celebrating the Mid-Autumn Festival or simply indulging in a unique dessert experience. The Snow Skin Mooncakes Recipe balances sweetness and softness beautifully, delivering a treat that’s light, refreshing, and bursting with flavor.

Ingredients You’ll Need
Creating these heavenly mooncakes requires simple yet essential ingredients that bring together the perfect balance of taste, texture, and that signature pale, snowy appearance.
- Glutinous rice flour: This gives the mooncake skin its iconic chewy, soft, and slightly stretchy texture.
- Rice flour: Adds structure and delicate balance to the dough, making it tender but not too sticky.
- Wheat starch or cornstarch: Essential for that smooth, elastic snow skin and also keeps the dough from being too gummy.
- Powdered sugar: Provides sweetness and dissolves quickly into the dough for an even taste.
- Milk or coconut milk: Gives moisture with a rich, creamy flavor that complements the skin perfectly.
- Sweetened condensed milk: Adds a subtle caramel sweetness that enhances the dough’s flavor and softness.
- Neutral oil (canola or vegetable): Ensures the dough remains pliable and smooth without overpowering flavors.
- Filling (lotus seed paste, red bean paste, or custard paste): The heart of the mooncake, flavorful and smooth, creating a delightful contrast with the soft skin.
- Chopped nuts or dried fruit (optional): Adds texture and surprise bites inside the filling.
- Cooked glutinous rice flour (for dusting): Prevents sticking while shaping and pressing the mooncakes.
How to Make Snow Skin Mooncakes Recipe
Step 1: Prepare the Snow Skin Dough
Start by sifting all the dry ingredients, which includes glutinous rice flour, rice flour, wheat starch, and powdered sugar, into a large mixing bowl to ensure no lumps. In a separate bowl, combine the milk, sweetened condensed milk, and neutral oil, mixing them thoroughly. Gradually pour the wet mixture into the dry ingredients, whisking constantly until you achieve a smooth batter free of lumps. Strain the batter through a fine sieve into a heatproof dish to keep it silky and prevent any lumps from steaming. Steam this mixture over medium heat for about 25 to 30 minutes until the dough is firm and cooked through. Allow it to cool slightly before dusting your hands with oil or gloves and kneading the dough until it feels smooth and elastic. Finally, wrap the dough tightly and chill it for 30 minutes to rest and soften further.
Step 2: Prepare Filling and Portioning
While the dough chills, portion your chosen filling into equal portions, around 25 grams each works wonderfully for mini mooncakes. You can customize your filling by mixing in delightful chopped nuts or dried fruit for an added fun texture. Likewise, divide your rested dough into portions of about 20 grams each that correspond to the filling size, ensuring a perfect wrapper-to-filling ratio for every mooncake.
Step 3: Assemble Your Mooncakes
Take a dough portion and gently flatten it into a disc shape, wide enough to fully encase the filling. Place the filling in the center and carefully wrap the dough around it, sealing all edges tightly so nothing leaks during the next step. Lightly dust your mooncake mold with cooked glutinous rice flour to prevent sticking, then place your filled dough into the mold and press to create the delicate patterns characteristic of mooncakes. Gently unmold and place the shaped snow skin mooncakes onto a tray. Repeat until all the dough and filling are used.
Step 4: Chill Before Serving
Once shaped, transfer the mooncakes to the refrigerator to chill for at least one hour. This chilling step enhances the tender, chewy texture and allows the flavors to meld perfectly. Enjoy these mooncakes best when served cold, making every bite a refreshing treat.
How to Serve Snow Skin Mooncakes Recipe

Garnishes
While Snow Skin Mooncakes are beautiful on their own, consider sprinkling a bit of edible gold dust or placing a tiny edible flower on top for an elegant touch. A light dusting of matcha powder or a few sesame seeds can also add a lovely hint of flavor and contrast to the otherwise soft, smooth surface.
Side Dishes
Pair your mooncakes with a fragrant cup of jasmine or oolong tea to complement the sweetness without overwhelming the palate. Fresh fruit slices like juicy oranges or crisp apples also make a refreshing side, balancing each bite with subtle acidity and crunch.
Creative Ways to Present
Try arranging the mooncakes on a bamboo leaf-lined platter for an authentic and rustic feel. Alternatively, present them in pretty boxes or on individual plates with a small dessert fork for a formal occasion. You can even place smaller mooncakes inside hollowed-out persimmons or mini melon bowls to impress your guests with a stunning presentation.
Make Ahead and Storage
Storing Leftovers
If you have any leftover Snow Skin Mooncakes, place them in an airtight container and store them in the refrigerator. They maintain their softness and charm for up to 2 to 3 days, making them perfect for enjoying a little later or sharing with friends and family.
Freezing
For longer storage, freezing is the way to go. Wrap each mooncake individually in plastic wrap and store them in an airtight freezer-safe container. Snow Skin Mooncakes will keep well for up to one month in the freezer without losing their texture or flavor.
Reheating
Unlike traditional baked mooncakes, these chilled versions are best served cold. If you prefer a slightly softer texture after refrigeration or freezing, allow the mooncakes to thaw in the refrigerator for several hours or overnight. Avoid microwaving as it can alter the delicate texture of the snow skin dough.
FAQs
What is snow skin mooncake?
Snow skin mooncake is a type of mooncake with a soft, chewy, and slightly stretchy outer layer made from glutinous rice flour, unlike the traditional baked mooncakes with a thick pastry crust. It is typically served chilled, especially enjoyed during the Mid-Autumn Festival for its refreshing texture.
Can I use coconut milk instead of regular milk in the Snow Skin Mooncakes Recipe?
Absolutely! Using coconut milk will add a richer aroma and a hint of tropical flavor, which pairs beautifully with sweet fillings and enhances the overall texture of the snow skin.
Do I need special molds for making snow skin mooncakes?
Mooncake molds are highly recommended because they give your snow skin mooncakes the traditional, pretty patterns and shapes. However, if you don’t have a mold, you can shape them by hand into round or square bites, though the details won’t be as intricate.
How long can I store snow skin mooncakes in the fridge?
Snow skin mooncakes stay fresh and soft in an airtight container in the refrigerator for about 2 to 3 days. Beyond that, the texture may start to harden or dry out slightly.
Is Snow Skin Mooncakes Recipe gluten-free?
If you use cornstarch instead of wheat starch, this Snow Skin Mooncakes Recipe can be gluten-free since glutinous rice flour does not contain gluten. This makes it a fantastic dessert option for those with gluten sensitivities.
Final Thoughts
There’s something truly special about making and sharing Snow Skin Mooncakes Recipe with the people you love. Their delicate texture, refreshing chill, and luscious filling create a dessert that’s as beautiful as it is delicious. Whether you’re celebrating the Mid-Autumn Festival or simply craving a sweet treat, I promise this recipe will quickly become a favorite in your kitchen. So, roll up your sleeves and dive into the joyful process of crafting these snowy delights—you won’t regret it!
Print
Snow Skin Mooncakes Recipe
- Prep Time: 30 minutes
- Cook Time: 30 minutes
- Total Time: 1 hour plus chilling time
- Yield: 10 mini mooncakes
- Category: Dessert
- Method: Steaming
- Cuisine: Chinese
- Diet: Vegetarian, Gluten Free (if using cornstarch)
Description
Snow Skin Mooncakes are a delightful no-bake Chinese dessert featuring a soft, chewy glutinous rice flour dough wrapped around sweet fillings like lotus seed paste, red bean paste, or custard. Steamed to perfection and served chilled, these mini mooncakes offer a modern twist on a traditional Mid-Autumn Festival treat, with a tender, mochi-like texture and subtly sweet flavor.
Ingredients
For the Dough (Snow Skin):
- 1/2 cup glutinous rice flour
- 1/2 cup rice flour
- 1/4 cup wheat starch or cornstarch
- 1/4 cup powdered sugar
- 1 cup milk (or coconut milk)
- 2 tablespoons sweetened condensed milk
- 2 tablespoons neutral oil (such as canola or vegetable oil)
For the Filling:
- 1 1/2 cups lotus seed paste, red bean paste, or custard paste (store-bought or homemade)
- Optional: 1/4 cup chopped nuts or dried fruit
For Dusting:
- Cooked glutinous rice flour (to prevent sticking)
Instructions
- Prepare Dry Ingredients: In a large bowl, sift together the glutinous rice flour, rice flour, wheat starch, and powdered sugar to ensure a smooth, lump-free dry mixture.
- Mix Wet Ingredients: In a separate bowl, combine the milk, sweetened condensed milk, and neutral oil, mixing thoroughly to blend.
- Combine and Whisk Batter: Gradually pour the wet mixture into the dry ingredients, whisking continuously until the batter is smooth and free of lumps.
- Sieve and Steam: Pour the batter through a fine sieve into a heat-safe dish. Steam the dough over medium heat for 25 to 30 minutes until it is cooked through and firm to the touch.
- Cool and Knead Dough: Let the dough cool slightly, then knead it using gloved or oiled hands until it becomes smooth and elastic. Wrap the dough in plastic wrap and chill in the refrigerator for 30 minutes to firm up.
- Portion Dough and Filling: Divide both the dough and filling into equal portions; for mini mooncakes, use approximately 20g of dough and 25g of filling each.
- Shape Mooncakes: Flatten a piece of dough into a disc, place the filling in the center, and wrap the dough tightly around the filling, sealing the edges completely.
- Dust and Mold: Lightly dust the formed mooncakes with cooked glutinous rice flour to prevent sticking, then press each into a mooncake mold. Gently release to imprint the pattern and shape.
- Chill Before Serving: Chill the molded mooncakes in the refrigerator for at least 1 hour before serving to allow the texture to set and flavors to meld.
Notes
- Cooked glutinous rice flour can be made by dry-toasting it in a pan over low heat for 5 minutes to prevent sticking.
- Snow skin mooncakes are best enjoyed chilled and should be eaten within 2–3 days for optimal freshness.
- Store mooncakes in an airtight container in the refrigerator to maintain their texture and flavor.


