

If you’re craving a dessert that’s rich, velvety, and utterly divine yet quick and fuss-free, you’re going to love this No-Bake Chocolate Mousse Bars Recipe. Imagine a crisp, chocolatey crust beneath a cloud-like mousse, topped with a smooth chocolate ganache—each bite is an elegant dance of textures and chocolate flavors. It’s the perfect treat to whip up when you want something decadent without turning on the oven or spending hours in the kitchen. Trust me, once you try this, it will become your go-to dessert for any occasion.

Ingredients You’ll Need
These ingredients are simple but essential, each bringing its own magic to the table. From the buttery cookie crumb crust to the luscious mousse and silky chocolate topping, every component works together to create a delightful balance of taste and texture.
- 2 cups chocolate cookie crumbs: Provides a crunchy, chocolaty base that holds everything together.
- ½ cup melted butter: Binds the cookie crumbs into a firm, buttery crust.
- 1 ½ cups heavy cream: Whipped to fluffy perfection, this makes the mousse light and airy.
- 1 cup semisweet chocolate chips, melted: Adds rich chocolate flavor and smoothness to the mousse layer.
- ¼ cup powdered sugar: Sweetens the mousse evenly without graininess.
- 1 teaspoon vanilla extract: Enhances the chocolate’s depth with warm, comforting notes.
- ¾ cup semisweet chocolate chips: Used in the chocolate layer for a melt-in-your-mouth finish.
- ½ cup heavy cream: Warmed and combined with chips to create the silky top layer.
- ½ cup whipped cream: Optional garnish to add extra creaminess and elegance.
- Chocolate shavings or cocoa powder (optional): For an eye-catching, flavorful finishing touch.
How to Make No-Bake Chocolate Mousse Bars Recipe
Step 1: Prepare the Crust
Start by mixing the chocolate cookie crumbs with the melted butter in a large bowl. This combination forms the base of your bars, so make sure the crumbs are thoroughly coated with butter for a sturdy, flavorful crust.
Step 2: Press and Chill
Firmly press the crumb mixture into the bottom of an 8×8-inch dish. The pressure you apply here is key to creating that satisfying crunch. Once pressed, place the dish in the refrigerator to chill while you prepare the mousse filling.
Step 3: Make the Mousse Filling
Beat the heavy cream, melted chocolate chips, powdered sugar, and vanilla extract together until fluffy and light. This mousse layer is what gives these bars their signature airy texture, balancing the denser crust beautifully.
Step 4: Spread the Mousse
Evenly spread the luscious mousse over the chilled crust, smoothing it out with a spatula. Pop the dish back into the fridge to set while you work on the chocolate layer.
Step 5: Create the Chocolate Layer
Heat the half cup of heavy cream until it’s warm—but not boiling—then pour it over the ¾ cup of semisweet chocolate chips. Let it sit for a minute before stirring until silky and smooth. This glossy chocolate layer adds a rich, indulgent finish.
Step 6: Add the Chocolate Layer
Carefully spread the warm chocolate ganache over the mousse layer, making sure it covers every corner. Smooth it out gently, then refrigerate the entire dish for at least 4 hours or until fully set and firm.
Step 7: Garnish and Slice
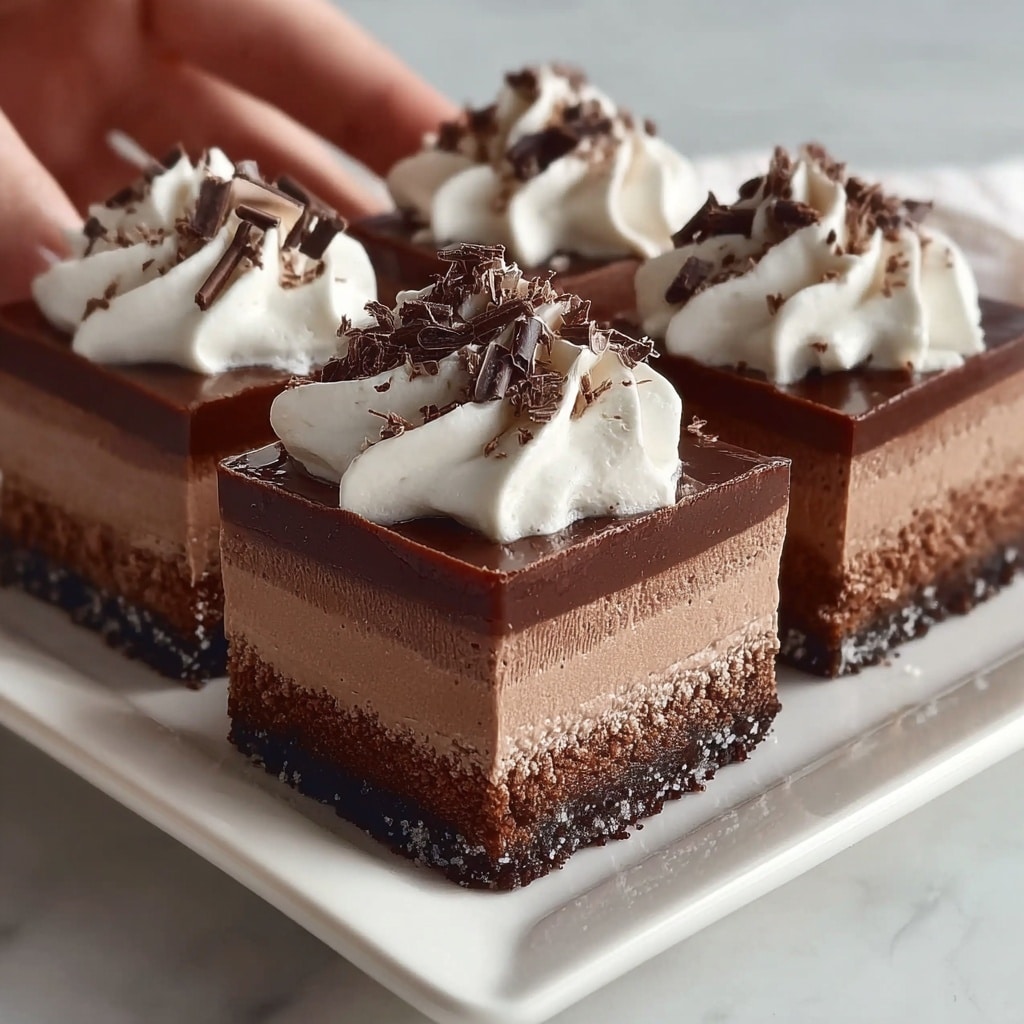
Once set, top the bars with whipped cream and sprinkle chocolate shavings or a dusting of cocoa powder if you like. Slice into 12 beautiful bars and get ready to enjoy your masterpiece!
How to Serve No-Bake Chocolate Mousse Bars Recipe
Garnishes
Adding a dollop of whipped cream and some chocolate shavings on top instantly elevates these bars, lending them a café-style flair. Fresh berries or a sprinkle of crushed nuts can also bring delightful color and crunch.
Side Dishes
Serve your No-Bake Chocolate Mousse Bars alongside a scoop of vanilla ice cream or a drizzle of raspberry coulis for a complementary flavor twist that brightens up the deep chocolate notes.
Creative Ways to Present
Try layering the mousse bars in individual glass cups for a pretty parfait appearance or cut them into bite-sized squares for easy, shareable treats at parties. Wrapping each piece with a decorative ribbon also makes for charming homemade gifts.
Make Ahead and Storage
Storing Leftovers
Keep leftover bars refrigerated in an airtight container to maintain their texture and freshness. They’ll stay delicious for up to 4 days, making them a perfect make-ahead dessert.
Freezing
You can freeze these bars wrapped tightly in plastic wrap and stored in a freezer-safe container for up to 2 months. Just thaw them overnight in the fridge before serving to preserve their creamy consistency.
Reheating
Since these bars are best enjoyed cold, avoid reheating. If you want a slightly softer texture, let them sit out at room temperature for about 10-15 minutes before digging in.
FAQs
Can I use a different type of cookie for the crust?
Absolutely! While chocolate cookie crumbs create a rich base, you can swap in graham crackers or digestive biscuits for a milder crust. Just adjust the amount of butter slightly to get the right firmness.
Is it possible to make this recipe dairy-free?
Yes, by using dairy-free options like coconut cream instead of heavy cream and a vegan butter substitute, you can create a delicious dairy-free version of these bars without sacrificing flavor or texture.
How long do these mousse bars need to chill?
A minimum of 4 hours in the fridge is recommended to allow the layers to set properly. For the best slicing experience, overnight chilling is even better.
Can I add flavors to the mousse?
Definitely! Adding a touch of espresso powder or a splash of liqueur like Baileys or Grand Marnier into the mousse mix will give these bars an exciting flavor boost.
What is the best way to cut the bars cleanly?
Use a sharp knife warmed in hot water and wiped dry before slicing. This prevents the layers from smudging and helps you get clean, beautiful bars every time.
Final Thoughts
I can’t recommend this No-Bake Chocolate Mousse Bars Recipe enough if you want a show-stopping dessert that’s surprisingly simple to make. Each spoonful is a little bite of heaven that’s sure to impress your family and friends. So grab your ingredients, and treat yourself—you deserve it!
Print
No-Bake Chocolate Mousse Bars Recipe
- Prep Time: 15 minutes
- Cook Time: 0 minutes
- Total Time: 4 hours 15 minutes
- Yield: 12 bars
- Category: Dessert
- Method: No-Cook
- Cuisine: American
Description
These No-Bake Chocolate Mousse Bars combine a crisp chocolate cookie crust with a rich, airy chocolate mousse and a smooth chocolate ganache topping. Perfect for chocolate lovers, these delicious bars require no baking and come together quickly, making them an ideal dessert for any occasion.
Ingredients
Crust
- 2 cups chocolate cookie crumbs
- ½ cup melted butter
Mousse Filling
- 1 ½ cups heavy cream
- 1 cup semisweet chocolate chips, melted
- ¼ cup powdered sugar
- 1 teaspoon vanilla extract
Chocolate Layer
- ¾ cup semisweet chocolate chips
- ½ cup heavy cream
Garnish
- ½ cup whipped cream
- Chocolate shavings or cocoa powder (optional)
Instructions
- Prepare the Crust: In a bowl, thoroughly mix the chocolate cookie crumbs with the melted butter to combine evenly, creating a crumbly mixture.
- Press into Pan: Firmly press the crumb mixture into the bottom of an 8×8-inch baking dish, ensuring an even and compact base.
- Chill the Crust: Place the crust in the refrigerator to set while preparing the mousse filling.
- Make the Mousse: Using a mixer, beat the heavy cream, melted semisweet chocolate chips, powdered sugar, and vanilla extract together until the mixture becomes light, fluffy, and smooth.
- Spread Mousse: Evenly spread the prepared chocolate mousse over the chilled cookie crust, creating a smooth layer.
- Refrigerate the Mousse: Place the dish back in the refrigerator to chill while preparing the chocolate ganache layer.
- Prepare Chocolate Layer: Gently heat the heavy cream until warm but not boiling.
- Make Ganache: Pour the warm cream over the semisweet chocolate chips and let it sit for one minute. Stir gently until the mixture becomes smooth and glossy.
- Spread Ganache: Pour and spread the melted chocolate ganache evenly over the mousse layer.
- Chill Completely: Refrigerate the assembled bars for at least 4 hours or until the layers are fully set.
- Garnish and Serve: Before serving, top the bars with whipped cream and optionally garnish with chocolate shavings or a dusting of cocoa powder.
- Slice and Enjoy: Slice the bars into 12 equal pieces and enjoy this rich, no-bake chocolate dessert.
Notes
- Ensure the heavy cream for the ganache is warm but not boiling to prevent seizing of chocolate.
- Use a fine chocolate cookie crumb for the crust for best texture.
- Chilling time is key for setting the layers properly; do not skip refrigeration.
- For a dairy-free version, substitute with coconut cream and dairy-free chocolate chips.
- Store leftovers covered in the refrigerator for up to 3 days.


