

There is something truly magical about the union of chocolate and peanut butter, and if you’re a fan of this classic combo, you are going to fall head over heels for this Chocolate Peanut Butter Dream Bars Recipe. These bars bring together the perfect crunch of a graham cracker crust, the luscious creaminess of a rich peanut butter layer, and a smooth, glossy chocolate topping that sets into a dreamy finish. Every bite is a heavenly blend of textures and flavors that feels like an indulgent treat yet is surprisingly easy to make. Trust me, once you try these bars, they’ll become your go-to dessert for any occasion.

Ingredients You’ll Need
Don’t let the simplicity of these ingredients fool you — each one plays a vital role in creating the perfect balance in these bars. From the buttery graham cracker base to the creamy peanut butter filling and the silky chocolate topping, every element brings its own unique flavor and texture to the table.
- 1 1/2 cups graham cracker crumbs: Provides a crunchy and slightly sweet foundation for the crust.
- 1/4 cup granulated sugar: Adds just the right amount of sweetness to the crust without overpowering the peanut butter.
- 1/2 cup unsalted butter, melted: Binds the graham crackers together and creates a rich, buttery crust.
- 1 cup creamy peanut butter: The star of the filling, delivering that classic peanut butter flavor with smooth texture.
- 1/2 cup unsalted butter, softened: Contributes creaminess and richness to the peanut butter layer.
- 2 cups powdered sugar: Sweetens and stabilizes the peanut butter mixture for perfect consistency.
- 1 tsp vanilla extract: Enhances flavor depth and adds a subtle warmth to the filling.
- 1 1/2 cups semi-sweet chocolate chips: Melts into a silky, glossy chocolate layer that finishes off the bars beautifully.
- 1/4 cup unsalted butter: Combined with chocolate chips to ensure a smooth, shiny chocolate topping.
How to Make Chocolate Peanut Butter Dream Bars Recipe
Step 1: Prepare the Crust
Start by mixing the graham cracker crumbs with the granulated sugar in a medium bowl. The braille of graham crumbs combined with just a touch of sugar creates a crunchy base that will balance out the creamy peanut butter layer perfectly.
Step 2: Add the Melted Butter
Pour in the melted butter and stir until the mixture looks like damp sand—this helps the crust hold together once pressed into the pan, adding a satisfying buttery richness.
Step 3: Form the Crust
Press the crumb mixture evenly into the bottom of a 9×9-inch square pan for a thinner bar or an 8×8-inch pan if you prefer thicker bars. Firm pressure here ensures the crust will stay intact when you slice the finished product.
Step 4: Chill the Crust
Place the crust in the refrigerator while you prepare the filling. This chilling step helps the crust set and ensures it won’t crumble when adding the layers on top.
Step 5: Make the Peanut Butter Layer
Using a large bowl, beat together the creamy peanut butter, softened butter, powdered sugar, and vanilla extract until smooth and velvety. This luscious filling is what makes these bars an unforgettable peanut butter dream come true.
Step 6: Spread the Peanut Butter Mixture
Evenly spread the peanut butter mixture over the chilled crust, smoothing it out with a spatula so that every bite will have that creamy, dreamy texture.
Step 7: Prepare the Chocolate Layer
In a microwave-safe bowl, melt the semi-sweet chocolate chips together with the butter in short 30-second bursts, stirring after each interval until everything is silky smooth. This chocolate layer will perfectly cap the peanut butter, bringing the bar’s flavors into harmony.
Step 8: Pour Chocolate Over Peanut Butter
Pour the melted chocolate over the peanut butter layer, spreading it evenly with a spatula. The chocolate should coat the surface in a glossy, delicious blanket that will harden as it chills.
Step 9: Chill Until Set
Refrigerate the bars for at least two hours to allow the chocolate to set and the bars to firm up. This step is key because it locks in the layers so you can cut clean, beautiful squares.
Step 10: Serve and Enjoy
Once set, slice into squares and enjoy every bite of these decadent, yet simple bars. Perfect for sharing with friends or savoring as a sweet little escape any time of day.
How to Serve Chocolate Peanut Butter Dream Bars Recipe

Garnishes
While these bars are fantastic on their own, a sprinkle of flaky sea salt on top of the chocolate layer just before chilling can elevate the flavor by adding a touch of savory contrast. You can also dust lightly with cocoa powder or crushed peanuts for a fun texture boost.
Side Dishes
Pair these bars with a cold glass of milk or a scoop of vanilla ice cream to complement their richness. For adults, a cup of robust coffee or a nutty port wine works wonders as well.
Creative Ways to Present
Try layering these bars in a dessert parfait glass with whipped cream and chopped bananas or drizzle with caramel sauce for a fancy twist. Cutting the bars into bite-sized cubes and serving on a skewer with fresh berries can turn them into a party-friendly finger food, too.
Make Ahead and Storage
Storing Leftovers
Once cooled, store leftover bars in an airtight container in the refrigerator to keep the layers firm and fresh. They should stay delicious for up to a week, making them a fantastic make-ahead treat.
Freezing
If you want to keep these bars longer, wrap individual pieces tightly in plastic wrap and freeze them in a sealed container for up to three months. Thaw in the fridge overnight before serving for best texture.
Reheating
This dessert is best enjoyed chilled, so reheating is not recommended as it can melt the chocolate and soften the crust. If you prefer a slightly less firm bar, simply leave them out at room temperature for 10-15 minutes before indulging.
FAQs
Can I use crunchy peanut butter instead of creamy?
You absolutely can! Using crunchy peanut butter will add a delightful texture to the filling, enhancing the crunch factor in contrast to the smooth chocolate topping.
What if I want to make these bars gluten-free?
Swap the graham cracker crumbs for a gluten-free alternative or use finely crushed gluten-free cookies. Just make sure they have a similar texture for the crust to hold together well.
Is it necessary to refrigerate these bars?
Yes, refrigeration helps the chocolate harden and keeps the peanut butter layer firm. It also prevents the bars from becoming too soft and difficult to slice cleanly.
Can I substitute the semi-sweet chocolate chips with dark chocolate?
Definitely! Dark chocolate will add a deeper, richer flavor with a slight bitterness that balances the sweetness of the peanut butter layer beautifully.
How thick should I spread the peanut butter layer?
The peanut butter layer should be even and about the same thickness as the crust to create a balanced bite where neither layer overpowers the other.
Final Thoughts
If you’re searching for a dessert that’s easy to make, utterly indulgent, and guaranteed to impress, the Chocolate Peanut Butter Dream Bars Recipe is exactly what you need. It’s a perfect blend of simplicity and decadence, and it’s bound to become one of your all-time favorites. So gather your ingredients, roll up your sleeves, and prepare to fall in love with these dreamy bars—you won’t regret a single bite!
Print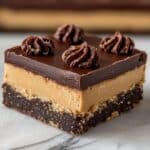
Chocolate Peanut Butter Dream Bars Recipe
- Prep Time: 15 minutes
- Cook Time: 0 minutes
- Total Time: 2 hours 15 minutes
- Yield: 16-20 bars
- Category: Dessert
- Method: No-Cook
- Cuisine: American
Description
Delight in these rich and indulgent Chocolate Peanut Butter Dream Bars featuring a crunchy graham cracker crust, a creamy peanut butter center, and a smooth chocolate topping. Perfectly balanced in sweetness and texture, these no-bake bars come together quickly and are ideal for satisfying any sweet tooth.
Ingredients
Crust
- 1 1/2 cups graham cracker crumbs
- 1/4 cup granulated sugar
- 1/2 cup unsalted butter, melted
Peanut Butter Layer
- 1 cup creamy peanut butter
- 1/2 cup unsalted butter, softened
- 2 cups powdered sugar
- 1 tsp vanilla extract
Chocolate Layer
- 1 1/2 cups semi-sweet chocolate chips
- 1/4 cup unsalted butter
Instructions
- Prepare the Crust: In a medium bowl, mix the graham cracker crumbs and granulated sugar thoroughly.
- Add Melted Butter: Stir in the melted butter until the mixture has the texture of wet sand and is evenly combined.
- Form the Crust: Press the crumb mixture firmly into the bottom of a 9×9-inch square baking pan (or an 8×8-inch pan for thicker bars) to create an even layer.
- Chill the Crust: Refrigerate the pan to set the crust while preparing the next layer.
- Make the Peanut Butter Layer: In a large bowl, beat the peanut butter, softened butter, powdered sugar, and vanilla extract together until the mixture is smooth and creamy.
- Spread Peanut Butter Layer: Evenly spread the peanut butter mixture over the chilled crust and smooth it out with a spatula.
- Melt Chocolate and Butter: In a microwave-safe bowl, melt the chocolate chips and butter in 30-second intervals, stirring in between until fully melted and smooth.
- Apply Chocolate Layer: Pour the melted chocolate over the peanut butter layer and spread evenly with a spatula.
- Chill Bars: Refrigerate the assembled bars for at least 2 hours, or until the chocolate topping is set and the bars are firm.
- Serve: Cut into squares and enjoy these delicious bars that are perfect for sharing or a sweet treat anytime.
Notes
- Use an 8×8-inch pan if you prefer thicker bars.
- Ensure the peanut butter and butter are softened to achieve a creamy texture.
- Keep bars refrigerated to maintain firmness, especially before serving.
- You can substitute semi-sweet chocolate chips with dark or milk chocolate based on preference.
- Store bars in an airtight container in the refrigerator for up to one week.


