

If you crave a dessert that brings cozy warmth, a touch of spice, and a natural sweetness all wrapped into one, this Sticky Pear Ginger Cake Recipe is going to become your new favorite. Packed with tender slices of ripe pear nestled beneath a moist, softly spiced ginger cake, every bite dances with comforting autumnal flavors. It’s not just a cake; it’s a hug in dessert form that celebrates the humble pear in such a charming, sticky, and indulgent way that you’ll want to share it with everyone you know.

Ingredients You’ll Need
This Sticky Pear Ginger Cake Recipe shines because of its simple, wholesome ingredients that come together to create a textured, flavorful masterpiece. Each component plays a vital role, from the natural sweetness of maple syrup to the zing of ground ginger that gives this cake its signature personality.
- 2 ripe pears, peeled, cored, and sliced: These provide juicy, tender pockets of natural sweetness that caramelize beautifully in the oven.
- 1/4 cup maple syrup or golden syrup: Adds sticky, rich sweetness that glazes the pears delightfully.
- 1/2 cup unsweetened applesauce: Keeps the cake moist and adds subtle apple flavor, reducing the need for added fat.
- 1/2 cup brown sugar (or coconut sugar): Brings depth and caramel notes to the cake’s crumb.
- 1/2 cup plant-based milk (such as almond or oat): A dairy-free choice that maintains creaminess and tenderness.
- 1/3 cup neutral oil (like sunflower or grapeseed): Ensures the cake stays moist but light without overpowering flavors.
- 1 tbsp ground ginger: The star spice lending warmth and a gentle spicy kick that complements the pears perfectly.
- 1 tsp ground cinnamon: Adds a classic spiced comfort note that blends seamlessly with ginger.
- 1/4 tsp ground cloves: A pinch goes a long way to deepen the spicy profile with subtle earthiness.
- 1/4 tsp salt: Balances sweetness and enhances all the layered flavors.
- 1 tsp vanilla extract: Softens the spices and rounds out the flavor beautifully.
- 1 1/2 cups all-purpose flour (can sub gluten-free blend): The structure for the cake, can be adapted to dietary needs without losing moistness.
- 1 tsp baking soda: Helps the cake rise light and fluffy while reacting with vinegar for a tender crumb.
- 1 tbsp apple cider vinegar: Activates baking soda and adds subtle tang to balance sweetness and spice.
How to Make Sticky Pear Ginger Cake Recipe
Step 1: Prepare Your Oven and Pan
Start by preheating your oven to 350°F (175°C). Lightly grease an 8-inch cake pan—round or square works just fine—and line the bottom with parchment paper. This simple prep ensures your beautiful sticky pear topping will release perfectly.
Step 2: Arrange the Pears and Syrup
Gently fan or layer the pear slices across the bottom of your prepared pan. The key here is to make sure the pears cover the entire base for that signature sticky top. Drizzle the maple or golden syrup evenly over the pears, so they’ll caramelize and become irresistible as the cake bakes.
Step 3: Mix the Wet Ingredients
In a large bowl, whisk together the applesauce, brown sugar, plant-based milk, oil, ground ginger, cinnamon, cloves, salt, and vanilla extract. Take your time to blend it until smooth—this is your spice-packed flavor base that will make your cake sing.
Step 4: Combine the Dry Ingredients
Sift in the flour and baking soda, then fold everything together gently just until combined. Overmixing can lead to a denser cake, so keep it light and airy. The little bits of spice and flour marrying the wet ingredients create the tenderness you want.
Step 5: Add the Apple Cider Vinegar
Just before pouring your batter into the pan, stir in the apple cider vinegar. This ingredient is magic—it reacts with the baking soda to help the cake rise softly and add a subtle depth of flavor.
Step 6: Bake to Golden Perfection
Pour the batter evenly over the pears in the pan. Bake for 35 to 40 minutes until a toothpick inserted into the center comes out clean. During baking, the pear slices will soften and meld with the sticky syrup, creating that luscious top layer.
Step 7: Cool and Flip
After baking, allow the cake to cool in the pan for about 10 minutes. Then carefully invert it onto a serving plate so that the sticky pear layer is gloriously displayed on top—this is the moment this cake truly shines visually and flavor-wise.
Step 8: Serve and Enjoy!
You can serve this cake warm for the ultimate comforting treat or at room temperature. Bonus points if you pair it with a dollop of vegan whipped cream for a creamy contrast that highlights all the spices beautifully.
How to Serve Sticky Pear Ginger Cake Recipe

Garnishes
A dusting of powdered sugar or a sprinkling of toasted chopped nuts like pecans or walnuts elevates the cake’s appearance and adds a pleasant crunch. For an elegant touch, a sprinkle of finely chopped fresh mint or a drizzle of extra maple syrup can brighten each slice wonderfully.
Side Dishes
This cake pairs beautifully with a scoop of vanilla or cinnamon dairy-free ice cream for a decadent dessert, or you can enjoy it alongside a cup of hot spiced chai or black tea. The warm spices in the cake echo the flavors in the drinks, creating a harmonious and cozy experience.
Creative Ways to Present
Turn this cake into a mini dessert extravaganza by making individual servings in ramekins or small pans. Another fun idea is layering slices between vegan whipped cream to create a rustic pear and ginger trifle. No matter how you present it, the sticky pear topping will always be the star.
Make Ahead and Storage
Storing Leftovers
Once cooled completely, store any leftover Sticky Pear Ginger Cake Recipe in an airtight container at room temperature for up to two days or refrigerate for up to five days. The cake holds moisture well, so reheated slices remain tender and delicious.
Freezing
You can freeze this cake by wrapping it tightly in plastic wrap and then aluminum foil to prevent freezer burn. Freeze for up to three months. To thaw, leave it refrigerated overnight or allow it to come to room temperature before warming slightly.
Reheating
When reheating, warm slices gently in a microwave for about 20 seconds or in a low oven (around 300°F) for 10 minutes. This brings back the sticky syrupy goodness and revives the soft crumb, making every bite feel freshly baked.
FAQs
Can I use other fruits instead of pears in this recipe?
Absolutely! While pears provide a unique texture and flavor, apples, peaches, or even nectarines can be swapped in. Just choose ripe, firm fruits that won’t become too mushy during baking.
Is this Sticky Pear Ginger Cake Recipe vegan?
Yes, it is! This recipe uses plant-based milk and oil, avoiding any dairy or eggs. It’s perfect for anyone looking for a vegan dessert that’s full of flavor and moist texture.
Can I make this cake gluten-free?
Definitely. Just substitute the all-purpose flour with a gluten-free flour blend of similar weight and keep the baking soda and vinegar trick to maintain the cake’s rise and tenderness.
What type of oil works best in this cake?
Neutral oils like sunflower or grapeseed are best because they don’t overpower the spicy flavors. Olive oil could work but may alter the delicate flavor balance.
How do I know when the cake is done baking?
Insert a toothpick or cake tester into the center of the cake. If it comes out clean or with a few moist crumbs clinging to it, the cake is ready. Avoid overbaking to preserve moisture.
Final Thoughts
This Sticky Pear Ginger Cake Recipe is a delicious way to bring warmth and comfort into your kitchen, filled with natural sweetness, spicy notes, and a sticky, luscious topping that feels truly special. Give it a try and watch how it becomes a beloved staple for cozy gatherings or indulgent solo treats. Once you taste it, you’ll understand why this cake is so hard to resist.
Print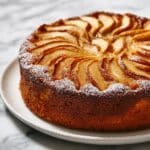
Sticky Pear Ginger Cake Recipe
- Prep Time: 15 minutes
- Cook Time: 40 minutes
- Total Time: 55 minutes
- Yield: 8 servings
- Category: Dessert
- Method: Baking
- Cuisine: American
- Diet: Vegan
Description
This Sticky Pear Ginger Cake is a moist, warmly spiced vegan dessert featuring tender pear slices caramelized with maple syrup and a ginger-infused batter made without dairy or eggs. Perfectly balanced with cinnamon and cloves, the cake is baked to golden perfection and served inverted to showcase the sticky pear topping. An ideal comforting treat for all seasons that is naturally plant-based and can be made gluten-free by using a suitable flour blend.
Ingredients
Sticky Pear Topping
- 2 ripe pears, peeled, cored, and sliced
- 1/4 cup maple syrup or golden syrup
Cake Batter
- 1/2 cup unsweetened applesauce
- 1/2 cup brown sugar (or coconut sugar)
- 1/2 cup plant-based milk (such as almond or oat)
- 1/3 cup neutral oil (like sunflower or grapeseed)
- 1 tbsp ground ginger
- 1 tsp ground cinnamon
- 1/4 tsp ground cloves
- 1/4 tsp salt
- 1 tsp vanilla extract
- 1 1/2 cups all-purpose flour (can substitute gluten-free blend)
- 1 tsp baking soda
- 1 tbsp apple cider vinegar
Instructions
- Preheat and Prepare Pan: Preheat your oven to 350°F (175°C). Lightly grease an 8-inch round or square cake pan and line the bottom with parchment paper to prevent sticking and for easy cake removal.
- Arrange Pear Slices: Neatly place the peeled, cored, and sliced pears in a fan shape or a single layer on the bottom of the prepared pan. Drizzle the maple syrup or golden syrup evenly over the pears to create a sticky and sweet topping once baked.
- Mix Wet Ingredients: In a large mixing bowl, whisk together the unsweetened applesauce, brown sugar (or coconut sugar), plant-based milk, neutral oil, ground ginger, cinnamon, cloves, salt, and vanilla extract until the mixture is smooth and well combined.
- Add Dry Ingredients: Sift in the all-purpose flour and baking soda to the wet mixture. Gently fold the batter until just combined, being careful not to overmix to keep the cake light and tender.
- Incorporate Vinegar: Stir in the tablespoon of apple cider vinegar right before pouring the batter into the pan. This will react with the baking soda to give the cake a nice rise and moist crumb.
- Pour and Bake: Carefully pour the batter over the pear slices in the pan, spreading it evenly. Bake in the preheated oven for 35 to 40 minutes, or until a toothpick inserted into the center of the cake comes out clean.
- Cool and Invert: Allow the cake to cool in the pan for about 10 minutes. Then, carefully invert it onto a plate so that the sticky pear layer is on top, showcasing the caramelized fruit beautifully.
- Serve: Serve the cake warm or at room temperature. For an extra treat, pair it with vegan whipped cream or your favorite plant-based topping.
Notes
- For a gluten-free version, substitute the all-purpose flour with a gluten-free baking blend.
- The apple cider vinegar activates the baking soda for leavening; do not skip this step.
- This cake stores well in an airtight container at room temperature for 2 days or refrigerated for up to 4 days.
- Reheat slices gently before serving to enjoy the sticky pear topping at its best.
- Use ripe but firm pears to maintain texture during baking and prevent mushiness.


