

If you have a sweet tooth and love a combination of rich chocolate, gooey caramel, and crunchy pecans, then you’re going to adore this Chocolate Turtle Cake Recipe. It’s a decadent, crowd-pleasing dessert that brings together smooth whipped topping, luscious caramel sauce, and moist chocolate cake in one unforgettable treat. Perfect for celebrations or just spoiling yourself, this recipe is as easy as it is indulgent, making it a staple for every dessert lover’s recipe box.

Ingredients You’ll Need
This recipe relies on simple ingredients that work harmoniously to create the luscious texture and complex flavor profile that make this cake so special. Each component adds a unique element, from the rich chocolatey base to the sweet, gooey toppings and crunchy nuts.
- Devil’s Food chocolate cake mix (15.25 oz): The foundation of your dessert, providing a deep, chocolatey flavor and moist crumb.
- Sweetened condensed milk (14 oz can): Adds creamy sweetness and soaks into the cake to keep it irresistibly soft.
- Caramel sundae topping (12 oz jar): Brings that luscious caramel flavor that’s synonymous with turtle desserts.
- Whipped topping (8 oz container, thawed): Lightens the texture and adds a fluffy finish.
- Chopped pecans (½ cup): Offers a buttery crunch that contrasts beautifully with the smooth toppings.
- Mini semi-sweet chocolate chips (½ cup): Give little bursts of chocolatey goodness in every bite.
- Salted caramel sauce (⅓ cup): A drizzling of this elevates the cake with a perfect balance of sweet and salty.
How to Make Chocolate Turtle Cake Recipe
Step 1: Prepare the Cake Batter
Start by preheating your oven to 350°F (175°C). Using the Devil’s Food cake mix, prepare the batter according to the package instructions — typically this involves mixing in water, eggs, and oil. The easy mix creates a wonderfully moist and chocolate-packed cake base.
Step 2: Bake to Perfection
Pour the batter into a greased 9×13-inch baking dish, smoothing it evenly. Bake as instructed, usually about 30-35 minutes, or until a toothpick inserted in the center comes out clean. This gives you a perfectly baked chocolate base ready for the next delicious layers.
Step 3: Let the Cake Cool and Create Pockets
Once baked, remove the cake from the oven and let it cool for around 10 minutes. While the cake is still warm, gently poke holes all over the surface with a fork. These pockets are the secret to soaking in all the sweet goodness that’s about to come.
Step 4: Soak with Sweetened Condensed Milk
Pour the entire can of sweetened condensed milk evenly over the warm cake. Its creamy sweetness seeps into the holes, ensuring every bite is moist and bursting with flavor. After this, allow the cake to cool completely before moving on.
Step 5: Add Caramel and Whipped Layers
Drizzle the caramel sundae topping over the cake, spreading it out gently so every slice gets a bit of that signature golden caramel taste. Next, spread the thawed whipped topping evenly over this caramel layer, adding a lovely light contrast to the dense cake.
Step 6: Sprinkle Pecans and Chocolate Chips
Top it off with chopped pecans and mini semi-sweet chocolate chips. These little additions bring a satisfying crunch and extra chocolate flavor that make this cake truly feel special and indulgent.
Step 7: Finish with Salted Caramel Drizzle and Chill
Drizzle salted caramel sauce across the top to enhance the sweet and salty dynamic. Once complete, refrigerate the cake for at least 2 hours so the layers meld together and the topping sets just right.
How to Serve Chocolate Turtle Cake Recipe

Garnishes
For an extra touch, you can sprinkle additional chopped pecans or chocolate chips on top just before serving. A light dusting of cocoa powder or a few fresh berries can also add a beautiful pop of color and flavor.
Side Dishes
This cake pairs beautifully with a scoop of vanilla ice cream or a dollop of freshly whipped cream to balance its richness. A hot cup of coffee or a creamy latte is the perfect drink companion, enhancing the chocolate and caramel notes.
Creative Ways to Present
Try serving individual portions in clear glass dessert dishes layered with extra caramel and nuts for a fancy presentation. You can also use cupcake liners to transform the cake into shareable treats, making parties and gatherings even sweeter.
Make Ahead and Storage
Storing Leftovers
After enjoying your Chocolate Turtle Cake Recipe, store any leftovers in an airtight container in the refrigerator. It stays moist and delicious for up to 4 days, letting you savor every last bite.
Freezing
If you want to save the cake for longer, wrap it tightly in plastic wrap and aluminum foil before freezing. It can be frozen for up to 2 months without losing flavor or texture. Thaw it overnight in the refrigerator before serving.
Reheating
Because this cake is best served cold or at room temperature, reheating isn’t necessary. However, if you prefer, warm slices briefly in the microwave for about 10-15 seconds to soften the whipped topping slightly.
FAQs
Can I use homemade chocolate cake instead of a box mix?
Absolutely! Homemade chocolate cake works wonderfully, and it’s a great way to personalize the Chocolate Turtle Cake Recipe if you want to control the ingredients or try a favorite family recipe.
What can I substitute for pecans if I have a nut allergy?
You can replace pecans with toasted coconut flakes or crushed pretzels for that crunchy element without the nut allergy risk. Both add a unique texture and flavor twist.
Is there a way to make this cake vegan?
To make a vegan version, you’ll need to use plant-based chocolate cake mix and vegan substitutes for condensed milk, caramel, and whipped topping. While it’s a bit of a challenge, it can be done with some creative ingredient swaps.
Can I make this cake gluten-free?
Yes, by using a gluten-free chocolate cake mix and ensuring all toppings are gluten-free, you can enjoy this decadent dessert without gluten concerns. Just double-check labels to keep it safe.
How long should I chill the cake before serving?
Refrigerating the cake for at least 2 hours is key. This chilling time lets the caramel and condensed milk soak in fully and allows the topping to set, resulting in a perfect texture and harmony of flavors.
Final Thoughts
This Chocolate Turtle Cake Recipe is a slice of heaven that brings together all the best flavors and textures you crave in a dessert. It’s surprisingly simple to make yet looks and tastes like something straight out of a bakery. I hope you try it soon and discover how it can become your go-to dessert for celebrations or anytime indulgence!
Print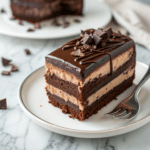
Chocolate Turtle Cake Recipe
- Prep Time: 15 minutes
- Cook Time: 35 minutes
- Total Time: 2 hours 50 minutes
- Yield: 12 servings
- Category: Dessert
- Method: Baking
- Cuisine: American
Description
This decadent Chocolate Turtle Cake combines rich Devil’s Food chocolate cake with layers of sweetened condensed milk, caramel, whipped topping, pecans, and chocolate chips. With a moist texture enhanced by caramel drizzles and crunchy nuts, it’s a perfect dessert for celebrations or any sweet craving.
Ingredients
Cake
- 1 box (15.25 oz) Devil’s Food chocolate cake mix
Toppings
- 1 can (14 oz) sweetened condensed milk
- 1 jar (12 oz) caramel sundae topping
- 1 container (8 oz) whipped topping, thawed
- ½ cup chopped pecans (Fisher)
- ½ cup mini semi-sweet chocolate chips
- ⅓ cup salted caramel sauce
Instructions
- Prepare the Cake: Preheat the oven to 350°F (175°C) to ensure it is ready when your batter is prepared.
- Mix Batter: Prepare the chocolate cake mix according to the box instructions, usually involving water, eggs, and oil, and mix thoroughly until smooth.
- Bake the Cake: Pour the batter into a greased 9×13-inch baking dish and bake for about 30-35 minutes or until a toothpick inserted in the center comes out clean.
- Cool Slightly: After baking, remove the cake from the oven and let it cool for about 10 minutes so it’s warm but not hot.
- Poke Holes: Use a fork to poke several holes across the surface of the cake to allow the sweetened condensed milk to soak in.
- Add Sweetened Condensed Milk: Pour the sweetened condensed milk evenly over the warm cake, allowing it to seep into the holes, enhancing moisture and sweetness. Let the cake cool completely.
- Apply Caramel Topping: Drizzle the caramel sundae topping evenly over the cooled cake to create a rich, gooey layer.
- Spread Whipped Topping: Spread the thawed whipped topping evenly over the caramel layer, providing a creamy and light texture contrast.
- Add Nuts and Chocolate Chips: Sprinkle the chopped pecans and mini semi-sweet chocolate chips over the whipped topping to add crunch and more chocolate flavor.
- Drizzle Salted Caramel Sauce: Drizzle salted caramel sauce over the top for an extra burst of caramel flavor that balances sweet and salty notes.
- Chill the Cake: Refrigerate the cake for at least 2 hours to allow all flavors to meld and the toppings to set properly.
- Serve: Slice the chilled cake into 12 servings and enjoy this luscious dessert.
Notes
- Use a 9×13-inch baking dish for best results.
- Ensure the whipped topping is fully thawed before spreading for smooth texture.
- For deeper caramel flavor, use high-quality caramel sauces.
- Can be stored covered in refrigerator for up to 3 days.
- Allow the cake to cool completely before adding toppings to prevent melting or sliding.


