

If you’re on the hunt for a tasty and wholesome snack, you’re going to love this No Bake Chocolate Peanut Butter Protein Bars Recipe. These bars bring together the rich creaminess of peanut butter, the deep flavor of cocoa, and a healthy boost of protein, all without ever turning on the oven. Perfect for anyone rushing out the door or needing a quick energy lift, these bars satisfy your sweet tooth with nourishing ingredients that power you through the day. They’re simple to make, no-fuss, and perfect for meal prep, making them a fantastic addition to your snack rotation.

Ingredients You’ll Need
Each ingredient in this lineup is carefully chosen to combine flavor, texture, and nutrition into every bite of your protein bars. The simplicity of these components means you’re likely to find most in your pantry already, making this recipe quick and accessible.
- Rolled oats (1 ½ cups): Acts as the hearty base, offering natural texture and fiber to keep you full longer.
- Natural peanut butter (1 cup): Provides creamy richness and protein, plus a lovely nutty flavor.
- Honey or maple syrup (½ cup): Adds just the right amount of natural sweetness and helps bind everything together.
- Vanilla or chocolate protein powder (½ cup): The key protein boost that makes these bars a perfect post-workout snack or midday pick-me-up.
- Unsweetened cocoa powder (¼ cup): Delivers a deep chocolate flavor without added sugar, complementing the peanut butter beautifully.
- Vanilla extract (1 teaspoon): Enhances overall flavor with a warm, inviting aroma.
- Salt (¼ teaspoon): Balances sweetness and enhances the other flavors.
- Dark chocolate chips (½ cup, optional): For a decadent topping that melts into a rich, glossy layer.
- Coconut oil (1 teaspoon, if melting chocolate chips): Helps create a smooth, melt-in-your-mouth chocolate topping.
How to Make No Bake Chocolate Peanut Butter Protein Bars Recipe
Step 1: Combine Your Dry Ingredients
Start by mixing the rolled oats, protein powder, cocoa powder, and salt in a large bowl until they are evenly distributed. This dry mixture forms the base of your bars, so it’s important that each component is well blended to ensure every bite has that perfect balance of flavors and texture.
Step 2: Warm the Peanut Butter and Sweetener
In a microwave-safe bowl or on the stove, gently heat the peanut butter and honey or maple syrup just until smooth and easily pourable. Stir in the vanilla extract to infuse your bars with a sweet, aromatic touch. The warmth makes it easier to combine this wet mixture with the dry ingredients.
Step 3: Mix Wet and Dry Together
Pour your warm peanut butter mixture over the oats and protein powder blend. Stir with a sturdy spoon or spatula until every bit of dry mixture is coated and the batter is sticky and uniform. This sticky mixture is what holds your bars together without baking.
Step 4: Press and Chill
Line an 8×8-inch baking dish with parchment paper, then press the mixture down firmly and evenly. If you’re opting for the chocolate topping, melt the dark chocolate chips with coconut oil and spread it gently over the pressed mixture for an indulgent finish. Refrigerate the entire dish for at least 1 hour to allow the bars to set firmly.
Step 5: Slice and Enjoy
Once chilled and firm, lift the parchment paper out of the dish and transfer to a cutting board. Slice into 12 equal bars and get ready to snack smart and delicious!
How to Serve No Bake Chocolate Peanut Butter Protein Bars Recipe

Garnishes
Add a sprinkle of chopped nuts, a dusting of cocoa powder, or a drizzle of melted peanut butter on top to boost both visual appeal and texture. These little touches make the bars feel extra special, especially when serving friends or family.
Side Dishes
Pair these protein bars with a fresh fruit salad or a dollop of Greek yogurt for a balanced snack or light breakfast. The bars’ richness and dense nutrition complement lighter sides perfectly, giving you a well-rounded energy boost.
Creative Ways to Present
Wrap individual bars in parchment paper tied with twine for a charming grab-and-go snack. For parties, arrange them on a platter with colorful berries and nuts sprinkled around for a gorgeous spread that’s as tasty as it looks.
Make Ahead and Storage
Storing Leftovers
These bars hold up beautifully stored in an airtight container in the fridge for up to one week. Keeping them chilled preserves their firmness and makes them easy to grab whenever hunger strikes.
Freezing
For longer storage, freeze the bars wrapped individually or in a sealed container for up to three months. Thaw in the fridge overnight before enjoying for a fresh-out-of-the-fridge taste and texture.
Reheating
These bars are delightful straight from the fridge or freezer. If you prefer a softer texture, you can warm one in the microwave for 10–15 seconds, but avoid overheating or they may get too soft.
FAQs
Can I substitute peanut butter with another nut butter?
Yes! Almond, cashew, or sunflower seed butter are excellent alternatives that will give a slightly different but equally delicious flavor. Just pick your favorite to customize your bars.
Is it possible to make this recipe vegan?
Absolutely. Use maple syrup instead of honey and choose a plant-based protein powder to keep the recipe 100% vegan-friendly.
How do protein powders affect the texture?
Protein powder adds density and helps the bars hold their shape. Using a good quality powder will ensure smooth mixing and a pleasant chew without chalkiness.
Can I add mix-ins like nuts or seeds?
Definitely! Feel free to stir in chopped nuts, seeds, or even mini chocolate chips before pressing the mixture into the pan for extra crunch and flavor variety.
What’s the best way to cut these bars cleanly?
Use a sharp knife and cut the bars while they are cold from the fridge. Wiping the knife clean between cuts will help keep the edges neat and tidy.
Final Thoughts
This No Bake Chocolate Peanut Butter Protein Bars Recipe is truly one of those feel-good, delicious snacks that you’ll want to make again and again. It’s quick, nourishing, and satisfies those sweet and salty cravings perfectly. Go ahead and give it a try – your taste buds and your busy schedule will thank you!
Print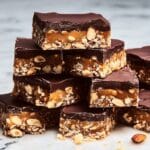
No Bake Chocolate Peanut Butter Protein Bars Recipe
- Prep Time: 10 minutes
- Cook Time: 0 minutes
- Total Time: 1 hour 10 minutes
- Yield: 12 bars
- Category: Snack
- Method: No-Cook
- Cuisine: American
- Diet: Gluten Free
Description
These No Bake Chocolate Peanut Butter Protein Bars are a delicious and healthy homemade snack packed with protein and fiber. Made with rolled oats, natural peanut butter, protein powder, and rich cocoa, they offer a perfect balance of sweet and chocolatey flavors without any baking required. Perfect for quick energy boosts, post-workout refueling, or a nutritious treat on the go.
Ingredients
Main Ingredients
- 1 ½ cups rolled oats
- 1 cup natural peanut butter
- ½ cup honey or maple syrup
- ½ cup vanilla or chocolate protein powder
- ¼ cup unsweetened cocoa powder
- 1 teaspoon vanilla extract
- ¼ teaspoon salt
Topping (Optional)
- ½ cup dark chocolate chips
- 1 teaspoon coconut oil (if melting chocolate chips)
Instructions
- Combine Dry Ingredients: In a large mixing bowl, stir together the rolled oats, protein powder, cocoa powder, and salt until evenly mixed.
- Warm Wet Ingredients: In a microwave-safe bowl or small saucepan, gently warm the peanut butter and honey together until smooth and pourable. Stir in the vanilla extract to combine.
- Mix Together: Pour the warm wet mixture over the dry ingredients and mix thoroughly until fully combined into a consistent dough-like mixture.
- Press Into Pan: Line an 8×8-inch baking dish with parchment paper. Press the mixture evenly into the pan, compacting it well.
- Prepare Topping (Optional): If using chocolate chips, melt them with coconut oil in a microwave or double boiler until smooth. Spread the melted chocolate evenly over the pressed mixture.
- Chill: Refrigerate the pan for at least 1 hour or until the bars are firm and set.
- Cut and Store: Once chilled, remove from the pan and cut into 12 bars. Store bars in the refrigerator for up to 1 week or freeze for longer preservation.
Notes
- Use crunchy peanut butter for extra texture.
- Swap peanut butter with almond or cashew butter for different flavors.
- Add mini chocolate chips, chopped nuts, or seeds into the mixture before pressing into the pan for added crunch and nutrition.


