
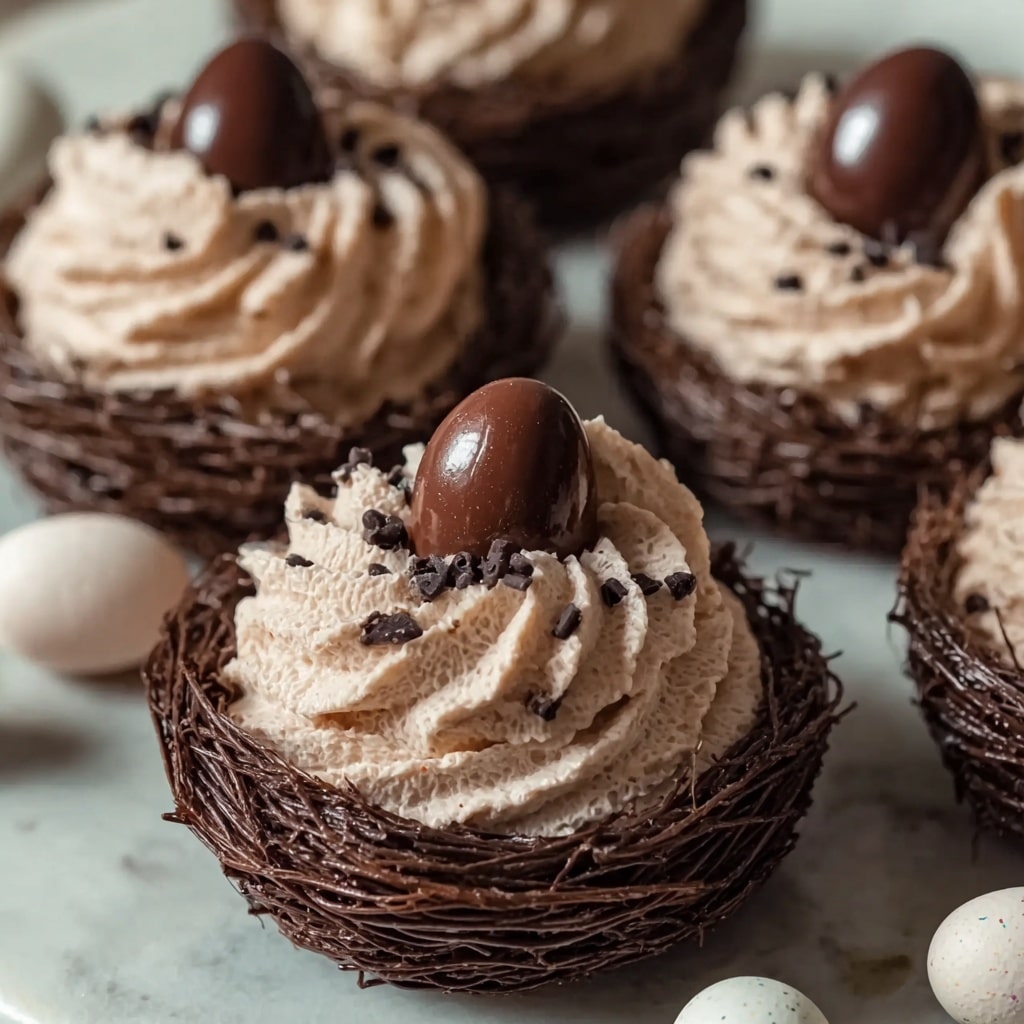
If you are looking for a show-stopping, delightful treat to brighten your Easter celebration, this Chocolate Meringue Easter Nests Recipe is an absolute must-try. These delicate, airy meringue nests are infused with rich cocoa and filled with colorful chocolate eggs, perfectly combining lightness with a decadent chocolate hit. The crisp shell and slightly chewy center create a texture that’s pure joy with every bite. Whether you’re an avid baker or just love fun, seasonal desserts, these nests are a charming way to impress your family and friends.

Ingredients You’ll Need
This recipe shines because it uses simple, straightforward ingredients that each bring something special to the table. From the fluffy egg whites that create the base of the meringue to the cocoa powder that adds a touch of chocolate magic, every ingredient is essential for that perfect balance of flavor, texture, and visual appeal.
- 4 large egg whites at room temperature: The foundation for light and airy meringue, room temperature whites whip up better and higher.
- 1 cup granulated sugar: Provides sweetness and helps stabilize the meringue for a glossy, firm finish.
- 1/4 teaspoon cream of tartar: Keeps the egg whites firm and prevents them from collapsing as you bake.
- 1 teaspoon vanilla extract: Adds subtle warmth and depth of flavor to your meringue.
- 2 tablespoons unsweetened cocoa powder (sifted): Gives your nests a beautiful chocolate hue and a rich, bittersweet taste.
- 1 cup mini chocolate eggs or candy-coated chocolate eggs: The irresistible colorful center that completes each nest with fun and sweetness.
How to Make Chocolate Meringue Easter Nests Recipe
Step 1: Preheat and Prepare
Start by preheating your oven to 225°F and lining a baking sheet with parchment paper. This low temperature ensures your meringues dry out slowly, achieving that perfectly crisp exterior without browning. The parchment paper will keep your nests from sticking and make clean-up easier.
Step 2: Whip Egg Whites
In a large, clean mixing bowl, use an electric mixer on medium speed to beat your egg whites until foamy. This initial stage helps incorporate air and starts building volume. Adding the cream of tartar now is key to stabilizing those air bubbles, so they stay intact as you continue to whip.
Step 3: Beat to Soft Peaks
Increase your mixer’s speed and keep whipping until soft peaks form—when the whites hold a barely firm shape. This step creates the perfect texture right before the sugar is incorporated, so pay attention here to avoid over or under beating.
Step 4: Gradually Add Sugar
Add the granulated sugar one tablespoon at a time while beating on high speed. This slow addition dissolves the sugar completely, avoiding graininess while building volume. Keep going until the meringue is stiff and glossy, with peaks that stand tall without falling over.
Step 5: Flavor and Fold in Cocoa
Beat in the vanilla extract to give your meringue a lovely aromatic touch. Then gently fold in the sifted cocoa powder. Folding rather than beating keeps those delicate bubbles intact, ensuring your nests stay light while acquiring a luscious chocolate color and flavor.
Step 6: Shape the Nests
Using a spoon, dollop the chocolate meringue onto your prepared baking sheet and carefully shape each mound into a nest with a shallow indentation in the center. This indentation is important because it will hold your mini chocolate eggs securely once baked.
Step 7: Bake and Cool
Bake the meringue nests for 1 hour and 15 minutes. After baking, turn off the oven but leave the nests inside with the door closed to cool completely. This gentle cooling process prevents cracking and helps the texture set beautifully.
Step 8: Add the Mini Chocolate Eggs
Once completely cooled, tuck the colorful mini chocolate eggs right into the center of each nest. This finishing touch transforms your nests into an eye-catching and festive Easter dessert everyone will adore.
How to Serve Chocolate Meringue Easter Nests Recipe

Garnishes
Sprinkling a tiny dusting of powdered sugar over the nests adds a pretty flourish reminiscent of freshly fallen snow. For extra fun, you can also add a few edible flowers or a drizzle of melted white chocolate around the plate to complement the nests’ charm and make them even more photogenic at your Easter gathering.
Side Dishes
These light and sweet meringue nests pair wonderfully with a cup of fresh fruit salad or a tangy berry compote. The bright, juicy acidity balances the richness of chocolate, providing a refreshing accompaniment that enhances the overall dessert experience.
Creative Ways to Present
Present your Chocolate Meringue Easter Nests Recipe on a rustic wooden platter or vintage cake stand to highlight their handmade beauty. For extra delight, nestle them amidst fresh spring greens or edible flowers on your table to create a nature-inspired Easter centerpiece everyone will love. You could even place them inside small paper cupcake liners in pastel colors to add an elegant touch.
Make Ahead and Storage
Storing Leftovers
Keep any leftover nests in an airtight container at room temperature to maintain their crisp texture. Avoid refrigeration as moisture can make meringues soft and lose their delightful crunch. They usually stay fresh for up to three days, making them perfect for preparing in advance.
Freezing
You can freeze meringue nests for longer storage by placing them in an airtight container separated with parchment paper to avoid sticking. When ready to use, simply thaw at room temperature for a couple of hours. While freezing doesn’t affect flavor, the texture might soften slightly, so it’s best to enjoy them fresh when possible.
Reheating
If your meringue nests lose a bit of crispness, a few minutes in a low oven (about 200°F) can help revive their texture. Just be careful not to heat them too long, or they could brown or crack. This trick is useful if you’re serving leftovers or frozen nests.
FAQs
Can I use powdered sugar instead of granulated sugar?
Granulated sugar works best for this recipe because it dissolves slowly and helps create the classic meringue texture. Powdered sugar contains cornstarch and can make the meringue softer and less crisp, so it’s best to stick with granulated sugar for your Chocolate Meringue Easter Nests Recipe.
Why does my meringue sometimes weep or create liquid?
Weeping happens when the sugar isn’t fully dissolved or if the meringue is overbeaten. Be sure to add sugar gradually and whip until glossy peaks form. Also, humidity can affect meringues, so try to make them on a dry day for the best results.
Can I make these nests without cocoa powder?
Absolutely! You can make classic white meringue nests if you prefer. The cocoa powder adds a lovely chocolate twist to the recipe, but the basic method remains the same. The nests will still be light, crisp, and perfect for Easter eggs.
Are these nests gluten-free?
Yes! This Chocolate Meringue Easter Nests Recipe is naturally gluten-free since it contains no flour or gluten-containing ingredients. Just be sure the chocolate eggs you use are also gluten-free if this is important for your dietary needs.
How do I know when the meringue is done baking?
The nests should feel dry and crisp to the touch, and easily lift off the parchment paper without sticking. After turning off the oven, letting them cool inside helps them finish drying. If they’re still sticky after cooling, give them a little more time in the oven on low heat if needed.
Final Thoughts
There’s something truly magical about the combination of airy meringue, rich chocolate, and colorful mini eggs that makes the Chocolate Meringue Easter Nests Recipe a standout for any spring celebration. It’s such a joyful, fun dessert to make and share with your loved ones, bringing a little extra sweetness and whimsy to your Easter table. Give this recipe a go — I promise it will become a cherished favorite year after year!
Print
Chocolate Meringue Easter Nests Recipe
- Prep Time: 15 minutes
- Cook Time: 1 hour 15 minutes
- Total Time: 1 hour 30 minutes plus cooling time
- Yield: 12 nests
- Category: Dessert
- Method: Baking
- Cuisine: American
- Diet: Gluten Free, Vegetarian
Description
Delight in these light and airy Chocolate Meringue Easter Nests, a perfect gluten-free and vegetarian dessert for the holiday season. Crispy on the outside and soft inside, these nests are infused with cocoa and topped with mini chocolate eggs, making them a festive treat that’s both beautiful and delicious.
Ingredients
Egg White Mixture
- 4 large egg whites at room temperature
- 1 cup granulated sugar
- 1/4 teaspoon cream of tartar
- 1 teaspoon vanilla extract
- 2 tablespoons unsweetened cocoa powder, sifted
Topping
- 1 cup mini chocolate eggs or candy-coated chocolate eggs
Instructions
- Preheat Oven and Prepare Baking Sheet: Preheat your oven to 225°F (107°C) and line a baking sheet with parchment paper to prevent sticking.
- Beat Egg Whites: In a large mixing bowl, use an electric mixer on medium speed to beat the egg whites until they become foamy.
- Add Cream of Tartar and Continue Beating: Add 1/4 teaspoon cream of tartar to the foamy egg whites and continue beating until soft peaks form, which means the peaks gently hold their shape.
- Incorporate Sugar Gradually: Gradually add the granulated sugar one tablespoon at a time while beating on high speed, until stiff, glossy peaks form indicating the meringue is stable and shiny.
- Beat in Vanilla Extract: Add 1 teaspoon vanilla extract and beat briefly to combine the flavor evenly throughout the meringue.
- Fold in Cocoa Powder: Gently fold sifted unsweetened cocoa powder into the meringue with a spatula, being careful not to deflate the mixture.
- Shape the Nests: Spoon the cocoa meringue onto the parchment-lined baking sheet, shaping each mound into a nest by creating a slight indentation in the center for the eggs later.
- Bake: Place the baking sheet into the preheated oven and bake the meringues for 1 hour and 15 minutes at 225°F, allowing them to dry and crisp slowly.
- Cool in Oven: Turn off the oven and let the meringue nests cool completely inside with the door closed, which helps them set without cracking.
- Add Chocolate Eggs: Once the nests are fully cooled, place 1 cup of mini chocolate eggs into the indentation of each meringue nest as a delightful decorative and tasty topping.
Notes
- Ensure your mixing bowl and beaters are completely clean and dry to achieve perfect meringue peaks.
- Store the meringue nests in an airtight container at room temperature to keep them crisp and fresh.


