

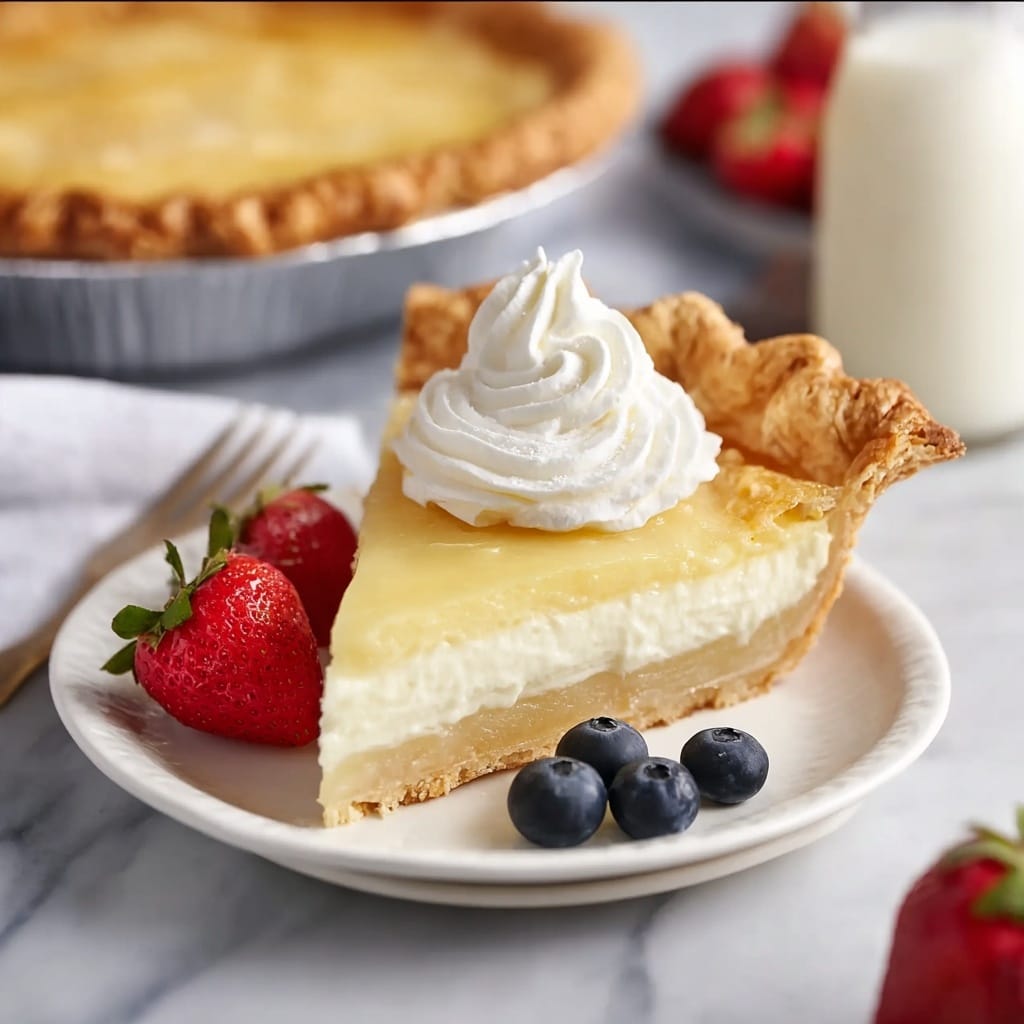
If you are looking for a dessert that’s soulful, comforting, and downright irresistible, this Rich & Creamy Buttermilk Pie Recipe will become your new go-to. With its luscious custard-like filling, subtly tangy from warm buttermilk and kissed with hints of vanilla, lemon, and coconut extracts, this pie is a true Southern treasure. Each bite melts smoothly on the tongue, striking the perfect balance between richness and lightness. Whether you’re baking it for a family gathering or craving a slice of pure nostalgia, this pie is guaranteed to brighten your day and delight anyone lucky enough to taste it.

Ingredients You’ll Need
Even though this pie feels decadent, the ingredients are wonderfully simple and fuss-free. Each one plays a vital role — the sugar sweetens just right, the flour adds body to that silky custard, and the buttermilk brings a tangy freshness that makes this pie unmistakably special.
- Granulated sugar (1½ cups): Sweetens the filling while helping to create a smooth texture.
- All-purpose flour (¼ cup): Adds structure to the custard so it sets beautifully without being too heavy.
- Salt (¼ teaspoon): Enhances all the flavors, balancing the sweetness perfectly.
- Eggs (2 whole eggs and 1 yolk): Provide richness and help bind the filling to a creamy consistency.
- Unsalted butter (5 tablespoons, melted): Adds a luscious mouthfeel and depth to the pie filling.
- Pure vanilla extract (1½ teaspoons): Infuses the custard with warm, inviting flavor.
- Lemon extract (¼ teaspoon): A subtle citrusy note that brightens the pie.
- Coconut extract (⅛ teaspoon): Adds a whisper of tropical flair, elevating the overall profile.
- Buttermilk (1 cup, warm): The star ingredient lending creaminess with a delightful tang.
- Unbaked 9-inch pie shell (chilled): The perfect buttery, flaky base to cradle the filling.
How to Make Rich & Creamy Buttermilk Pie Recipe
Step 1: Preheat and Prepare
Begin by heating your oven to 350°F (175°C). Starting with a well-heated oven ensures your pie bakes evenly with that signature golden crust and perfectly set filling.
Step 2: Combine Dry Ingredients
Whisk together granulated sugar, all-purpose flour, and salt in a large bowl. For an ultra-smooth custard texture, feel free to sift these dry ingredients before mixing. This foundation is crucial for a silky pie filling without lumps.
Step 3: Beat the Eggs
In a separate bowl, whisk the two whole eggs and one egg yolk until completely uniform. This makes sure your filling is rich and silky once combined with the other ingredients.
Step 4: Mix Dry and Wet Ingredients
Gradually incorporate the dry mixture into the beaten eggs, whisking continuously. Aim for a smooth, lump-free batter to build the custard base of your pie.
Step 5: Add Butter and Extracts
Whisk in the melted butter, vanilla extract, lemon extract, and coconut extract. These add layers of warmth, brightness, and a unique depth of flavor that set this pie apart from the ordinary.
Step 6: Stir in Warm Buttermilk
Slowly pour in the warm buttermilk while stirring gently. Mix until the batter is perfectly smooth and free of streaks. If bubbles appear, allow the mixture to rest briefly so they can dissipate for a cleaner finish.
Step 7: Pour Batter into Pie Shell
Transfer the custard batter into the chilled, unbaked 9-inch pie shell. Be sure the shell is cold so it can crisp nicely as the filling bakes.
Step 8: Bake in Two Stages
Place the pie on the lower oven rack and bake for 25 minutes. Then move it to the middle rack and continue baking for another 25 minutes or until the edges are set and the center still jiggles slightly. This technique helps the filling bake evenly without cracking.
Step 9: Cool Completely
Remove the pie from the oven and set it on a cooling rack. Allow it to cool for 2 to 3 hours, until the bottom of the pan no longer feels warm. Cooling gradually prevents sogginess and perfects the texture.
Step 10: Chill Until Set
Refrigerate the pie for at least 2 hours to let it fully set. This step is essential for that signature firm-yet-creamy texture.
Step 11: Ready to Serve
Enjoy your pie cold or at room temperature, plain or topped with whipped cream and fresh berries for extra indulgence. Each serving is a little celebration of homestyle comfort.
How to Serve Rich & Creamy Buttermilk Pie Recipe
Garnishes
Simple touches like a dollop of freshly whipped cream, a sprinkle of cinnamon, or a handful of seasonal berries complement the pie’s smooth texture and bright flavors beautifully. These garnishes add freshness and a pop of color that makes every slice look irresistible.
Side Dishes
This pie pairs wonderfully with a hot cup of coffee or tea. For a more decadent dessert experience, serve alongside vanilla ice cream or a drizzle of caramel sauce to elevate the experience. The richness of the pie balances sweet and creamy, making any beverage or side a perfect partner.
Creative Ways to Present
Surprise your guests by serving individual mini buttermilk pies in ramekins for personal portions. You can also dust the top with powdered sugar or lemon zest for a subtle flair. For festive occasions, arrange slices on a platter with edible flowers or mint leaves for a picturesque presentation.
Make Ahead and Storage
Storing Leftovers
Leftover Rich & Creamy Buttermilk Pie Recipe keeps wonderfully in the refrigerator for up to 4 days when covered tightly with plastic wrap or foil. Keeping the pie chilled preserves its creamy custard texture and prevents the crust from becoming soggy.
Freezing
You can freeze the whole pie or individual slices wrapped well in plastic wrap and then foil for up to 2 months. Thaw overnight in the refrigerator and enjoy the next day with minimal texture loss, perfect for planning ahead for celebrations.
Reheating
Because this pie is best served chilled or at room temperature, it’s ideal to let frozen slices thaw naturally rather than reheating. If you prefer a warmer slice, briefly heat it in a low oven for 10 minutes, but avoid microwaving, which can alter the texture.
FAQs
What does buttermilk do in this pie?
Buttermilk adds a subtle tang and creamy texture that balances the sweetness, making the filling rich yet refreshing. It’s what gives this pie its signature smoothness and slight zestiness.
Can I use a store-bought pie crust?
Absolutely! A quality store-bought pie shell works just fine and saves time. Just make sure it’s well chilled before adding the filling for a flaky crust.
How do I know when the pie is done baking?
The edges should be set and the center slightly jiggly but not liquid. It will firm up as it cools and chills, so don’t overbake and risk a dry texture.
Can I make this pie dairy-free?
You could try substituting the butter with a vegan alternative and use a dairy-free buttermilk substitute, but keep in mind this will change the texture and flavor somewhat.
What’s the best way to slice this pie cleanly?
Use a sharp knife warmed under hot water and wiped dry before slicing. This helps cut through the rich custard neatly without sticking.
Final Thoughts
You truly can’t go wrong with this Rich & Creamy Buttermilk Pie Recipe — it’s a timeless classic that feels like a warm hug from your own kitchen. The comforting custard filling coupled with the flaky crust will have you reaching for seconds and sharing slices with friends. Give it a try and watch it become a beloved staple in your dessert repertoire!
Print
Rich & Creamy Buttermilk Pie Recipe
- Prep Time: 20 minutes
- Cook Time: 55 minutes
- Total Time: 3 hours 15 minutes
- Yield: 8 servings
- Category: Dessert
- Method: Baking
- Cuisine: Southern American
Description
This Rich & Creamy Buttermilk Pie offers a velvety, custard-like filling with delicate hints of lemon and coconut extracts, baked inside a flaky 9-inch pie crust. Perfectly set yet slightly jiggly at the center, this classic Southern dessert is refreshing served chilled or at room temperature, making it an ideal treat for any occasion.
Ingredients
Pie Filling
- 1½ cups granulated sugar
- ¼ cup all-purpose flour
- ¼ teaspoon salt
- 2 eggs, room temperature
- 1 egg yolk, room temperature
- 5 tablespoons unsalted butter, melted
- 1½ teaspoons pure vanilla extract
- ¼ teaspoon lemon extract (adjust to taste)
- ⅛ teaspoon coconut extract (adjust to taste)
- 1 cup buttermilk, warm
Crust
- 1 (9-inch) unbaked pie shell, chilled
Instructions
- Preheat oven: Preheat your oven to 350°F (175°C) to ensure the pie bakes evenly in a hot environment.
- Combine dry ingredients: In a large bowl, whisk together the granulated sugar, all-purpose flour, and salt. For an extra-smooth filling, sift these ingredients together. Set aside.
- Whisk eggs: In another large bowl, whisk the eggs and egg yolk until the mixture is completely uniform in color and well combined.
- Mix dry into wet: Gradually whisk the dry ingredients into the egg mixture. Continue whisking until the batter is smooth and free of lumps.
- Add butter and extracts: Whisk in the melted butter, vanilla extract, lemon extract, and coconut extract until everything is thoroughly incorporated.
- Incorporate buttermilk: Slowly stir in the warm buttermilk, mixing until the batter is smooth and no streaks remain. If the mixture develops bubbles on top, let it settle for a few moments before proceeding.
- Fill pie shell: Pour the prepared batter into the chilled, unbaked 9-inch pie shell.
- Bake pie: Place the pie on the lower oven rack and bake for 25 minutes. Once that time is up, move the pie to the middle rack and bake for another 25 minutes, or until the edges are set and the center is just slightly jiggly.
- Cool on rack: Remove the pie from the oven and transfer it to a cooling rack. Allow it to cool for 2-3 hours, or until the bottom of the pan is no longer hot to the touch.
- Chill to set: Once cooled, refrigerate the pie for at least 2 more hours to let it fully set before slicing and serving.
- Serve: Serve the pie cold or at room temperature, plain or topped with whipped cream and fresh berries as desired.
Notes
- Use room temperature eggs for a smoother custard texture.
- Adjust lemon and coconut extracts according to your flavor preference for subtle or more pronounced notes.
- Let bubbles in the batter settle before baking to prevent air pockets in the pie.
- Ensure the pie is fully chilled to achieve the right creamy consistency before serving.
- To make slicing easier, run a sharp knife around the edges before serving.
- This pie is best enjoyed within 2-3 days of preparation when stored covered in the refrigerator.


