

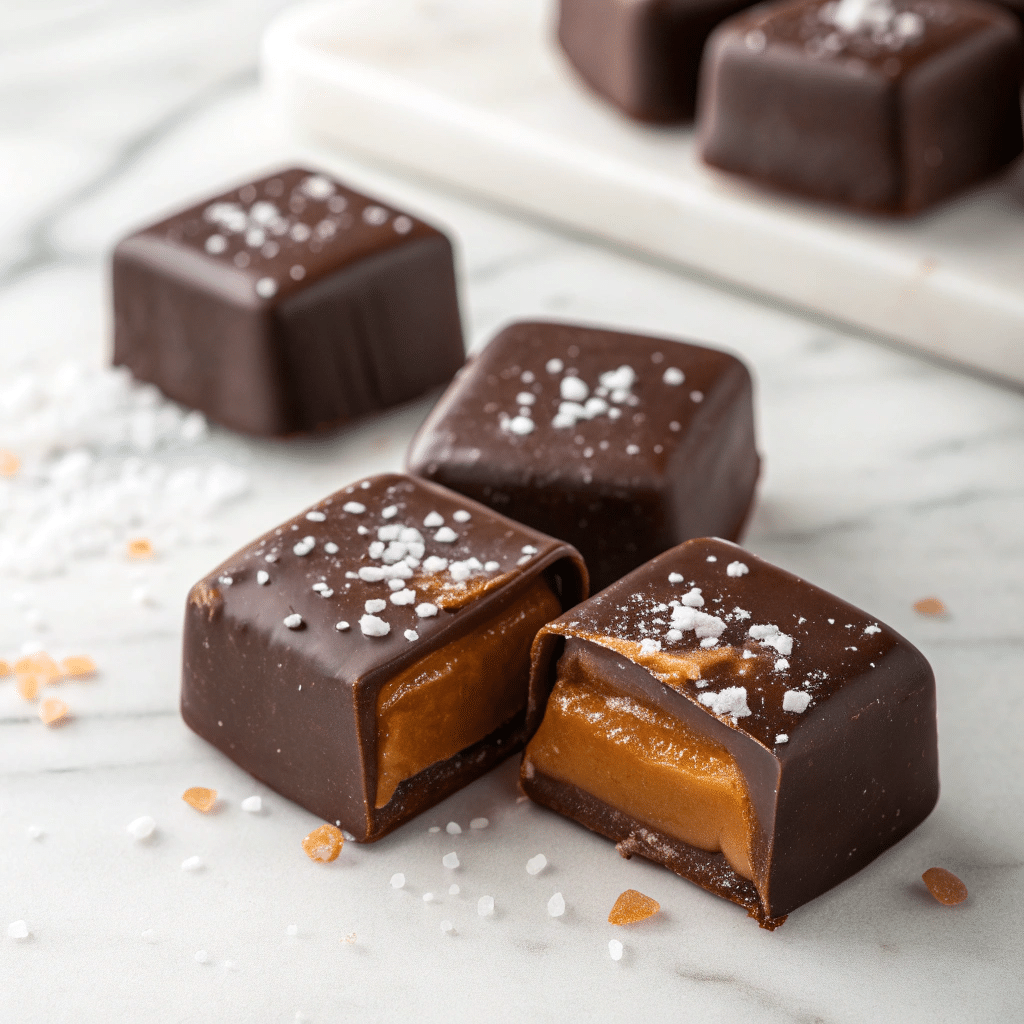
If you’ve ever dreamed of biting into a chewy, decadent treat that perfectly balances rich chocolate and buttery caramel, then this Homemade Chocolate Caramels Recipe is going to become your new obsession. These luscious caramels blend smooth cocoa with just the right touch of salt and cream to create a candy that feels homemade in the best possible way. Whether you’re treating yourself after a long day or sharing with friends, these caramels deliver that melt-in-your-mouth goodness that keeps everyone reaching for just one more piece.

Ingredients You’ll Need
Making these delightful caramels requires just a handful of simple ingredients, each playing an essential role in crafting that perfect texture, flavor, and color. From creamy heavy cream to rich cocoa powder, everything combines beautifully to create these irresistible treats.
- Heavy cream: Adds rich creaminess and helps create the smooth, chewy texture.
- Granulated sugar: The main sweetener that caramelizes and forms the base for the candy.
- Light corn syrup: Prevents crystallization and keeps the caramels silky.
- Unsweetened cocoa powder: Brings deep chocolatey flavor and a lovely color.
- Salt: Balances the sweetness perfectly, enhancing every note.
- Unsalted butter: Adds richness and helps with a tender chew.
- Vanilla extract: Infuses a warm, sweet aroma that complements the chocolate.
- Flaky sea salt (optional): A finishing touch that offers bursts of delightful crunch and contrast.
How to Make Homemade Chocolate Caramels Recipe
Step 1: Prepare Your Pan
First things first, line an 8×8-inch baking pan with parchment paper, making sure the paper overhangs on the sides. This will make it so much easier to lift out your set caramel later, helping you cut perfect squares without sticky fingers.
Step 2: Combine Ingredients and Cook
In a heavy-bottomed saucepan, whisk together the cream, sugar, light corn syrup, cocoa powder, and salt. Place it over medium heat and stir continuously until the sugar fully dissolves and the mixture begins to boil. This step is crucial to avoid graininess and ensure smooth caramel.
Step 3: Reach the Perfect Temperature
Attach a candy thermometer to the saucepan and continue cooking the mixture, this time without stirring, until it reaches 245°F—the firm ball stage. This precise temperature is the secret to those perfectly chewy caramels in this Homemade Chocolate Caramels Recipe, so be patient as you watch and wait.
Step 4: Finish the Caramel
Remove the pan from heat and stir in the butter pieces and vanilla extract until the caramel is beautifully smooth and glossy. The butter enriches the flavor while the vanilla adds a reassuring depth, making each bite heavenly.
Step 5: Set and Slice
Pour your luscious caramel mixture into the prepared pan, spreading evenly. Let it cool at room temperature for several hours until fully set—resisting the urge to cut too soon is half the battle won! Once firm, lift out the caramel using the parchment paper, then slice into bite-sized squares. If you like, sprinkle each piece with flaky sea salt for that irresistible salty-sweet contrast.
How to Serve Homemade Chocolate Caramels Recipe
Garnishes
A little sprinkle of flaky sea salt on top is a simple but brilliant garnish, making every piece pop with flavor. You can also experiment with drizzling a bit of melted dark or white chocolate on top for an extra touch of elegance and indulgence.
Side Dishes
Caramels shine as a delightful after-dinner treat, perfectly paired with a hot cup of coffee or a creamy chai latte. For a festive twist, serve alongside fresh berries or nuts that add a contrasting texture and freshness to the candy’s richness.
Creative Ways to Present
Wrap individual caramels in wax paper twists to make charming little gifts or party favors that friends and family will adore. For a dessert platter, arrange the caramels alongside other bite-sized sweets to create a colorful, inviting display that’s hard to resist.
Make Ahead and Storage
Storing Leftovers
Once wrapped individually in wax paper, store your Homemade Chocolate Caramels Recipe in an airtight container at room temperature. They stay fresh and chewy for up to two weeks, giving you plenty of time to enjoy those sweet moments.
Freezing
If you want to save your caramels for even longer, freezing is a great option. Place the wrapped pieces in a freezer-safe bag or container, and they can last for about two months. When you’re ready for a treat, simply thaw them at room temperature.
Reheating
Caramels are best enjoyed at room temperature, but if they become too firm, gently warm them for a few seconds in your hands or microwave to soften the texture slightly. Be careful not to overheat—these caramels are meant to be chewed slowly and savored.
FAQs
Can I use a different type of chocolate instead of cocoa powder?
While the recipe specifically calls for unsweetened cocoa powder to control sweetness and texture, you might experiment with melted chocolate, though it can affect the caramel’s consistency. Cocoa powder keeps the candy light and chewy.
Why is a candy thermometer necessary for this recipe?
The candy thermometer is key for reaching the perfect temperature to achieve the ideal chewy texture. Too low and the caramels will be sticky; too high and they’ll become hard and brittle.
Can I replace light corn syrup with another sweetener?
Corn syrup prevents sugar crystallization, which keeps the caramels smooth. Using honey or maple syrup can change the texture and taste, so it’s best to stick with light corn syrup for this recipe.
How do I know when the caramels are ready to cut?
Allow the caramel to cool completely at room temperature until firm—this usually takes a few hours. Cutting too soon can result in sticky or misshapen pieces.
Are these caramels suitable for vegetarians?
Yes, this Homemade Chocolate Caramels Recipe uses vegetarian-friendly ingredients, making it perfect for anyone avoiding animal-based products apart from dairy.
Final Thoughts
I can’t recommend this Homemade Chocolate Caramels Recipe enough if you crave something sweet, rich, and absolutely scrumptious. The way the smooth chocolate melds with buttery caramel creates an unforgettable taste adventure. So gather your ingredients, follow these steps, and prepare for your kitchen to be filled with the warmest, most inviting aroma. Your taste buds will thank you, and these caramels just might become your go-to treat for any occasion.
Print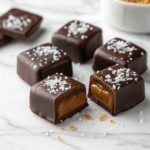
Homemade Chocolate Caramels Recipe
- Prep Time: 10 minutes
- Cook Time: 25 minutes
- Total Time: 35 minutes (plus several hours cooling time)
- Yield: About 64 pieces
- Category: Candy
- Method: Stovetop
- Cuisine: American
- Diet: Vegetarian
Description
Indulge in these homemade chocolate caramels that combine rich cocoa with a buttery, chewy caramel texture. Perfectly sweet and slightly salted with flaky sea salt, these treats are ideal for gifting or enjoying as a delightful snack any time.
Ingredients
Caramel Base
- 1 cup heavy cream
- 1 cup granulated sugar
- 1 cup light corn syrup
- 1/4 cup unsweetened cocoa powder
- 1/2 teaspoon salt
- 4 tablespoons unsalted butter, cut into pieces
- 1 teaspoon vanilla extract
Topping
- Flaky sea salt for topping (optional)
Instructions
- Prepare the pan: Line an 8×8-inch baking pan with parchment paper, leaving overhangs on the sides to easily lift out the caramel later.
- Combine ingredients: In a heavy-bottomed saucepan, mix together the heavy cream, granulated sugar, light corn syrup, unsweetened cocoa powder, and salt over medium heat.
- Cook the mixture: Stir constantly until sugar dissolves and the mixture comes to a boil. Attach a candy thermometer and continue cooking without stirring until the temperature reaches 245°F, indicating the firm ball stage.
- Add butter and vanilla: Remove the pan from heat carefully, then stir in the unsalted butter pieces and vanilla extract until the mixture becomes smooth and glossy.
- Set the caramel: Pour the hot caramel mixture into the prepared pan and allow it to cool at room temperature for several hours until completely set and firm.
- Cut and finish: Once set, use the parchment overhang to lift the caramel from the pan. Cut into approximately 64 small squares and, if desired, sprinkle with flaky sea salt for a sophisticated touch.
- Store: Wrap each piece individually in wax paper and store in an airtight container at room temperature for up to two weeks.
Notes
- Use a candy thermometer for precise temperature control to achieve perfect caramel consistency.
- The cooling time is critical; do not rush setting the caramels to maintain chewiness.
- Flaky sea salt topping is optional but enhances the flavor with a salty contrast.
- Store wrapped caramels at room temperature to preserve texture and freshness.


