

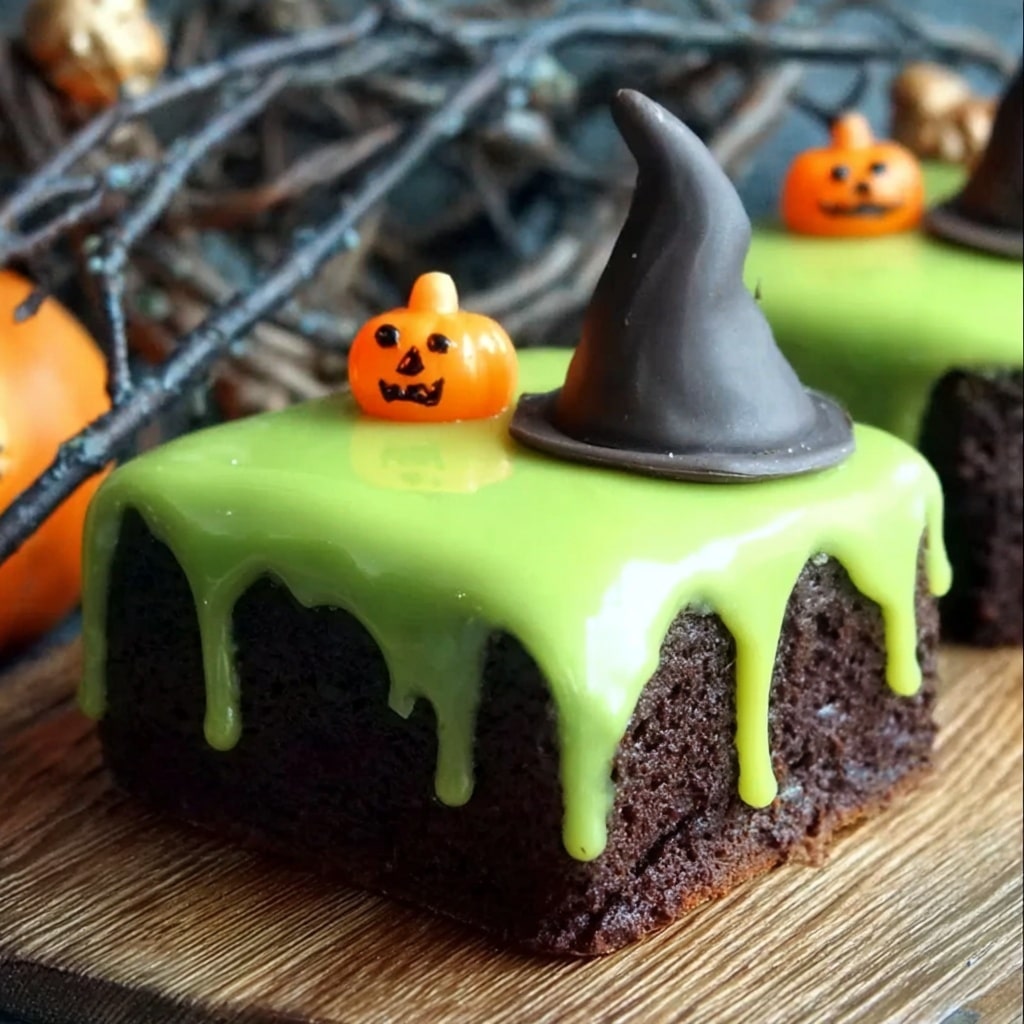
If you’re looking to wow your friends and family with a spooky dessert that’s as fun to make as it is to eat, the Melting Witch Poke Cake Recipe is your ultimate Halloween treat. This showstopper combines rich chocolate cake with luscious caramel-infused pockets, topped with whimsically green whipped frosting and the cutest witch hats made from Oreos and sugar cones. Each bite melts in your mouth, delivering a perfect balance of flavors and textures while adding a festive flair that will have everyone asking for seconds. Trust me, this is one recipe you’ll want to keep on repeat every fall!

Ingredients You’ll Need
The magic of this Melting Witch Poke Cake Recipe lies in a handful of simple, everyday ingredients. Each element plays a vital role in creating the moist, flavorful cake and the enchanting presentation that makes it truly special.
- Chocolate cake mix: The base of the cake, rich and tender to support all the fillings and toppings.
- Eggs, oil, and water: Typical cake mix essentials that ensure perfect texture and moisture.
- Sweetened condensed milk: Adds creamy sweetness and helps those signature poke holes turn into dreamy caramel pockets.
- Caramel sauce: Intensifies the flavor, blending beautifully with the condensed milk for gooey deliciousness.
- Whipped topping: The fluffy, smooth layer tinted green to give the cake that classic witchy vibe.
- Green food coloring: Just a few drops transform the whipped topping into a vibrant, eye-catching icing.
- Chocolate sugar cones: These become the iconic witch hats when cleverly decorated.
- Oreos: Perfect for forming the base of the witch hats, adding crunch and charm.
- Orange and black icing: Essential for piping festive decorations and securing the hats on the cake.
- Candy eyeballs or Halloween sprinkles (optional): Fun accents to enhance the spooky theme.
How to Make Melting Witch Poke Cake Recipe
Step 1: Prepare Your Cake
Preheat your oven to 350°F (175°C) and get ready to mix up the chocolate cake batter. Whether you’re using a box mix or your favorite homemade recipe, follow the instructions carefully for eggs, oil, and water. Pour the batter into a 9×13-inch pan and bake until a toothpick inserted comes out clean. This classic chocolate cake forms the perfect sturdy yet moist foundation for all the delicious toppings that make this Melting Witch Poke Cake Recipe so unforgettable.
Step 2: Cool and Create the Pumpkin Patch
Once baked, let the cake cool for about 10 minutes—just enough time to handle it easily but still warm. Then, using the handle of a wooden spoon, delicately poke holes about an inch apart across the entire surface. These holes are the secret behind that gooey caramel puddle, so poke generously but carefully for best effect.
Step 3: Mix and Pour the Gooey Filling
Combine the sweetened condensed milk and caramel sauce in a bowl until smooth and inviting. Pour this luscious mixture evenly over the warm cake, allowing it to seep down into all those poke holes. Let the cake rest for about 15 minutes so the filling can melt into every corner, making each bite decadently rich and moist.
Step 4: Whip Up the Enchanting Green Topping
Now for the fun and festive part! Gently stir green food coloring into your whipped topping until you achieve a vibrant witchy hue. Spoon and spread this bright green layer evenly across the cake’s surface, creating a perfect canvas for your witch hat decorations. This bright color not only screams Halloween but also adds a light, airy contrast to the dense cake beneath.
Step 5: Craft the Witch Hats
For each hat, place an Oreo cookie upside down on top of the green frosting, serving as a sturdy base. Then, attach a chocolate sugar cone over the Oreo like a pointy witch’s hat using a dab of orange or black icing as edible glue. Pipe a rim around the base of the cone with the orange icing, giving it a finished look. Add candy eyeballs or Halloween sprinkles for extra character and spooky charm.
Step 6: Chill and Serve
Pop the decorated cake into the fridge for at least an hour to let the flavors meld and the frosting set. The chilling not only makes slicing easier but also heightens the taste experience by letting all those luscious elements meld together perfectly. When ready, slice into this fallen enchanted forest and watch your guests delight in every wickedly delicious bite!
How to Serve Melting Witch Poke Cake Recipe
Garnishes
To make your Melting Witch Poke Cake Recipe even more festive, sprinkle on extra candy eyeballs, mini chocolate chips, or Halloween-themed sprinkles just before serving. These tiny details add an exciting visual layer and invite curiosity and smiles from everyone at the table.
Side Dishes
This cake shines as the star dessert, but pairing it with a scoop of vanilla bean ice cream or a dollop of freshly whipped cream complements the caramel and chocolate flavors beautifully. For a fun fall twist, serve alongside warmed spiced apple cider or a cup of rich hot chocolate to complete the autumnal celebration.
Creative Ways to Present
Instead of one large pan, you can bake this Melting Witch Poke Cake Recipe in individual ramekins or cupcake tins with a single witch hat on each. This makes for delightful party favors or personalized servings. Alternatively, place the cake on a black or orange serving platter to enhance the spooky, Halloween-themed effect and watch it disappear in no time.
Make Ahead and Storage
Storing Leftovers
Any leftover Melting Witch Poke Cake Recipe can be covered tightly with plastic wrap or stored in an airtight container in the refrigerator for up to 4 days. This keeps the whipped topping fresh and the cake moist, so you can enjoy every magical bite later without losing any of the enchantment.
Freezing
While this cake is best fresh, you can freeze it for longer storage. Wrap individual slices tightly in plastic wrap, then place them in a freezer-safe container or bag. Frozen cake will keep well for up to 2 months. Thaw overnight in the fridge before serving to preserve texture and flavor.
Reheating
If you want to warm a slice slightly, especially to enjoy with ice cream, microwave it for 10 to 15 seconds. Be careful not to melt the whipped topping. This little warm-up enhances the gooey caramel filling and the chocolate notes without compromising the cake’s charm.
FAQs
Can I make this cake from scratch instead of using a box mix?
Absolutely! A homemade chocolate cake can be used instead of a box mix to make your Melting Witch Poke Cake Recipe even more special. Just make sure it’s moist and sturdy enough to hold the poke holes and the gooey filling.
What if I don’t have green food coloring?
You can use any brand of green food coloring, whether liquid, gel, or natural alternatives like spinach or matcha powder for a subtle tint. Just start with a small amount and adjust until you get that perfect witchy green vibrance.
Can I use a different type of frosting instead of whipped topping?
Whipped topping is ideal for its light, airy texture that contrasts the rich cake and caramel filling. However, you could substitute with a light buttercream if preferred, just tint it green and spread gently.
Is this recipe kid-friendly?
Definitely! Kids love the fun decorations and the sweet, gooey flavors. Just be mindful if the kids are very young, as the candy decorations might be a choking hazard.
How long can I prepare this cake in advance?
You can assemble most of the cake a day before serving and keep it refrigerated. Add the hats and final decorations a few hours before guests arrive for the freshest appearance.
Final Thoughts
This Melting Witch Poke Cake Recipe is a deliciously playful way to embrace Halloween festivities with a homemade treat that’s sure to impress and delight. With its gooey caramel pockets, vibrant green frosting, and clever witch hat decorations, it brings together taste and theme in perfect harmony. Give it a go and make your next spooky gathering a truly sweet success!
Print
Melting Witch Poke Cake Recipe
- Prep Time: 20 minutes
- Cook Time: 35 minutes
- Total Time: 1 hour 15 minutes
- Yield: 12-15 servings
- Category: Dessert
- Method: Baking
- Cuisine: American
Description
This Melting Witch Poke Cake is a fun and festive Halloween dessert featuring a moist chocolate cake filled with a luscious caramel and sweetened condensed milk mixture, topped with vibrant green whipped topping and whimsical witch hats made from Oreos and chocolate sugar cones. Perfect for spooky celebrations, this easy-to-make poke cake combines rich flavors with playful decorations for a crowd-pleasing treat.
Ingredients
Cake
- 1 box chocolate cake mix (or homemade chocolate cake recipe)
- Ingredients required for the cake mix (usually eggs, oil, and water)
Filling
- 1 (14 oz) can sweetened condensed milk
- 1 (12 oz) jar caramel sauce
Topping and Decoration
- 1 container of whipped topping (Cool Whip or homemade)
- Green food coloring (Adam’s Extract or any brand)
- Chocolate sugar cones (for the witch hats)
- Oreos (for the hat base)
- Orange icing (Wilton orange food coloring) for decorating the hats
- Black icing for additional decorating details
- Candy eyeballs or other Halloween sprinkles (optional)
Instructions
- Preheat the Oven: Preheat your oven to 350°F (175°C) to get it ready for baking the cake.
- Prepare and Bake the Cake: Follow the package instructions to prepare the chocolate cake batter, then pour it into a 9×13-inch baking pan. Bake according to package directions until a toothpick inserted comes out clean.
- Cool the Cake Slightly: Allow the cake to cool for about 10 minutes so it is warm but not hot, which helps with poking holes and absorbing the filling.
- Poke Holes in the Cake: Using the handle of a wooden spoon, poke holes spaced about 1 inch apart all over the surface of the cake. This allows the filling to soak in deeply.
- Mix the Filling: In a bowl, combine the sweetened condensed milk and caramel sauce until fully blended.
- Fill the Cake: Slowly pour the caramel and condensed milk mixture over the cake, making sure it seeps into the poke holes. Let the cake sit for 15 minutes to absorb the filling.
- Prepare the Whipped Topping: Add green food coloring to the whipped topping and mix until you achieve a vibrant green color, perfect for a witchy look.
- Frost the Cake: Spread the green whipped topping evenly over the entire cake surface to create a spooky topping layer.
- Assemble the Witch Hats: Place an Oreo cookie on top of the cake, then attach an upside-down chocolate sugar cone on top of the Oreo using a small dab of icing as glue.
- Decorate the Hats: Pipe orange icing around the base of each cone to form a hatband, and add black icing or other details as desired.
- Add Extra Decorations: Sprinkle additional Halloween-themed sprinkles or candy eyeballs on and around the hats for a festive touch.
- Chill Before Serving: Refrigerate the finished cake for at least one hour to allow the flavors to meld and the topping to set, then serve chilled.
Notes
- You can use a homemade chocolate cake if preferred instead of a boxed mix.
- For a denser filling, use less caramel sauce or adjust sweetness to taste.
- Green food coloring can be adjusted to desired shade for a brighter or darker effect.
- If you don’t have a piping bag, use a plastic sandwich bag with the corner cut off to pipe icing.
- Store leftovers covered in the refrigerator; consume within 3-4 days for best freshness.
- This cake is a fun project for kids to help decorate safely.


