

If you adore festive treats that capture the joy of the holiday season in every bite, you are going to fall head over heels for this Little Debbie Christmas Cake Balls Recipe. These irresistibly soft, white chocolate-coated delights combine the nostalgic flavors of Little Debbie Christmas Tree Cakes with creamy cream cheese and a festive touch of sprinkles, creating tiny bites of holiday magic. Whether you’re looking for an easy-to-make party favorite, a cozy treat for family gatherings, or a fun dessert to share with friends, this recipe is your new go-to for delicious, no-fuss Christmas cheer.

Ingredients You’ll Need
This Little Debbie Christmas Cake Balls Recipe requires just a handful of simple ingredients, each playing a crucial role in bringing out the perfect balance of flavor, texture, and festive appearance. The cake provides that familiar spiced, fruity base, the cream cheese adds needed moisture and richness, the white chocolate lends smooth sweetness, and the sprinkles pop with holiday color.
- Little Debbie Christmas Tree Cakes: These are the star component and bring a comforting, flavorful foundation to the recipe.
- Cream cheese, softened: Adds creamy tanginess and helps bind the cake crumbs into balls that hold shape perfectly.
- Vanilla extract: Enhances overall sweetness and adds warm depth to the mixture.
- White chocolate chips: Provides a luscious, smooth coating that’s slightly sweet and festive.
- Vegetable oil: Keeps the melted white chocolate silky and easy to dip the cake balls.
- Red and green sprinkles (optional): Adds bright, festive decoration making the treats perfect for holiday parties.
How to Make Little Debbie Christmas Cake Balls Recipe
Step 1: Crumble the Cake
Begin by opening your box of Little Debbie Christmas Tree Cakes and crumbling all ten cakes into a large bowl. Use your hands or a fork to break the cakes into fine crumbs—this base texture is key to ensuring the cake balls will come together nicely.
Step 2: Mix the Ingredients
Add the softened cream cheese and vanilla extract to your bowl of cake crumbs. Mix thoroughly with a sturdy spoon or your hands until you have a smooth, cohesive mixture that holds its shape when pressed. This binding stage is essential for forming sturdy, moist cake balls.
Step 3: Shape the Cake Balls
Using a tablespoon-sized scoop or your hands, scoop portions of the mixture and roll them into neat balls. As you go, place each ball on a parchment-lined baking sheet. This not only keeps things tidy but prevents sticking while you prepare the chocolate coating.
Step 4: Melt the White Chocolate
Place white chocolate chips and vegetable oil into a microwave-safe bowl. Microwave in short 20 to 30-second intervals, stirring between each to encourage an even, glossy melt without burning. The oil will thin the chocolate slightly, making it easier to coat the cake balls.
Step 5: Coat the Cake Balls
Dip each cake ball carefully into the melted white chocolate, using a fork to fully coat it. Allow any excess chocolate to drip off before placing each coated ball back onto the parchment paper. This smooth coating adds a lovely sweetness and elegant finish.
Step 6: Decorate and Chill
If you want to add that extra festive flair, sprinkle red and green sprinkles over the fresh chocolate coat before it sets. Once decorated, refrigerate the cake balls for at least 30 minutes or until the white chocolate hardens and forms a beautiful, stable shell around your treats.
Step 7: Enjoy!
Your Little Debbie Christmas Cake Balls Recipe is now ready to serve. These can be enjoyed chilled straight from the fridge or at room temperature, making them an easy, crowd-pleasing dessert perfect for any holiday celebration.
How to Serve Little Debbie Christmas Cake Balls Recipe

Garnishes
To keep things simple yet show-stopping, the red and green sprinkles add festive colors without overpowering the flavors. For an extra touch, you could even dust a few with edible glitter or finely chopped nuts for a bit of texture and sparkle.
Side Dishes
These cake balls are delightful on their own but also pair beautifully with a warm cup of cocoa, a mug of coffee, or even a holiday cocktail. They make excellent finger food alongside fruit platters or cheese boards, adding a sweet contrast to savory flavors.
Creative Ways to Present
Presentation is key to holiday charm! Arrange your Little Debbie Christmas Cake Balls Recipe on a festive platter lined with a doily or sprigs of fresh pine for a rustic look. You can also serve them in decorative paper cups for easy grabbing at parties or create a dessert tree by stacking them on a tiered stand.
Make Ahead and Storage
Storing Leftovers
Once coated and chilled, these cake balls keep well stored in an airtight container in the refrigerator for up to 5 days. This makes them an excellent make-ahead treat, so you can prepare them in advance and have dessert ready when guests arrive.
Freezing
To freeze, place cake balls on a baking sheet in a single layer and freeze until firm. Then transfer to a freezer-safe container or zip-top bag, separating layers with parchment paper. They will keep in the freezer for up to 2 months, allowing you to enjoy your festive treats long after the holidays.
Reheating
There’s no need to reheat these little gems. Simply thaw frozen cake balls in the refrigerator overnight, then bring them to room temperature before serving for the best texture and flavor.
FAQs
Can I use other flavors of Little Debbie cakes for this recipe?
Absolutely! While this recipe shines with the Christmas Tree Cakes’ festive flavors, you can experiment with other Little Debbie cake varieties to create unique cake balls tailored to your taste.
What if I don’t have cream cheese on hand?
Cream cheese is important for texture and moisture, but as a substitute, you might try mascarpone cheese or even a thick frosting, though results may vary slightly.
Can I make these cake balls vegan or dairy-free?
This recipe relies on cream cheese and white chocolate, which traditionally contain dairy. However, you can try vegan cream cheese alternatives and dairy-free white chocolate chips to adapt this treat for dietary preferences.
How do I prevent the white chocolate from hardening with streaks or lumps?
Melting the chocolate slowly in short intervals and stirring well between each ensures a smooth, even consistency. Adding the vegetable oil helps keep the chocolate glossy and fluid for coating.
What is the best way to transport these cake balls to a party?
Use a sturdy container with snug compartments or line a travel box with parchment paper to prevent them from rolling around and maintain their perfect shape during transport.
Final Thoughts
If you’re craving a festive treat that delivers big on flavor with minimal fuss, this Little Debbie Christmas Cake Balls Recipe is an absolute must-try. They capture the spirit of the season in each creamy, chocolaty bite and are sure to become a cherished part of your holiday celebrations. Grab those Christmas Tree Cakes and get ready for a sweet adventure that will have everyone asking for more!
Print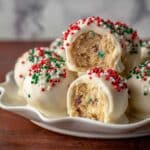
Little Debbie Christmas Cake Balls Recipe
- Prep Time: 15 minutes
- Cook Time: 0 minutes
- Total Time: 45 minutes
- Yield: 12 servings
- Category: Dessert
- Method: No-Cook
- Cuisine: American
Description
These delightful Little Debbie Christmas Cake Balls are a festive and fun dessert made by combining crumbled Christmas Tree Cakes with cream cheese, coated in white chocolate and decorated with colorful sprinkles. Perfect for holiday parties or a sweet seasonal treat, they are easy to make and sure to impress.
Ingredients
Base
- 1 box Little Debbie Christmas Tree Cakes (10 cakes)
- 1/2 cup cream cheese, softened
- 1/2 teaspoon vanilla extract
Coating
- 1 cup white chocolate chips
- 1 tablespoon vegetable oil
Decoration (optional)
- Red and green sprinkles
Instructions
- Crumble the Cake: Begin by crumbling the Little Debbie Christmas Tree Cakes into a large bowl. Use your hands or a fork to break them into fine crumbs, ensuring there are no large chunks.
- Mix: Add the softened cream cheese and vanilla extract to the cake crumbs. Mix thoroughly with a spoon or spatula until the mixture is smooth and holds together when pressed, indicating it’s ready to shape.
- Shape: Scoop tablespoon-sized portions of the mixture and roll them into balls with your hands. Place each ball on a baking sheet lined with parchment paper to prevent sticking.
- Melt Chocolate: In a microwave-safe bowl, combine white chocolate chips and vegetable oil. Microwave in 20-30 second intervals, stirring after each until the chocolate is completely melted and smooth.
- Coat: Dip each cake ball into the melted white chocolate using a fork, ensuring they are evenly coated. Let excess chocolate drip off before placing the balls back onto the parchment-lined baking sheet.
- Decorate: While the coating is still wet, sprinkle red and green sprinkles over the cake balls for a festive look, if desired.
- Chill: Refrigerate the cake balls for at least 30 minutes to allow the white chocolate coating to fully set and harden.
- Serve: Enjoy the cake balls chilled or at room temperature as a sweet holiday treat.
Notes
- Make sure the cream cheese is fully softened for easy mixing.
- You can substitute white chocolate chips with almond bark for easier melting and coating.
- For a quicker set time, chill the cake balls in the freezer for 15-20 minutes instead of the refrigerator.
- Store cake balls in an airtight container in the refrigerator for up to 5 days.
- If sprinkles are not available, shredded coconut or colored sugar can be used as alternative decorations.


