

There is something truly irresistible about a treat that brings together the creamy richness of peanut butter, the deep, comforting touch of chocolate, and a delightful crunch from crispy rice cereal—all without turning on the oven. This Healthy No-Bake Chocolate Peanut Butter Crunch Bars Recipe strikes the perfect harmony between indulgence and wholesome ingredients, offering a delicious yet nourishing snack you can feel good about. It’s quick to prepare, naturally sweetened, and sure to become your go-to recipe when you crave something sweet but wholesome.

Ingredients You’ll Need
Getting the ingredients right is the secret to making these bars both satisfying and wholesome. Each component plays a vital role in delivering the perfect texture, flavor, and health benefits you’ll love. From the creamy peanut butter that binds everything together to the crispy rice cereal that adds that much-needed crunch, these ingredients come together beautifully with just a few simple steps.
- 1 cup smooth peanut butter: Provides creamy richness and healthy fats, acting as the base that holds everything together.
- 1/2 cup maple syrup or agave nectar: A natural sweetener that lends just the right amount of sweetness without overpowering the flavors.
- 1/4 cup coconut oil: Adds moisture and helps the bars set firmly once chilled.
- 1 tsp vanilla extract: Enhances the overall flavor with its warm, inviting aroma.
- 3 cups crispy rice cereal: Creates a light, crunchy texture to balance the creamy peanut butter and chocolate.
- 1 1/2 cups dairy-free chocolate chips: Brings a luscious chocolate layer that melts in your mouth.
- 1/4 cup peanut butter (for topping): Used for drizzling, adding a pretty swirl and extra peanut butter punch.
How to Make Healthy No-Bake Chocolate Peanut Butter Crunch Bars Recipe
Step 1: Prepare Your Pan
Line an 8×8-inch baking pan with parchment paper. This little step ensures your bars won’t stick, making for easy removal once they’re set. It’s a simple prep task that pays off beautifully in the end.
Step 2: Melt and Mix the Wet Ingredients
In a large microwave-safe bowl, combine the smooth peanut butter, maple syrup, and coconut oil. Heat in 20-second bursts, stirring in between until everything is melted and mixed smoothly. This warm, glossy mixture is the heart of your bars, delivering both flavor and structure.
Step 3: Add Vanilla Extract
Stir in 1 teaspoon of vanilla extract until fully incorporated. This step elevates the flavor, adding warm, sweet notes that make every bite taste even more delightful.
Step 4: Combine with Crispy Rice Cereal
Gently fold in the crispy rice cereal until every piece is coated beautifully with the peanut butter mixture. This ensures each bite has that satisfying crunch paired with creamy sweetness.
Step 5: Press Into the Pan
Transfer the mixture to your prepared pan and press it down evenly and firmly. Compacting it well is key to bars that hold together when cut, so don’t be shy with your palms here!
Step 6: Melt the Chocolate Chips
In a microwave-safe bowl, melt the dairy-free chocolate chips in 20-second increments, stirring each time until smooth. This silky chocolate will become the decadent top layer of your bars.
Step 7: Spread the Chocolate Layer
Pour the melted chocolate over your pressed cereal mixture and spread it evenly using a spatula. This layer will become the luscious crown of your crunchy bars.
Step 8: Swirl Peanut Butter Topping
Drizzle the remaining 1/4 cup peanut butter over the chocolate and use a knife or toothpick to swirl it around. This artistic swirl not only looks fantastic but adds a double hit of peanut butter flavor.
Step 9: Chill Until Set
Pop the whole pan in the refrigerator for at least 1 hour. This chilling time allows the chocolate to harden and the bars to solidify, so they cut cleanly and hold their shape perfectly.
Step 10: Cut and Enjoy!
Lift the bars out of the pan using the parchment paper and cut into squares. Ready for serving, these bars offer a perfect blend of texture and flavor that’s sure to impress.
How to Serve Healthy No-Bake Chocolate Peanut Butter Crunch Bars Recipe

Garnishes
Sprinkle a tiny pinch of sea salt or a few chopped roasted peanuts on top just before chilling for an extra burst of texture and flavor contrast that makes every bite pop.
Side Dishes
Pair these bars with a refreshing fruit salad or a dollop of coconut yogurt for a balanced snack or dessert that combines sweet, crunchy, and creamy in every bite.
Creative Ways to Present
Try wrapping individual bars in parchment paper tied with a cute string for thoughtful homemade gifts, or serve them on a rustic wooden board with a scatter of fresh berries for a visually stunning dessert platter.
Make Ahead and Storage
Storing Leftovers
Store any leftover bars in an airtight container in the refrigerator to keep them fresh and firm. They stay great for up to a week, making them an excellent grab-and-go snack option.
Freezing
These bars freeze beautifully! Place parchment-separated layers in a freezer-safe container and freeze for up to 3 months. When ready to enjoy, just thaw in the fridge overnight.
Reheating
Since these are best enjoyed chilled, reheating is not necessary. If you prefer them a little softer, let the bars sit at room temperature for 10 minutes before serving.
FAQs
Can I use crunchy peanut butter instead of smooth?
Absolutely! Crunchy peanut butter will add an extra layer of texture to your bars, making them even more delightful with little bits of peanuts throughout.
What if I don’t have dairy-free chocolate chips?
You can use regular chocolate chips or any chocolate you love. Just make sure to adjust for sweetness and melting time accordingly.
Is there a way to make these bars nut-free?
Yes! Swap the peanut butter for sunflower seed butter or almond butter if allergies are a concern. The flavor changes a bit but remains delicious and wholesome.
Can I use honey instead of maple syrup or agave nectar?
Honey works well as a natural sweetener, but it may create a slightly different texture. Stir it in gently and adjust the amount to your preferred sweetness.
How do I make these bars vegan?
Use maple syrup or agave for sweetening, coconut oil, dairy-free chocolate chips, and ensure your peanut butter contains no animal products. This keeps the bars fully vegan and tasty.
Final Thoughts
I genuinely cannot recommend trying the Healthy No-Bake Chocolate Peanut Butter Crunch Bars Recipe enough. It’s an effortless way to satisfy your sweet tooth and fuel your body with wholesome ingredients, all while keeping your kitchen cool and fuss-free. Whether you’re making these for a quick snack, a lunchbox treat, or a crowd-pleasing dessert, they are sure to become a beloved favorite that you’ll want to make again and again.
Print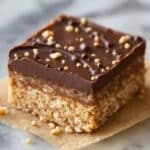
Healthy No-Bake Chocolate Peanut Butter Crunch Bars Recipe
- Prep Time: 15 minutes
- Cook Time: 10 minutes
- Total Time: 1 hour 10 minutes
- Yield: 16 servings
- Category: Snack
- Method: No-Cook
- Cuisine: American
- Diet: Gluten Free
Description
These Healthy No-Bake Chocolate Peanut Butter Crunch Bars are a delicious and simple treat combining creamy peanut butter, crispy rice cereal, and rich dairy-free chocolate. Perfect for a quick snack or dessert, they require no baking and come together in just over an hour, making them an effortless crowd-pleaser that’s both gluten-free and vegan.
Ingredients
Base Mixture
- 1 cup smooth peanut butter
- 1/2 cup maple syrup or agave nectar
- 1/4 cup coconut oil
- 1 tsp vanilla extract
- 3 cups crispy rice cereal
Topping
- 1 1/2 cups dairy-free chocolate chips
- 1/4 cup peanut butter (for topping)
Instructions
- Prepare Pan: Line an 8×8-inch baking pan with parchment paper and set aside to make removal of the bars easy.
- Melt Base Ingredients: In a large microwave-safe bowl, combine smooth peanut butter, maple syrup, and coconut oil. Heat in 20-second intervals, stirring between each until fully melted and well combined.
- Add Vanilla: Stir in the vanilla extract thoroughly to integrate the flavor.
- Combine with Cereal: Add the crispy rice cereal to the peanut butter mixture and gently fold until all cereal is evenly coated.
- Press Mixture into Pan: Transfer the coated cereal mixture into the parchment-lined pan. Press down firmly and evenly to form a compact base layer.
- Melt Chocolate Chips: In a separate microwave-safe bowl, melt the dairy-free chocolate chips using 20-second increments, stirring until smooth and glossy.
- Pour and Spread Chocolate: Pour the melted chocolate evenly over the pressed cereal mixture and spread with a spatula or the back of a spoon.
- Drizzle Peanut Butter: Warm the remaining 1/4 cup peanut butter slightly if needed, then drizzle it over the chocolate layer. Use a knife or toothpick to swirl and create a marbled effect.
- Set Bars: Refrigerate the pan for at least 1 hour, or until the chocolate topping is firm and set.
- Cut and Serve: Once set, lift the bars out using the parchment paper, cut into 16 squares, and serve.
Notes
- Use dairy-free chocolate chips to keep the bars vegan and suitable for those with lactose intolerance.
- Press the cereal mixture firmly into the pan to ensure bars hold together well.
- If the peanut butter is too thick for drizzling, warm it slightly to loosen.
- Store the bars in the refrigerator to maintain their firmness and freshness.
- These bars are perfect for a quick snack, lunchbox treat, or dessert.


