

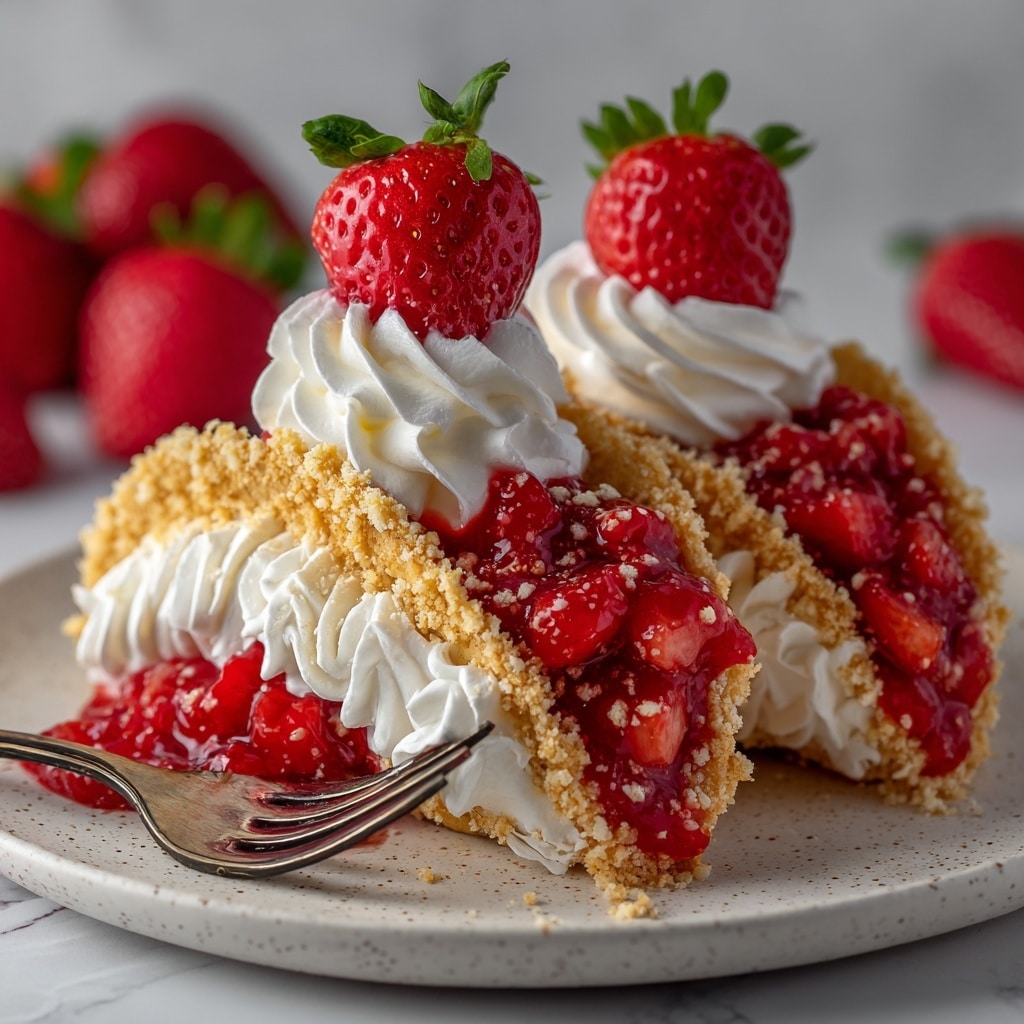
If you have a sweet tooth and love a burst of fresh fruit combined with creamy indulgence, you are going to adore this Strawberry Crunch Cheesecake Tacos Recipe. Imagine crispy, golden-baked tortilla shells filled with luscious, fluffy cheesecake, coated in a delightful strawberry crunch, and topped with a vibrant mixture of fresh strawberries. This recipe is not just a treat for your taste buds but also a fun and impressive dessert that’s perfect for sharing at gatherings or enjoying as a special everyday delight. Once you try these, they’ll quickly become one of your favorite go-to desserts!

Ingredients You’ll Need
What makes the Strawberry Crunch Cheesecake Tacos Recipe so irresistible? It’s all in the simple yet perfectly balanced ingredients that come together to create a beautiful blend of texture, flavor, and color. Each element plays a key role, from the creamy cheesecake filling to the crunchy strawberry coating and crisp taco shells.
- Cream cheese, 8 ounces: Provides the rich and creamy base for the cheesecake filling, softened for easy mixing.
- Granulated sugar, 1/2 cup plus 2 tablespoons: Sweetens the filling and adds a sparkling finish to the taco shells.
- Vanilla extract, 1 teaspoon: Gives the cheesecake filling a warm, aromatic flavor.
- Heavy cream, 1/4 cup: Whipped into the filling for lightness and fluffiness.
- Golden Oreo cookies, 1 cup finely crushed: Forms the base of the strawberry crunch coating with a buttery crunch.
- Freeze-dried strawberries, 1/4 cup crushed: Adds intense strawberry flavor and a pop of vibrant color to the coating.
- Melted butter, 1/4 cup plus 2 tablespoons: Binds the crunch coating and creates crispy taco shells.
- Large flour tortillas, 6: The crispy, warm taco shell base for the cheesecake filling.
- Fresh strawberries, 1 cup sliced: Topped on the tacos to provide juicy freshness and a tangy contrast.
- Lemon juice, 1 tablespoon: Brightens the strawberry topping and balances the sweetness.
How to Make Strawberry Crunch Cheesecake Tacos Recipe
Step 1: Prepare the Strawberry Crunch Coating
Start by pulsing the Golden Oreos in a food processor until they’re finely crushed. If you don’t have one, place the cookies in a resealable bag and crush them with a rolling pin until no big chunks remain. Then crush the freeze-dried strawberries into a powder using the same method. Combine these two in a bowl for a perfectly balanced strawberry crunch that’s both colorful and flavorful. Add the melted butter and stir well until the mixture resembles wet sand — this coating will add that signature crunch that makes this recipe shine.
Step 2: Make the Cheesecake Filling
Make sure your cream cheese is softened to room temperature—that’s the secret to a smooth, creamy filling. Beat the cream cheese until fluffy, then incorporate granulated sugar gradually. Add the vanilla extract for warmth, followed by the heavy cream, mixing gently to keep the filling light and airy. Let it chill in the fridge for at least 30 minutes to firm up—it makes filling the tacos much easier and results in a perfect texture.
Step 3: Create the Taco Shells
Cut circles out of flour tortillas with a large cookie cutter or knife. Brush both sides of each circle with melted butter, then sprinkle granulated sugar generously on both sides. Fold each circle in half to resemble a taco shape and secure with a toothpick if needed. Bake them in a 350°F oven on a lined baking sheet for about 8 to 10 minutes until crisp and golden-brown. Let them cool completely to maintain that wonderful crunch.
Step 4: Assemble the Cheesecake Tacos
Once the shells are cooled, spoon the chilled cheesecake filling inside. Then gently press the filled side of each taco into the strawberry crunch coating, ensuring every bite will have a perfect strawberry crunch. Chill the assembled tacos for at least 15 minutes so everything sets beautifully and the flavors marry together.
Step 5: Prepare and Add the Strawberry Topping
Slice fresh strawberries and toss them with granulated sugar and lemon juice. Let the mixture sit to develop a juicy, sweet-tart flavor that’s the perfect complement to the creamy filling. Just before serving, spoon this luscious topping over each taco for a fresh burst of strawberry goodness and a gorgeous finish.
How to Serve Strawberry Crunch Cheesecake Tacos Recipe
Garnishes
For an extra wow factor, consider adding fresh mint leaves on top or a light dusting of powdered sugar. Whipped cream can add an additional layer of creamy delight, and a drizzle of strawberry syrup or melted white chocolate can elevate the look and taste for special occasions.
Side Dishes
These cheesecake tacos are rich and sweet, so pairing them with a light, refreshing side works beautifully. A simple mixed berry salad, a scoop of vanilla ice cream, or a dollop of Greek yogurt with honey complements the dish without overwhelming the palate.
Creative Ways to Present
Serve the Strawberry Crunch Cheesecake Tacos Recipe on a wooden board lined with parchment paper for a rustic feel or arrange them on a colorful platter with extra fresh strawberries scattered around. You could also fill mini taco holders for a perfectly portioned dessert at parties or create a taco dessert bar where guests customize toppings!
Make Ahead and Storage
Storing Leftovers
Keep any leftover cheesecake tacos refrigerated in an airtight container. They will maintain their freshness and texture best if eaten within 2 days. Avoid leaving them out at room temperature for extended periods to keep the cheesecake filling safe and delicious.
Freezing
Because of the delicate texture of the cheesecake filling and the crunch coating, freezing is not ideal and may affect the crispiness and freshness of the tacos. If necessary, you can freeze just the cheesecake filling in an airtight container for up to a month and assemble fresh tacos when ready.
Reheating
It’s best to enjoy these tacos cold for maximum enjoyment, but if the taco shells lose their crispiness, you can refresh them by briefly placing them in a 325°F oven for a couple of minutes. Avoid heating the filled tacos as it will soften the coating and filling undesirably.
FAQs
Can I use regular strawberries instead of freeze-dried for the crunch coating?
Freeze-dried strawberries are essential for creating the fine, crunchy coating without adding moisture. Using fresh strawberries would make the coating soggy, so stick with freeze-dried for the best texture and flavor impact.
What can I substitute for Golden Oreos?
If you can’t find Golden Oreos, plain vanilla sandwich cookies or shortbread cookies work well as alternatives. Just crush them finely and combine with the freeze-dried strawberries to keep that crisp, buttery texture.
How long can I prepare the cheesecake filling in advance?
The cheesecake filling can be made up to 24 hours ahead and stored in the fridge, covered tightly. This actually helps the flavors meld and the filling firm up for easier assembly.
Can I make these taco shells gluten-free?
Absolutely! Use gluten-free flour tortillas as a substitute. Just be sure to check the baking time since different brands may crisp up quicker or take longer.
Is this recipe suitable for kids?
Definitely! Kids love the fun taco shape and sweet flavors. Just be cautious with the sugar levels based on your child’s diet preferences, and they’ll have a delightful treat that’s both playful and yummy.
Final Thoughts
There is something truly magical about the Strawberry Crunch Cheesecake Tacos Recipe that makes dessert time feel special and fun. From the crispy, buttery taco shells to the creamy, dreamy cheesecake filling and that spectacular strawberry crunch coating, every bite bursts with flavor and texture. I can’t wait for you to make this recipe your own and share it with those you love—once you try it, it’s guaranteed to become a favorite dessert in your kitchen!
Print
Strawberry Crunch Cheesecake Tacos Recipe
- Prep Time: 25 minutes
- Cook Time: 10 minutes
- Total Time: 1 hour
- Yield: 6 servings
- Category: Dessert
- Method: Baking
- Cuisine: American
- Diet: Vegetarian
Description
Strawberry Crunch Cheesecake Tacos are a delightful and easy-to-make dessert featuring a creamy cheesecake filling nestled inside crisp, buttery tortilla shells coated with a crunchy strawberry and Oreo crumb mixture. Topped with a fresh macerated strawberry topping, these tacos provide a perfect balance of creamy, crunchy, and fruity flavors that are sure to impress at any gathering.
Ingredients
Cheesecake Filling
- 8 ounces cream cheese, softened
- 1/2 cup granulated sugar
- 1 teaspoon vanilla extract
- 1/4 cup heavy cream
Strawberry Crunch Coating
- 1 cup Golden Oreo cookies, finely crushed
- 1/4 cup freeze-dried strawberries, finely crushed
- 1/4 cup melted butter
Taco Shells
- 6 large flour tortillas
- 2 tablespoons melted butter, for brushing
- 2 tablespoons granulated sugar, for sprinkling
Strawberry Topping
- 1 cup fresh strawberries, sliced
- 2 tablespoons granulated sugar
- 1 tablespoon lemon juice
Instructions
- Crush the Oreo Cookies: In a food processor, pulse the Golden Oreos until finely crushed into crumbs. Alternatively, place cookies in a resealable bag and crush with a rolling pin until no large chunks remain.
- Crush the Freeze-Dried Strawberries: Using a food processor or resealable bag and rolling pin, crush the freeze-dried strawberries into a fine powder.
- Mix Crunch Coating: In a medium bowl, combine the crushed Oreo crumbs and freeze-dried strawberry powder evenly.
- Add Butter to Coating: Pour melted butter over the crumb mixture and stir well until moistened and the texture resembles wet sand. Set aside.
- Prepare Cheesecake Filling: Ensure cream cheese is softened. Beat it in a large bowl with an electric mixer until smooth and creamy. Gradually add granulated sugar and continue beating until light and fluffy.
- Add Vanilla and Cream: Stir in vanilla extract. Then gradually add heavy cream and mix on low speed until just combined.
- Chill Filling: Cover the bowl with plastic wrap and refrigerate the cheesecake filling for at least 30 minutes to firm up slightly.
- Shape Taco Shells: Using a large 6- to 8-inch cookie cutter or a sharp knife, cut circles from the flour tortillas.
- Butter and Sugar Tortillas: Brush both sides of each tortilla circle with melted butter, then sprinkle both sides with granulated sugar.
- Form Taco Shells: Gently fold each tortilla circle in half to create a taco shell shape. Use toothpicks if needed to secure edges.
- Bake Taco Shells: Preheat oven to 350°F (175°C). Arrange taco shells on a parchment-lined baking sheet and bake for 8-10 minutes until golden brown and crispy.
- Cool Taco Shells: Remove from oven and cool completely on a wire rack before filling.
- Fill Tacos with Cheesecake: Spoon chilled cheesecake filling into each cooled taco shell.
- Apply Strawberry Crunch Coating: Gently press each filled taco shell into the strawberry crunch coating, fully covering the cheesecake filling.
- Chill Assembled Tacos: Place coated tacos on a plate or tray and refrigerate for at least 15 minutes to set.
- Prepare Strawberry Topping: Wash, hull, and slice fresh strawberries. In a medium bowl, combine sliced strawberries, sugar, and lemon juice, gently tossing to coat.
- Macerate Strawberries: Let the strawberry mixture sit for at least 15 minutes to blend flavors.
- Serve: Just before serving, spoon the macerated strawberry topping over the strawberry crunch-coated cheesecake tacos for added freshness and flavor.
Notes
- Ensure cream cheese is fully softened for a smooth filling.
- If you don’t have a food processor, use a resealable bag and rolling pin to crush cookies and freeze-dried strawberries.
- Use toothpicks to hold taco shells if they do not hold shape firmly after folding.
- The assembled tacos can be refrigerated up to 2 hours before serving to maintain crispness and flavor.
- For gluten-free option, substitute tortillas with gluten-free tortillas, but note texture changes.


