
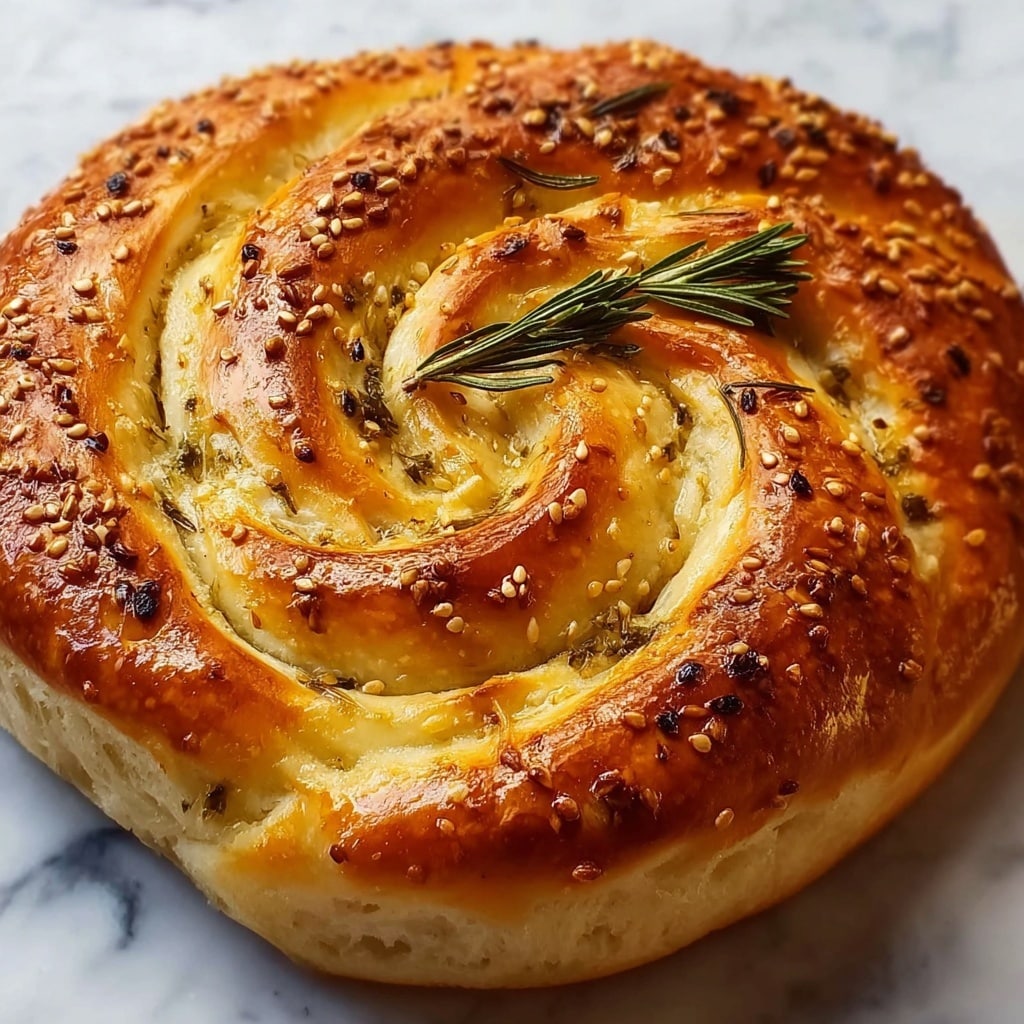
If you are looking for a bread recipe that feels like a warm hug fresh from the oven, this Rustic No Knead Rosemary Garlic Bread Recipe is exactly what you need. It’s delightfully simple to make, requiring just a few ingredients and almost no effort, but the results taste like you’ve been baking for hours. The fragrant rosemary and savory garlic blend beautifully into the crusty exterior and tender crumb, making each bite a sensory treat. Whether you’re a beginner or a seasoned baker, this recipe will quickly become a beloved staple in your kitchen.

Ingredients You’ll Need
Getting the ingredients together for this bread is a breeze, yet each element plays a crucial role. From the fragrant herbs to the yeast that makes the dough rise, every component contributes to the taste, texture, and that irresistible rustic look.
- 3 cups all-purpose flour: Provides the structure and foundation for our bread’s chewy texture.
- 3 cloves garlic, minced: Adds aromatic depth and a subtle punch of flavor that pairs perfectly with rosemary.
- 1 tablespoon finely chopped fresh rosemary: Brings an earthy, piney freshness, making the bread truly special. Feel free to add more for a bolder taste.
- 1 ¼ teaspoons kosher salt: Enhances all the flavors and balances the bread’s natural sweetness.
- ¾ teaspoon freshly ground black pepper: Offers a gentle heat that complements the garlic and rosemary wonderfully.
- ½ teaspoon instant yeast: Works quietly in the background to give your dough its beautiful rise with no kneading needed.
- 1 ½ cups water, at room temperature: Hydrates the dough to create that moist, tender crumb inside the crust.
- 2 tablespoons cornmeal: Adds a hint of texture and prevents sticking, while contributing to the rustic finish.
How to Make Rustic No Knead Rosemary Garlic Bread Recipe
Step 1: Prepare the Dough
Start by whisking together the flour, minced garlic, fresh rosemary, kosher salt, black pepper, and instant yeast in a large bowl. These dry ingredients married together create the flavorful base for your bread. Then, gradually add the water and mix with a wooden spoon or your hand. The dough will be wet and sticky — don’t fret, that’s exactly what gives it its rustic charm. The hands-off fermentation is where the magic happens.
Step 2: Let It Rest and Rise
Cover that bowl tightly with plastic wrap and let it rest at room temperature for 18 to 24 hours. During this time, the yeast slowly works its magic, forming bubbles on the surface that show your dough is alive and ready. This long rise builds flavor and texture while requiring zero kneading, making this an effortless day-one step.
Step 3: Shape and Proof the Dough
Once your dough is bubbly and airy, prepare a 10-inch cast iron skillet by lightly oiling it and sprinkling the bottom with cornmeal to prevent sticking and add texture. On a floured surface, gently shape the dough into a round shape, keeping as much air inside as possible. Place it carefully into the skillet, cover with a clean dishtowel, and let it rest until it doubles in size and springs back slowly when poked, about two hours. This second rise ensures a beautiful crumb and oven spring.
Step 4: Bake to Golden Perfection
Preheat your oven to 450 degrees Fahrenheit. Pop the skillet directly into the oven and bake for 30 to 40 minutes, letting the heat create that gorgeous golden crust that crackles when you tear into it. The smell of rosemary and garlic will fill your kitchen, making it nearly impossible to wait for it to cool. But trust me, that crunch and aroma are worth every second.
How to Serve Rustic No Knead Rosemary Garlic Bread Recipe
Garnishes
To elevate each serving, sprinkle coarse sea salt or a pinch of extra chopped rosemary on top just before serving. This adds a lovely sparkle of flavor and visual appeal. A light drizzle of good-quality olive oil on freshly sliced pieces emphasizes the bread’s rustic nature.
Side Dishes
This bread is a star alongside soups, stews, and salads. It soaks up hearty tomato bisques or creamy butternut squash soups beautifully. Pair it with a crisp green salad for a satisfying lunch or alongside roasted vegetables and grilled chicken for dinner that feels both elegant and comforting.
Creative Ways to Present
Create a rustic bread basket by slicing the bread thickly and stacking it in a charming cloth-lined bowl. Or, turn it into bruschetta topped with fresh mozzarella, tomatoes, and basil as a casual but impressive appetizer. The possibilities are endless, making the Rustic No Knead Rosemary Garlic Bread Recipe adaptable for any meal or occasion.
Make Ahead and Storage
Storing Leftovers
Wrap leftover bread in a clean kitchen towel or place it in a paper bag at room temperature to maintain its crusty exterior while keeping the interior soft. Avoid plastic wrap unless freezing, as it can make the crust soggy. Enjoy within two days for optimal freshness.
Freezing
If you want to keep your bread longer, slice it before freezing and store in an airtight freezer bag. This makes it easy to toast or warm individual slices as needed without thawing the entire loaf.
Reheating
To revive that fresh-baked experience, warm slices in a toaster or oven at 350 degrees Fahrenheit for about 5 to 7 minutes. This simple step brings back the crust’s crispness and the warm, fragrant crumb you fell in love with.
FAQs
Can I use dried rosemary instead of fresh?
Yes, you can substitute dried rosemary, though fresh rosemary delivers a brighter, more vibrant flavor. Use about one-third the amount of dried rosemary compared to fresh, and crush it slightly to release its oils.
Why does the dough need to rest so long without kneading?
The long resting time allows the yeast to slowly ferment the dough, developing flavor and a nice crumb structure while gluten forms naturally. This eliminates the need for kneading and results in a moist, airy loaf.
What if I don’t have a cast iron skillet?
You can bake this bread on a preheated baking sheet or in a Dutch oven. Just be sure to adjust baking times accordingly and use cornmeal or parchment paper to prevent sticking.
Can I add other herbs or toppings?
Absolutely! Feel free to experiment with thyme, oregano, or even a sprinkle of parmesan cheese on top before baking. The Rustic No Knead Rosemary Garlic Bread Recipe is very versatile.
Is this bread good for sandwiches?
Definitely! The sturdy yet tender crumb holds up beautifully in sandwiches and toast. It’s especially delicious with savory fillings like roasted vegetables or melted cheese.
Final Thoughts
There’s something truly special about homemade bread that fills your kitchen with irresistible aromas and brings everyone to the table. This Rustic No Knead Rosemary Garlic Bread Recipe is a charming mix of effortless preparation and delightful flavors that you’ll want to make time and again. It’s comfort, simplicity, and a touch of rustic elegance all baked into one wonderful loaf. Give it a try and watch it become an instant favorite!
Print
Rustic No Knead Rosemary Garlic Bread Recipe
- Prep Time: 10 minutes
- Cook Time: 40 minutes
- Total Time: 19 hours 10 minutes
- Yield: 8 servings
- Category: Bread
- Method: Baking
- Cuisine: American
- Diet: Vegetarian
Description
This Rustic No Knead Rosemary Garlic Bread is a simple and aromatic homemade bread recipe perfect for those who love fresh, crusty bread without the fuss of kneading. Infused with fragrant garlic and fresh rosemary, this bread requires minimal preparation and bakes to a golden brown crust with a chewy interior, ideal for pairing with soups, salads, or enjoyed on its own.
Ingredients
Dry Ingredients
- 3 cups all-purpose flour
- 1 tablespoon finely chopped fresh rosemary (or more, to taste)
- 1 ¼ teaspoons kosher salt
- ¾ teaspoon freshly ground black pepper
- ½ teaspoon instant yeast
- 2 tablespoons cornmeal
Fresh Ingredients
- 3 cloves garlic, minced
Liquids
- 1 ½ cups water, at room temperature
Instructions
- Prepare the Dough: In a large bowl, combine the all-purpose flour, minced garlic, chopped fresh rosemary, kosher salt, freshly ground black pepper, and instant yeast until evenly mixed.
- Mix Ingredients: Add the room temperature water to the dry mixture and stir with a wooden spoon or by hand until a wet, sticky dough forms, which should take about 30 seconds.
- First Rise: Cover the bowl tightly with plastic wrap and let the dough rest at room temperature for 18 to 24 hours, until the surface is dotted with bubbles indicating fermentation.
- Prepare Baking Vessel: Lightly oil a 10-inch cast iron skillet or spray it with nonstick cooking spray, then sprinkle with cornmeal to prevent sticking.
- Shape the Dough: On a lightly floured surface, gently shape the dough into a round loaf without kneading too much to keep the air bubbles intact.
- Second Rise: Place the shaped dough into the prepared skillet, cover with a clean kitchen towel, and allow it to rest at room temperature for about 2 hours until it doubles in size and passes the poke test (slowly springs back).
- Preheat Oven: While the dough is proofing, preheat your oven to 450 degrees Fahrenheit (232 degrees Celsius).
- Bake the Bread: Place the cast iron skillet with the dough into the preheated oven and bake for 30 to 40 minutes until the bread turns golden brown and crusty on the outside.
Notes
- Use fresh rosemary for the best flavor; dried rosemary can be used but reduce quantity as it is more concentrated.
- Do not skip the resting time as it allows the dough to develop flavor and texture without kneading.
- Ensure water is at room temperature to activate yeast properly.
- Use a cast iron skillet for even heat distribution and better crust formation.
- Allow the bread to cool completely before slicing to maintain its texture.


