

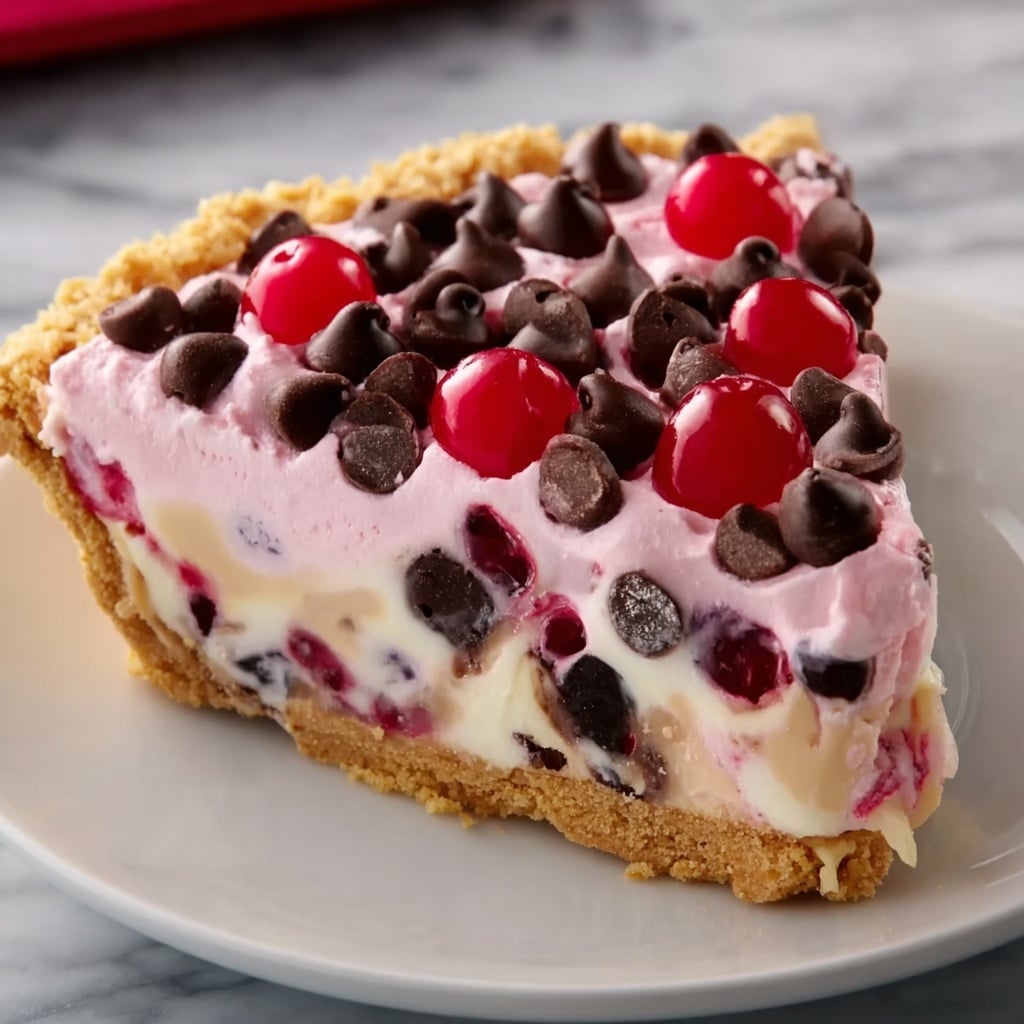
If you’re searching for a dessert that’s bursting with fruity brightness and rich chocolatey goodness but requires zero time in the oven, then this No-Bake Easy Cherry Chocolate Chip Pie Recipe is about to become your new go-to favorite. Imagine a velvety cream cheese filling studded with mini chocolate chips, layered over a crisp graham cracker crust, and crowned with luscious cherry pie filling—a truly effortless treat that tastes like it took hours to create. Whether you want a show-stopping centerpiece for your next gathering or a quick sweet fix for your own cravings, this pie delivers in every delicious bite.

Ingredients You’ll Need
The magic of this No-Bake Easy Cherry Chocolate Chip Pie Recipe lies in its simple but essential ingredients. Each plays a vital role—from creating that buttery, crunchy crust to adding creamy sweetness and the perfect pop of cherry flavor. Let’s break down these must-haves so you can truly appreciate how they come together.
- 1 1/2 cups graham cracker crumbs: The foundation of your crust, providing a slightly sweet crunch that holds everything beautifully.
- 1/2 cup melted unsalted butter: Binds the graham crackers together, adding richness without overpowering the flavors.
- 1/4 cup granulated sugar: Adds a touch of sweetness to balance the crust’s texture.
- 8 oz cream cheese, softened: Creates a smooth, creamy filling that’s the heart of this pie’s irresistible texture.
- 1/2 cup powdered sugar: Sweetens the filling with a fine touch that blends seamlessly.
- 1 tsp vanilla extract: A whisper of warmth and aroma that elevates the entire pie.
- 1 1/2 cups heavy whipping cream, whipped to stiff peaks: Lightens the filling, making it fluffy and luscious.
- 1 cup mini chocolate chips: Pockets of chocolate joy that add delightful texture and bursts of flavor.
- 1 can (21 oz) cherry pie filling: The star topping, providing juicy cherries with a vibrant color and tangy sweetness.
- Extra mini chocolate chips for garnish: Adds that final decorative touch with a hint of crunch.
- Whipped cream for serving (optional): Perfect for those who want to take indulgence to the next level.
How to Make No-Bake Easy Cherry Chocolate Chip Pie Recipe
Step 1: Prepare the Crust
Start by mixing the graham cracker crumbs, melted butter, and granulated sugar in a medium bowl. This combination forms the delicious base that gives your pie its structure and signature crunch. Press this mixture firmly into the bottom and sides of a 9-inch pie pan to ensure it holds its shape perfectly.
Step 2: Chill the Crust
Pop the crust in the refrigerator for 15-20 minutes. This chilling step helps the butter solidify so your crust sets nice and firm, ready to support all the creamy layers without falling apart when you slice.
Step 3: Make the Cream Cheese Filling
In a large bowl, beat the softened cream cheese until it’s luxuriously smooth and creamy. Adding the powdered sugar and vanilla extract next, keep mixing until everything is combined seamlessly, giving you a sweet and fragrant base that’s just begging for the next elements.
Step 4: Fold in Whipped Cream and Chocolate Chips
Carefully fold the whipped cream into the cream cheese mixture. This gentle folding keeps the filling light and fluffy, a perfect contrast to the crunch of the crust. Lastly, stir in the mini chocolate chips, distributing those melty bursts of chocolate throughout every bite.
Step 5: Assemble the Pie Layers
Spoon half of your cream cheese filling into the chilled crust, spreading it into an even layer. Next, spoon on the cherry pie filling, spreading gently but evenly—reserve a few cherries to decorate the top if you like. Finally, spread the remaining cream cheese mixture on top, smoothing it out for a beautiful finish.
Step 6: Chill Until Set
Refrigerate the assembled pie for at least 3 to 4 hours. This rest time allows the flavors to meld together while the filling firms up to the perfect sliceable consistency. The wait is absolutely worth it.
Step 7: Garnish and Serve
Right before serving, sprinkle extra mini chocolate chips over the pie and add a dollop of whipped cream along with those reserved cherries. These simple touches turn this no-bake treat into something truly irresistible and picture-perfect.
How to Serve No-Bake Easy Cherry Chocolate Chip Pie Recipe
Garnishes
The beauty of this pie is enhanced by its garnishes. A handful of extra mini chocolate chips adds texture, while a few fresh or reserved cherries on top provide pops of vibrant color and a sweet-tart contrast. A generous swirl of whipped cream not only looks inviting but also adds an extra layer of creamy indulgence.
Side Dishes
This pie pairs wonderfully with light, fresh sides that balance its richness. Think crisp mixed greens with a tangy vinaigrette, or even a scoop of vanilla ice cream if you want to double down on decadence. A cup of hot coffee or a fizzy sparkling water can also complement the flavors beautifully.
Creative Ways to Present
For a special occasion, serve this pie in clear glass pie dishes to showcase its colorful layers. You can also portion it into individual mini jars or cups, layering filling and cherries for a charming presentation. Adding edible flowers or sprinkling cocoa powder on top can elevate its visual appeal and impress your guests.
Make Ahead and Storage
Storing Leftovers
After enjoying your pie, simply cover it tightly with plastic wrap or store it in an airtight container in the fridge. It will keep beautifully fresh for up to 3 days, so you can savor each slice without worry.
Freezing
If you want to save some for later, this pie freezes well. Wrap it securely with plastic wrap and then foil before placing it in the freezer. When you’re ready to indulge again, thaw it in the fridge overnight for best texture and flavor.
Reheating
Since this is a no-bake chilled dessert, it’s best served cold and isn’t meant for reheating. To enjoy the flavor nuances and creamy texture, always serve straight from the refrigerator after chilling.
FAQs
Can I use fresh cherries instead of cherry pie filling?
Absolutely! Fresh cherries can give your pie a natural sweetness and lovely texture. Just make sure to pit them first and toss with a bit of sugar or cornstarch to mimic the consistency of pie filling.
Is it possible to make this recipe dairy-free?
Yes, by substituting cream cheese and heavy cream with dairy-free alternatives like vegan cream cheese and coconut cream, you can still achieve a rich and creamy filling that fits your dietary needs.
How long does this pie need to chill?
A minimum of 3 to 4 hours is recommended to allow the pie to set properly and flavors to meld, but chilling overnight is even better for sliceability and taste.
Can I make the crust with something other than graham crackers?
Definitely! Digestive biscuits or even crushed vanilla wafers make excellent alternatives that will give a slightly different but delicious crust texture and flavor.
What’s the best way to cut the pie cleanly?
Use a sharp knife dipped in hot water and wiped dry before slicing. This helps create smooth, clean cuts through the creamy filling and keeps your slices looking beautiful.
Final Thoughts
This No-Bake Easy Cherry Chocolate Chip Pie Recipe is a shining example of how a few straightforward ingredients can come together to create something truly magical. Whether it’s a sunny afternoon treat or a showstopper for guests, this pie’s creamy texture, fruity zing, and chocolate pops will delight everyone lucky enough to share it. So why wait? Gather your ingredients and dive into a slice of this easy, no-fuss deliciousness today!
Print
No-Bake Easy Cherry Chocolate Chip Pie Recipe
- Prep Time: 30 minutes
- Cook Time: 0 minutes
- Total Time: 3 hours 30 minutes
- Yield: 8 servings
- Category: Dessert
- Method: No-Cook
- Cuisine: American
Description
This no-bake easy cherry chocolate chip pie is a delightful combination of creamy cheesecake filling, sweet cherry pie topping, and crunchy graham cracker crust. Perfect for warm days or when you want a quick dessert without turning on the oven. The luscious blend of cream cheese, whipped cream, and mini chocolate chips layered with cherry pie filling creates a rich yet refreshing treat everyone will love.
Ingredients
Crust
- 1 1/2 cups graham cracker crumbs
- 1/2 cup melted unsalted butter
- 1/4 cup granulated sugar
Filling
- 8 oz cream cheese, softened
- 1/2 cup powdered sugar
- 1 tsp vanilla extract
- 1 1/2 cups heavy whipping cream, whipped to stiff peaks
- 1 cup mini chocolate chips
Topping and Garnish
- 1 can (21 oz) cherry pie filling
- Extra mini chocolate chips for garnish
- Whipped cream for serving (optional)
Instructions
- Prepare the Crust: Combine the graham cracker crumbs, melted butter, and granulated sugar in a medium bowl until the mixture is evenly moistened and holds together when pressed.
- Form the Crust: Press the crumb mixture firmly into the bottom and up the sides of a 9-inch pie pan to create an even crust layer.
- Chill the Crust: Refrigerate the crust for 15-20 minutes to set while you prepare the filling.
- Make the Filling: In a large mixing bowl, beat the softened cream cheese until smooth and creamy, ensuring no lumps remain.
- Add Sweeteners and Flavor: Mix in the powdered sugar and vanilla extract until the mixture is well combined and smooth.
- Fold in Whipped Cream: Gently fold the whipped heavy cream into the cream cheese mixture until the filling is light and fluffy, maintaining the airy texture.
- Add Chocolate Chips: Stir in the mini chocolate chips evenly throughout the filling to distribute chocolate flavor in every bite.
- Assemble the First Layer: Spoon half of the cream cheese filling into the chilled crust and spread it evenly to cover the base.
- Add Cherry Layer: Spread a layer of cherry pie filling over the cream cheese layer, reserving a few cherries for garnish if desired.
- Top with Remaining Filling: Spread the remaining cream cheese mixture over the cherry layer smoothly and evenly.
- Chill the Pie: Refrigerate the assembled pie for at least 3 to 4 hours to allow it to fully set and develop flavor.
- Garnish Before Serving: Sprinkle extra mini chocolate chips on top of the pie for added texture and decoration.
- Add Whipped Cream and Cherries: Optionally add a dollop of whipped cream and a few reserved cherries for a beautiful presentation.
- Slice and Serve: Cut the pie into 8 slices and enjoy this creamy, cherry-chocolate dessert.
Notes
- Ensure the cream cheese is softened to room temperature for a smooth filling without lumps.
- Whip the heavy cream to stiff peaks to get a light and stable filling texture.
- Press the crust firmly to prevent it from crumbling when serving.
- This pie must be refrigerated for several hours to set properly as it is no-bake.
- Use mini chocolate chips for a better distribution and texture in the filling.
- Cherry pie filling can be substituted with fresh cherry compote for a fresher taste.
- Optional whipped cream topping adds extra elegance and creaminess.


 Recipe 11")

