

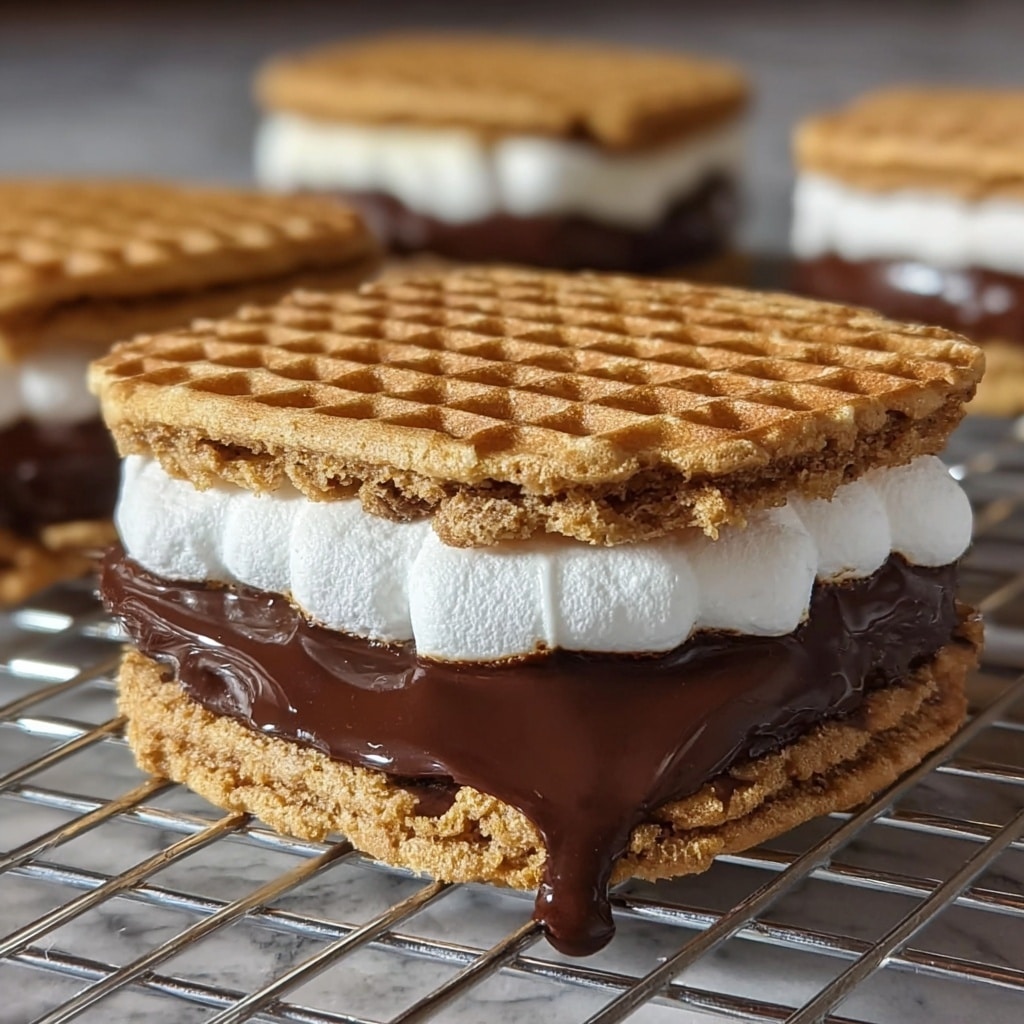
If you are looking for a fun and irresistible treat that brings together the nostalgic flavors of campfire s’mores with the rich creaminess of peanut butter, you have to try this Peanut Butter S’mores Sandwich Cookies Recipe! These cookies are soft, chewy, and filled with gooey marshmallows and chocolate chips, all sandwiched between peanut butter-infused cookies. Perfect for sharing at parties or simply satisfying your sweet tooth at home, this recipe promises a delightful bite every single time.

Ingredients You’ll Need
The beauty of this recipe lies in how simple yet thoughtfully chosen the ingredients are. Each one plays a vital role in creating the perfect balance of texture, flavor, and that mouth-watering golden color we adore in baked cookies.
- 1 cup all-purpose flour: The foundation of our cookie dough, providing structure and softness.
- 1/2 cup granulated sugar: Adds sweetness and helps with a delicate crunch on the edges.
- 1/2 cup brown sugar: Brings a rich, caramel-like moisture and chewiness to the cookies.
- 1/2 cup unsalted butter, softened: For creamy richness and that melt-in-your-mouth texture.
- 1/2 cup creamy peanut butter: Infuses a nutty flavor that perfectly complements the chocolate and marshmallows.
- 1 large egg, room temperature: Helps bind the ingredients and adds to the cookie’s tender crumb.
- 1 tsp vanilla extract: Enhances the depth of flavor with its warm aroma.
- 1/2 tsp baking soda: Gives the cookies a light rise, making them soft yet chewy.
- 3/4 cup semi-sweet chocolate chips: Melty pockets of chocolate to satisfy your sweet cravings.
- 1 cup mini marshmallows: The star ingredient for that gooey, melty s’mores magic!
How to Make Peanut Butter S’mores Sandwich Cookies Recipe
Step 1: Preheat and Prepare
Begin by preheating your oven to 350 degrees Fahrenheit (175 degrees Celsius). This sets the perfect temperature to bake your cookies evenly. Line your baking sheets with parchment paper to prevent sticking and make cleanup a breeze.
Step 2: Cream the Butter and Sugars
In a large bowl, use a mixer or a strong arm to cream together the softened butter, granulated sugar, brown sugar, and creamy peanut butter. You want to beat them until the mixture is light and fluffy — this step is crucial as it incorporates air, which will give your cookies a delightful texture.
Step 3: Add Egg and Vanilla
Now add the egg and vanilla extract into the creamed mixture. Beat until everything is fully combined and smooth. This helps create a luscious dough base that’s rich and fragrant.
Step 4: Combine Dry Ingredients and Add to Wet Mixture
In a separate bowl, whisk the all-purpose flour with the baking soda. Gradually add this dry mixture into the wet ingredients, mixing gently until just combined. Overmixing here can lead to tougher cookies, so be gentle to make sure your cookies stay soft and tender.
Step 5: Fold in Chocolate Chips
Take your time to fold in the semi-sweet chocolate chips evenly throughout the dough. These chocolate gems aren’t just for flavor — they add beautiful texture and pockets of melted chocolate in every bite.
Step 6: Scoop Dough onto Baking Sheets
Using a tablespoon, scoop out dough balls onto your lined baking sheets, leaving enough space between them to allow spreading. This spacing will help each cookie bake evenly and maintain their lovely round shape.
Step 7: Bake the Cookies
Bake your cookies for 10 to 12 minutes or until the edges turn a gorgeous golden color while the centers remain soft and slightly underbaked. This contrast is key to getting that perfect chewy texture.
Step 8: Add the Mini Marshmallows
Quickly press mini marshmallows into the center of each cookie right when they come out of the oven. Then pop them back into the oven for an additional 1 to 2 minutes until the marshmallows puff up and become delightfully gooey.
Step 9: Assemble the Sandwich Cookies
Allow the cookies to cool slightly on the baking sheet so they firm up just enough to handle. Then, carefully sandwich two cookies together, marshmallow sides facing in. The marshmallows will stick the cookies together, creating that classic s’mores sandwich you know and love.
How to Serve Peanut Butter S’mores Sandwich Cookies Recipe
Garnishes
For an extra touch of indulgence, dust your peanut butter s’mores sandwich cookies with a light sprinkle of powdered sugar. You can also drizzle some melted chocolate or even a little caramel over the top for a decadent finish that’s sure to impress.
Side Dishes
Pair these sandwich cookies with a cold glass of milk or a scoop of vanilla ice cream for a classic pairing. If you’re serving them as part of a larger dessert spread, fresh berries or a cup of rich hot cocoa make fantastic companions to bring out the s’mores vibe.
Creative Ways to Present
Feeling playful? Stack several sandwich cookies to create a mini tower for a fun party centerpiece. You can also wrap each cookie sandwich individually in parchment paper tied with a string, making them adorable, portable treats for picnics or gift bags.
Make Ahead and Storage
Storing Leftovers
Store your sandwich cookies in an airtight container at room temperature for up to 3 days. The cookies will maintain their soft texture, and the marshmallows inside will remain delightfully gooey.
Freezing
You can freeze the cookie sandwiches by wrapping them individually in plastic wrap, then placing them in a freezer-safe container or bag. They keep well for up to 2 months. Just thaw them at room temperature before enjoying.
Reheating
To bring the gooey magic back to life, warm the cookies slightly in the microwave for 10 to 15 seconds. This gentle heat will soften the marshmallows and chocolate, making each bite melt-in-your-mouth delicious.
FAQs
Can I use crunchy peanut butter instead of creamy?
Absolutely! Using crunchy peanut butter will add a delightful texture to the cookies, giving you little bits of peanut crunch that contrast nicely with the gooey marshmallows.
What if I don’t have mini marshmallows?
Regular-sized marshmallows can work too; just cut them into smaller pieces before adding them to the cookies so they fit well and melt evenly.
Can these cookies be made gluten-free?
Yes! Substitute the all-purpose flour with a gluten-free flour blend and make sure your baking soda and other ingredients are gluten-free certified for a safe and tasty alternative.
How do I prevent the cookies from spreading too much during baking?
Make sure your butter and peanut butter are not too warm or melted, and chill the dough slightly before scooping. This helps maintain their shape and prevents excessive spreading.
Can I double this Peanut Butter S’mores Sandwich Cookies Recipe?
Yes, doubling the recipe works perfectly and is great for bigger gatherings. Just be sure to adjust your baking sheets accordingly and bake in batches to avoid overcrowding the oven.
Final Thoughts
There is something truly special about this Peanut Butter S’mores Sandwich Cookies Recipe that makes you feel cozy and nostalgic with every bite. Whether you’re cooking for family, friends, or just treating yourself, these cookies bring smiles and satisfaction in the most delicious way. I hope you’ll give this recipe a try and create many sweet memories with it!
Print
Peanut Butter S’mores Sandwich Cookies Recipe
- Prep Time: 15 minutes
- Cook Time: 15 minutes
- Total Time: 30 minutes
- Yield: 12 sandwich cookies (approximately 12 servings)
- Category: Dessert
- Method: Baking
- Cuisine: American
Description
These Peanut Butter S’mores Sandwich Cookies combine the classic flavors of peanut butter, chocolate, and marshmallows in a deliciously soft and chewy cookie. Perfect for a fun twist on traditional s’mores, these cookies are easy to prepare and bake, making them an ideal treat for any occasion.
Ingredients
Dry Ingredients
- 1 cup all-purpose flour
- 1/2 tsp baking soda
Wet Ingredients
- 1/2 cup unsalted butter, softened
- 1/2 cup creamy peanut butter
- 1 large egg, room temperature
- 1 tsp vanilla extract
Sugars
- 1/2 cup granulated sugar
- 1/2 cup brown sugar
Add-ins
- 3/4 cup semi-sweet chocolate chips
- 1 cup mini marshmallows
Instructions
- Preheat Oven: Preheat your oven to 350°F (175°C) to ensure it reaches the optimal baking temperature for the cookies.
- Cream Butter and Sugars: In a mixing bowl, cream together the softened unsalted butter, granulated sugar, brown sugar, and creamy peanut butter until the mixture is light and fluffy—this helps create a tender cookie texture.
- Add Egg and Vanilla: Beat in the large egg and vanilla extract until the ingredients are fully combined, ensuring a smooth dough.
- Mix Dry Ingredients: In a separate bowl, whisk together the all-purpose flour and baking soda, then gradually add this to the wet mixture. Stir gently to combine without overmixing to keep the cookies tender.
- Fold in Chocolate Chips: Incorporate the semi-sweet chocolate chips evenly throughout the dough for a rich chocolate flavor in every bite.
- Portion Dough: Scoop tablespoon-sized portions of dough onto baking sheets lined with parchment paper, spacing them apart to allow for spreading.
- Initial Bake: Bake the cookies in the preheated oven for 10-12 minutes until the edges turn golden brown but the centers remain soft.
- Add Marshmallows: Remove the baking sheets from the oven and press mini marshmallows gently into the center of each cookie. Return to the oven and bake for an additional 1-2 minutes until the marshmallows puff up.
- Assemble Sandwich Cookies: Let the cookies cool slightly, then sandwich two cookies together, marshmallow-side in, to create delicious s’mores sandwich cookies.
Notes
- For best results, use room temperature egg and softened butter to ensure smooth mixing.
- You can substitute crunchy peanut butter if you prefer added texture.
- Press the marshmallows gently so they don’t fully melt off the cookie during the second bake.
- Allow cookies to cool enough before sandwiching to prevent the marshmallows from sticking to your fingers.
- Store the sandwich cookies in an airtight container to keep them soft and fresh for up to 3 days.


