
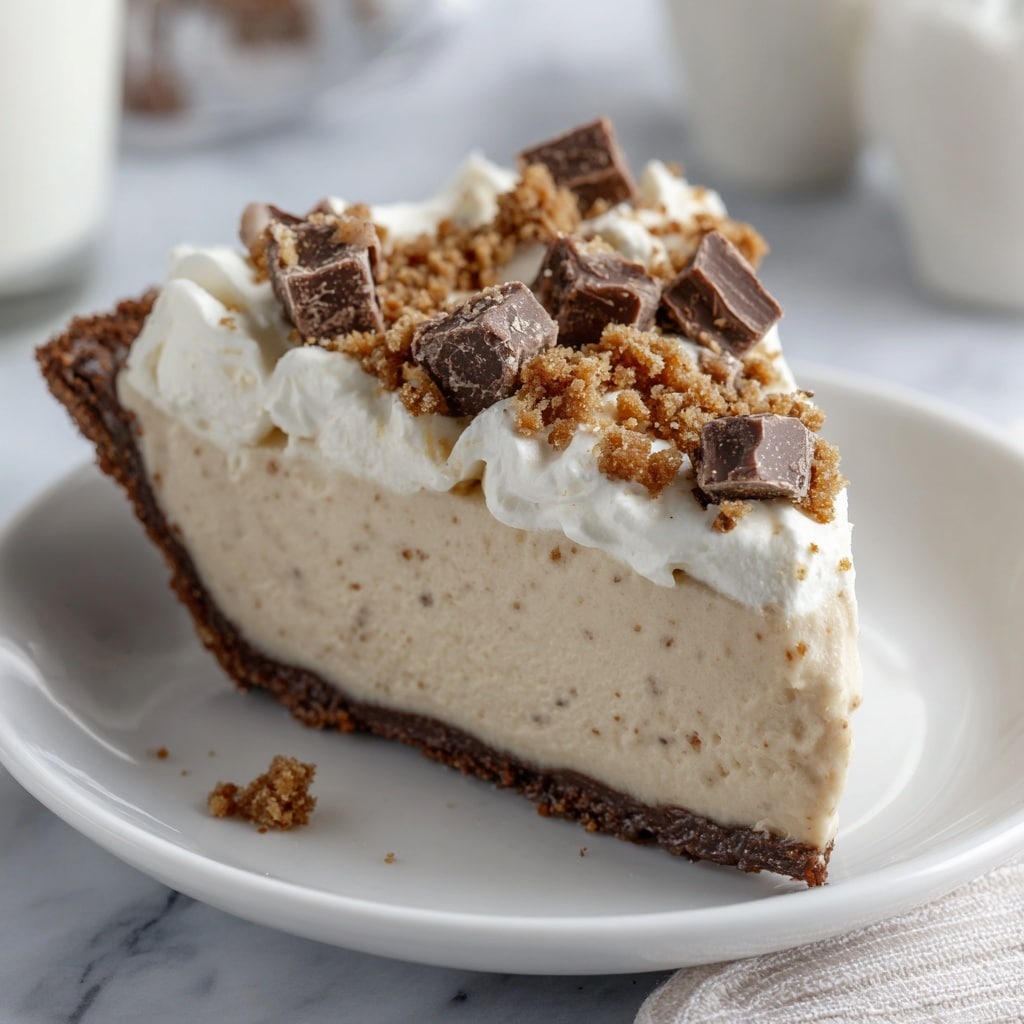
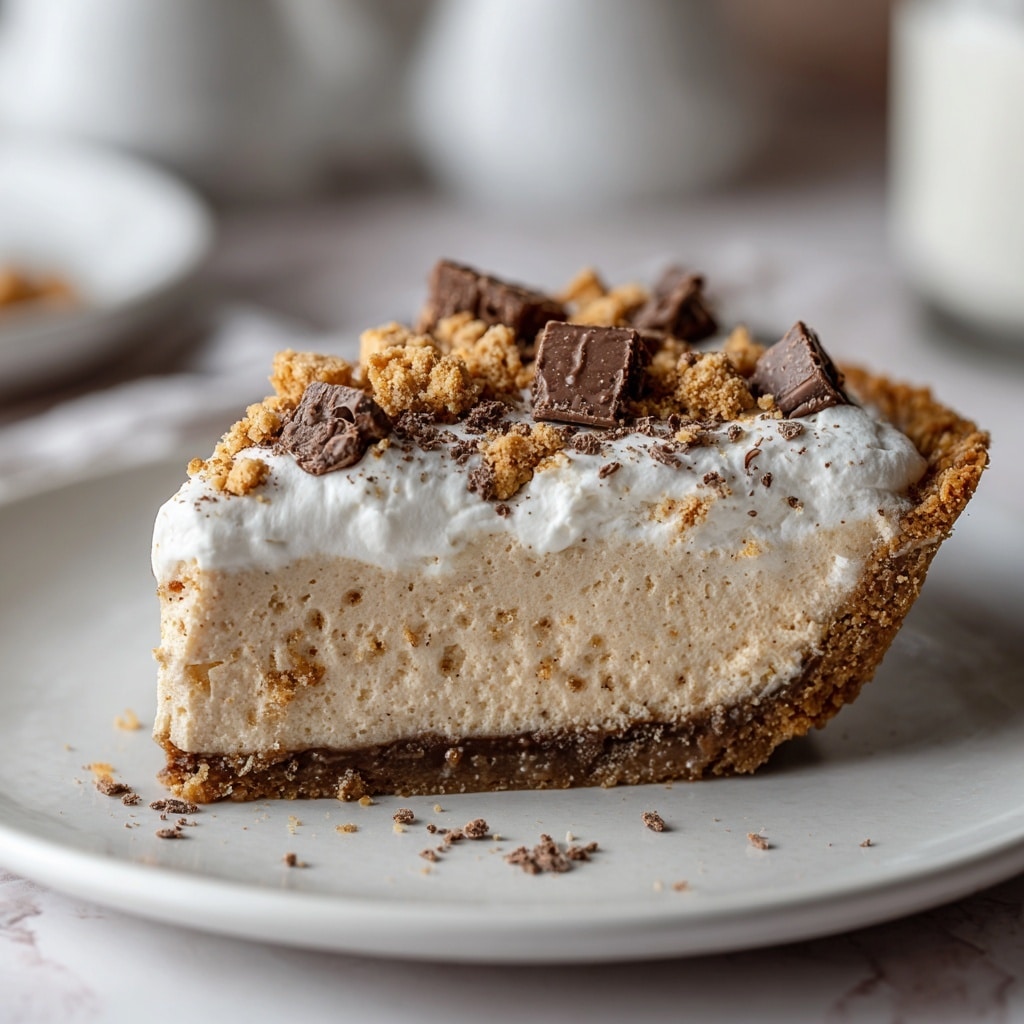
If you’re craving a dessert that brings together the irresistible flavors of crunchy candy and creamy peanut butter, this Butterfinger Peanut Butter Pie Recipe is exactly what you need. It combines a buttery graham cracker crust with a luscious peanut butter filling, all studded with crunchy Butterfinger pieces for that perfect texture contrast. Every bite delivers a rich, sweet, and slightly salty experience that feels like a celebratory treat but is simple enough to whip up on a weeknight. If you love peanut butter and candy bars, this pie will quickly become your go-to dessert whenever you want to impress without stress.

Ingredients You’ll Need
Every ingredient in this Butterfinger Peanut Butter Pie Recipe plays a starring role, creating layers of flavor and texture that work beautifully together. From the buttery graham cracker crust to the creamy peanut butter and tangy cream cheese, to the iconic crunch of Butterfinger bars, each component is essential to making this pie unforgettable.
- 2 cups graham cracker crumbs: Adds a crunchy, slightly sweet base that holds the pie together perfectly.
- 1/2 cup unsalted butter, melted: Binds the crust ingredients while adding rich, buttery flavor.
- 1 cup creamy peanut butter: The star flavor, providing smoothness and a luscious nutty taste.
- 8 oz cream cheese (softened): Adds a velvety tang that balances the sweetness and lends body to the filling.
- 1 cup powdered sugar: Sweetens the filling with that delicate powdered texture, dissolving smoothly.
- 1 tsp vanilla extract: Enhances all the flavors, adding depth and a warm aroma.
- 8 oz whipped topping (like Cool Whip, thawed): Makes the filling light and fluffy, perfect for that airy pie texture.
- 4 Butterfinger candy bars (2.1 oz each, crushed, plus extra for topping): Brings the pie’s signature crunch and a snappy, chocolate-peanut taste.
How to Make Butterfinger Peanut Butter Pie Recipe
Step 1: Prepare the Crust
Start by mixing the graham cracker crumbs with the melted butter in a medium bowl until every crumb is coated and clumps together nicely. Press this mixture firmly into the bottom and sides of a 9-inch pie dish — this forms the golden, buttery base your pie will sit on. Pop it into the fridge to chill while you whip up the filling.
Step 2: Make the Peanut Butter Filling
In a large bowl, beat the creamy peanut butter and softened cream cheese until silky smooth. It may take about 2 minutes of good mixing to get that perfect texture. Then, add in the powdered sugar and vanilla extract, continuing to beat until everything is well combined and creamy, about another 1 to 2 minutes. This mixture is where all the luscious flavors start to come alive.
Step 3: Fold in the Whipped Topping
Gently fold the whipped topping into your peanut butter mixture. The key here is to be gentle — you want to keep as much air in the filling as possible, so don’t overmix. This step creates a light, fluffy texture that makes each bite feel like a cloud of peanut buttery bliss.
Step 4: Add the Butterfinger Pieces
Take three of your Butterfinger candy bars and crush them into small, chunky pieces. Fold these into the filling to distribute bursts of crisp, chocolate-coated peanut crunch throughout the pie. This step is where the pie really earns its name and personality.
Step 5: Assemble the Pie
Pour your beautifully creamy filling into the chilled graham cracker crust and smooth out the top with a spatula so it’s even and inviting. At this point, the pie is already looking amazing and smelling like a peanut butter dream.
Step 6: Add the Topping
Crush the last Butterfinger bar and sprinkle it generously on top of the pie, giving it that extra crunch and a pretty, textured finish. This topping is what takes the pie from delicious to truly show-stopping.
Step 7: Chill to Set
Place the pie in the refrigerator for at least 4 hours or better yet, overnight, to let it set completely. This chilling step ensures the filling firms up enough for easy slices while keeping the pie delectably creamy.
Step 8: Serve and Enjoy
Slice your pie and serve it chilled. For clean, professional-looking slices, dip your knife in hot water and wipe it dry between cuts — trust me, it makes all the difference! Now, sit back and savor the perfect balance of creamy peanut butter and crispy Butterfinger crunch.
How to Serve Butterfinger Peanut Butter Pie Recipe
Garnishes
The pie is fabulous on its own, but you can absolutely jazz it up with some creative garnishes. A dollop of whipped cream adds extra lightness, while a drizzle of caramel or chocolate sauce brings a decadent flair. For a pop of color and freshness, scatter some chopped roasted peanuts or a few fresh raspberries on top – they complement the pie’s rich flavors beautifully.
Side Dishes
This pie shines as a dessert after a casual dinner or special occasion meal. Pair it with a simple cup of coffee or a scoop of vanilla ice cream for the ultimate indulgence. If you want something lighter, fresh fruit or a tangy lemon sorbet can offer a refreshing counterpoint that balances the pie’s richness.
Creative Ways to Present
For a fun twist, serve individual portions in small glass jars or parfait cups layered with whipped cream and crushed Butterfinger pieces. You could also turn this Butterfinger Peanut Butter Pie Recipe into mini tarts using a muffin tin crust or create a no-bake trifle by layering chopped pie with whipped cream and chocolate shavings. Presentation can be as playful as your taste buds want!
Make Ahead and Storage
Storing Leftovers
Once your pie is made, cover it tightly with plastic wrap or a pie saver and keep it refrigerated. It will stay fresh and delicious for up to 3 days, so you can enjoy second helpings without rushing.
Freezing
If you’d like to store this pie longer, it freezes wonderfully. Wrap it securely with plastic wrap and then aluminum foil to prevent freezer burn. When wrapped properly, the pie can last in the freezer for up to 1 month without losing its lovely texture or flavor.
Reheating
Since this is a chilled, no-bake pie, it’s best enjoyed cold and shouldn’t be reheated. Just thaw frozen slices in the refrigerator overnight before serving, so your Butterfinger Peanut Butter Pie Recipe retains that perfect creamy consistency and crunch.
FAQs
Can I use crunchy peanut butter instead of creamy?
Yes, you can substitute crunchy peanut butter for creamy if you want extra texture in the filling, but keep in mind it will make the pie a bit chunkier. The creamy peanut butter provides the smooth, melt-in-your-mouth consistency that contrasts nicely with the Butterfinger crunch.
What can I use instead of Butterfinger bars if I can’t find them?
If Butterfinger bars aren’t available, you can try similar peanut butter and toffee candy bars like Heath or Skor bars. The flavor won’t be exactly the same, but the similar crunchy texture and nutty flavors still work well in this pie.
Is this pie gluten-free?
The traditional recipe uses graham cracker crumbs which contain gluten. To make it gluten-free, you can substitute with gluten-free graham cracker crumbs or another gluten-free cookie crumb of your choice. Just make sure the candy bars are gluten-free as well.
Can I make this pie dairy-free?
To make a dairy-free version, look for dairy-free alternatives for cream cheese and whipped topping, and use a dairy-free buttery spread for the crust. Be sure to double-check that your Butterfinger bars are free of dairy, or use a suitable candy alternative.
How long does the pie need to chill?
The pie should chill for at least 4 hours to set properly, but overnight chilling is best for the creamiest texture and easiest slicing. This gives the peanut butter filling time to firm up while keeping that rich, airy mouthfeel.
Final Thoughts
If you’ve been searching for a dessert that’s easy to make but feels utterly special, this Butterfinger Peanut Butter Pie Recipe is your winning ticket. It’s creamy, crunchy, and bursting with the kind of flavors that draw everyone to the table. Trust me, once you try it, you’ll want to make it again and again for family, friends, or just because you deserve a little sweet joy.
Print
Butterfinger Peanut Butter Pie Recipe
- Prep Time: 30 minutes
- Cook Time: 0 minutes
- Total Time: 4 hours 30 minutes
- Yield: 8 servings
- Category: Dessert
- Method: No-Cook
- Cuisine: American
Description
This no-bake Butterfinger Pie with Peanut Butter is a creamy, crunchy dessert featuring a graham cracker crust, a luscious peanut butter and cream cheese filling, and crushed Butterfinger candy bars folded in and sprinkled on top. Perfectly sweetened with powdered sugar and the lightest whipped topping, this pie is a delightful treat that freezes no oven time and chills to set into a rich, textured delight.
Ingredients
Crust
- 2 cups graham cracker crumbs
- 1/2 cup (1 stick) unsalted butter, melted
Filling
- 1 cup creamy peanut butter
- 8 oz cream cheese, softened
- 1 cup powdered sugar
- 1 tsp vanilla extract
- 8 oz whipped topping (such as Cool Whip), thawed
- 4 Butterfinger candy bars (2.1 oz each), crushed (plus extra for topping)
Instructions
- Prepare the crust: In a medium bowl, combine the graham cracker crumbs and melted butter until the mixture is well blended. Press it firmly into the bottom and up the sides of a 9-inch pie dish. Refrigerate the crust while preparing the filling.
- Make the filling: In a large bowl, beat the creamy peanut butter and softened cream cheese together until smooth and creamy, about 2 minutes. Add the powdered sugar and vanilla extract, continuing to mix until fully incorporated and well combined, about 1-2 minutes more.
- Fold in whipped topping: Gently fold the thawed whipped topping into the peanut butter and cream cheese mixture until just combined, taking care not to overmix to maintain a light texture.
- Add Butterfinger pieces: Crush three of the Butterfinger bars and fold the crushed candy pieces into the peanut butter filling evenly.
- Assemble the pie: Pour the filling mixture into the prepared crust, spreading the top smoothly with a spatula for an even finish.
- Add topping: Crush the remaining Butterfinger bar and sprinkle the pieces evenly over the top of the pie for added crunch and decoration.
- Chill: Refrigerate the completed pie for at least 4 hours or preferably overnight to allow it to set properly and for flavors to meld.
- Serve: When ready to serve, slice the pie into portions. For clean slices, dip your knife in hot water and wipe it dry between each cut.
Notes
- This is a no-bake pie, requiring only chilling to set the filling.
- Use a spatula to gently fold ingredients to avoid deflating the whipped topping.
- For best results, chill overnight to ensure the pie is firm and flavors meld well.
- Butterfinger bars can be substituted with similar peanut butter candy bars if preferred.
- Storing leftover pie covered in the refrigerator is recommended; consume within 3-4 days.


