

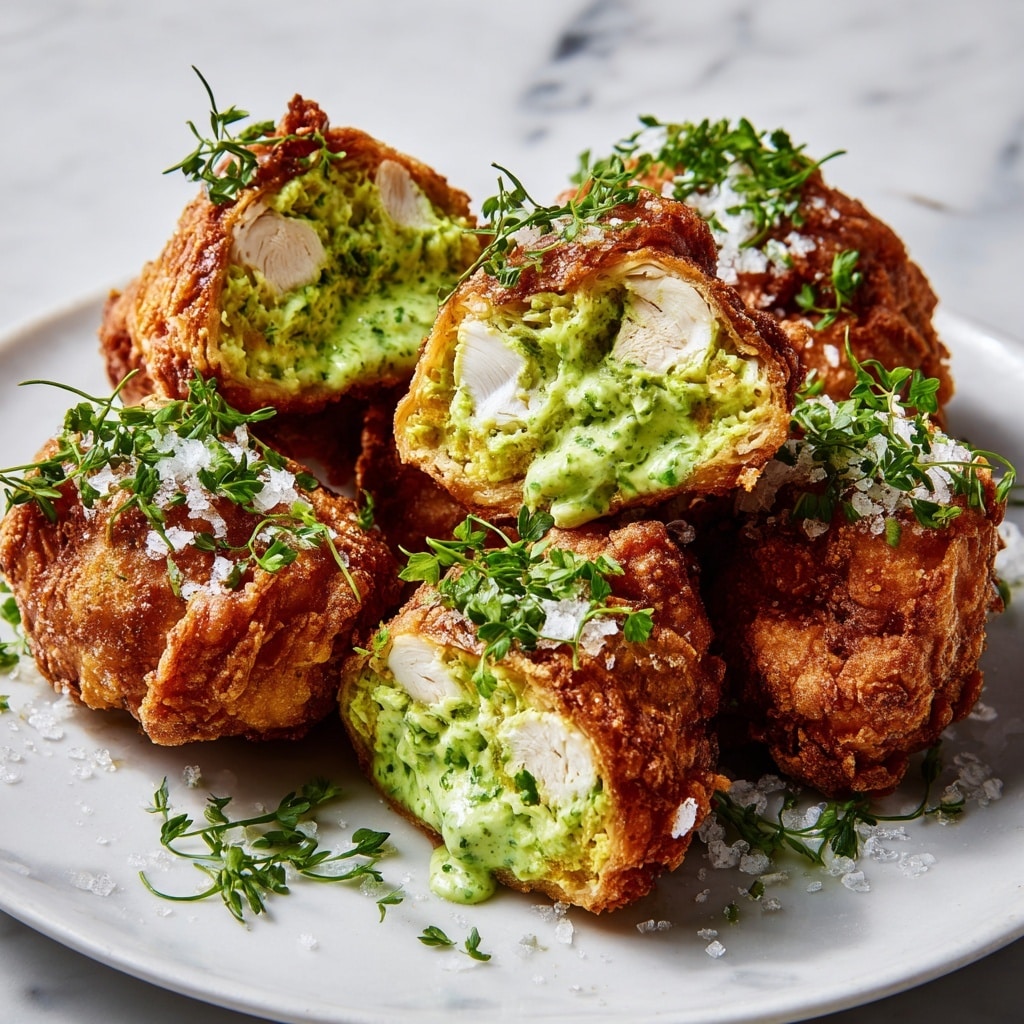
There is something simply magical about a beautifully crispy exterior giving way to tender, juicy chicken wrapped around a melting, fragrant garlic butter center. This Chicken Kiev with Garlic Butter Recipe is a true showstopper that combines classic technique with bold flavors, making it a perfect dish to impress family or friends. Whether it’s your first time making it or you’re a seasoned fan, this recipe will guide you through every step to achieve that irresistible buttery burst in every bite.

Ingredients You’ll Need
These ingredients might seem straightforward, but each one plays an essential role in creating the perfect Chicken Kiev experience. From the rich butter that carries the delightfully sharp garlic and fresh parsley, to the crispy panko coating that promises that golden crunch, every element is carefully chosen to build layers of flavor and texture.
- Unsalted butter (90g): The creamy base for the garlic butter filling that melts inside your chicken.
- Fresh parsley (2 teaspoons, finely chopped): Adds a fresh, herbaceous brightness to cut through the richness.
- Garlic (2 cloves, minced): Provides that irresistible pungent aroma and kick in the butter.
- Salt (¼ teaspoon): Enhances all flavors; omit if using salted butter for balance.
- Chicken breasts (2, skinless and boneless): The tender vessels that hold the flavorful butter center.
- Salt (½ teaspoon) and freshly ground black pepper (¼ teaspoon): Simple seasoning to make sure the chicken itself shines.
- Large egg (1, lightly whisked): Helps the coating stick for that perfect crunch.
- All-purpose flour (¼ cup): The first layer in the chicken’s crispy crust journey.
- Panko breadcrumbs (1 cup): The secret weapon for an ultra-crispy, golden coating.
- Canola or vegetable oil (around 1 liter): The frying medium that gives the chicken that classic crispy finish.
- Chopped parsley (for garnish): A fresh, colorful touch to your finished plate.
How to Make Chicken Kiev with Garlic Butter Recipe
Step 1: Prepare the Garlic Butter Filling
Start by mixing softened unsalted butter with freshly chopped parsley, minced garlic, and a pinch of salt. This fragrant butter blend forms the heart of the dish, so be sure to mix everything thoroughly to evenly distribute those vibrant flavors. Once mixed, shape the butter into a compact rectangle on baking paper and pop it in the fridge until firm. This allows you to cut it easily into neat batons that’ll fit perfectly inside your chicken breasts.
Step 2: Flatten and Season the Chicken
Lay each chicken breast between sheets of parchment paper and gently pound them down to an even thickness of about half a centimeter. This step ensures the chicken cooks evenly and creates enough room to enclose the garlic butter. Season both sides generously with salt and freshly ground black pepper to bring out the natural chicken flavor.
Step 3: Stuff and Roll the Chicken
Place a baton of the chilled garlic butter in the center of each flattened chicken breast. Carefully fold the sides over the butter, then roll the chicken up tight, making sure the seam is on the underside to keep everything sealed in. Wrap each roll tightly with cling film, twisting the ends to maintain the shape, and freeze for 30 minutes — this helps the butter stay inside while cooking.
Step 4: Breading the Chicken
Set up three separate bowls for your breading station: one with flour, one with lightly whisked egg, and one with panko breadcrumbs. Remove the chicken rolls from their cling film and give each roll a proper coating by dusting in flour first, dipping in egg second, and finally rolling in panko. Press gently to ensure the breadcrumbs adhere well. The extra freeze time after rolling hardens everything just enough to maintain that beautiful shape during frying.
Step 5: Fry and Bake to Perfection
Preheat your oven to 180°C (350°F). In a deep pot, heat up about a liter of oil to 190°C (375°F) — the ideal frying temperature for a crisp, golden crust. Carefully lower the chicken into the oil and fry for 2-3 minutes per side until perfectly golden. Transfer the rolls to a rack over a baking sheet and bake them for 15 minutes until the chicken is cooked thoroughly and the internal temperature hits 65°C (150°F). Once done, let the rolls rest a couple of minutes to settle all those delicious juices inside.
How to Serve Chicken Kiev with Garlic Butter Recipe
Garnishes
A simple sprinkle of finely chopped fresh parsley on top adds just the right touch of color and a subtle herbaceous lift. It’s a no-fuss garnish that beautifully complements the rich, buttery center of the Chicken Kiev without overpowering it.
Side Dishes
Because this dish is rich and indulgent, pairing it with light, fresh sides works beautifully. Think steamed green beans tossed with lemon, a crisp garden salad, or even silky mashed potatoes that soak up all those buttery drippings. Roasted baby carrots or a lightly dressed mixed leaf salad add a refreshing contrast that makes the meal balanced and complete.
Creative Ways to Present
For a special occasion, slice the Chicken Kiev rolls into neat rounds to reveal that glorious, molten garlic butter core. Arrange them on a platter with bright microgreens, or serve atop a bed of herbed rice for a stunning and elegant presentation. Drizzling a touch of lemon-infused olive oil around the plate adds a citrusy pop that complements the garlic butter beautifully.
Make Ahead and Storage
Storing Leftovers
You can store any leftover Chicken Kiev in an airtight container in the refrigerator for up to 2 days. To preserve that crispy exterior, avoid covering the pieces tightly to prevent sogginess. Instead, place parchment paper between layers if stacking is necessary.
Freezing
This recipe works wonderfully for freezing, especially if you prepare the chicken rolls and bread them in advance. After the initial 30-minute freeze post-wrapping, you can freeze them long term individually wrapped in cling film and packed in a freezer-safe bag for up to 3 months. Just skip the fresh frying step and bake directly from frozen, adding a little extra time to ensure thorough cooking.
Reheating
To reheat, bake the Chicken Kiev in a preheated oven at 180°C (350°F) until warmed through, about 12-15 minutes. Avoid microwaving as this tends to make the coating soggy and the textures lose their signature crispness.
FAQs
Can I use salted butter instead of unsalted for the garlic butter filling?
Yes, but be sure to omit or reduce the added salt in the recipe to avoid over-seasoning. The goal is a balanced flavor where the salt enhances without overpowering the delicate garlic butter.
What can I substitute for panko breadcrumbs if I don’t have them?
If you don’t have panko on hand, regular breadcrumbs can work, though they won’t give the same light, airy crunch. Crushing cornflakes or crackers finely can also create a nice crispy texture as an alternative coating.
How do I prevent the garlic butter from leaking out during cooking?
The key is chilling and tightly wrapping the chicken with cling film to seal everything firmly, then freezing before breading. This step helps the butter stay in place and slowly melt inside, avoiding any leakage during frying and baking.
Is it possible to bake the Chicken Kiev without frying first?
While frying gives that iconic golden crust, you can bake the breaded rolls directly, though the exterior won’t be as crispy. To mimic crunch, lightly spray or brush the coated chicken with oil before baking at a high temperature.
Can I make more than two servings easily?
Absolutely! Simply multiply the ingredients accordingly. Just keep the cooking time and temperature consistent, and consider frying in batches to maintain the oil temperature and crispness.
Final Thoughts
There is nothing quite like biting into your own homemade Chicken Kiev with Garlic Butter Recipe. The crunchy coating, the juicy chicken, and that surprise garlic butter center make every mouthful a joyous experience. Take your time with each step, savor the process, and I promise you’ll end up with a dish that feels both elegant and comforting. Give it a try, and watch this become one of your favorites to make and share!
Print
Chicken Kiev with Garlic Butter Recipe
- Prep Time: 30 minutes
- Cook Time: 25 minutes
- Total Time: 1 hour
- Yield: 2 servings
- Category: Main Course
- Method: Frying
- Cuisine: European
Description
Chicken Kiev is a classic dish featuring tender chicken breasts stuffed with a garlic-parsley butter, breaded, fried to a golden crisp, and finished in the oven. This recipe guides you through creating the flavorful garlic butter filling, perfectly pounding and rolling the chicken, and achieving a deliciously crispy exterior with a juicy, buttery center.
Ingredients
For the Garlic Butter Filling:
- 90g unsalted butter, softened
- 2 teaspoons finely chopped fresh parsley
- 2 cloves garlic, finely minced (approximately 2 teaspoons)
- ¼ teaspoon salt (omit if using salted butter)
For the Chicken:
- 2 chicken breasts (220-250g each), skinless and boneless
- ½ teaspoon salt
- ¼ teaspoon freshly ground black pepper
- 1 large egg, lightly whisked
- ¼ cup all-purpose flour
- 1 cup panko breadcrumbs
- Canola or vegetable oil for frying (approximately 1 liter)
For Serving:
- Finely chopped parsley for garnish
Instructions
- Prepare the Garlic Butter Filling: In a bowl, combine softened butter, chopped parsley, minced garlic, and salt. Mix together thoroughly until well combined.
- Shape the Butter: Place the butter mixture onto a sheet of baking paper, forming it into a rectangle approximately 10×6 cm in size.
- Chill the Butter: Refrigerate the shaped butter until firm, then cut it lengthwise into two equal batons.
- Prepare the Chicken: Lay the chicken breasts smooth side down between two sheets of parchment paper.
- Pound the Chicken: Use a meat mallet to gently pound each breast evenly to about 0.5 cm thickness.
- Season the Chicken: Sprinkle both sides with salt and freshly ground black pepper evenly.
- Stuff with Garlic Butter: Place one butter baton in the center of each flattened chicken breast.
- Roll and Seal: Fold the sides of the chicken over the butter, then roll it tightly, ensuring the seam is underneath to keep it sealed.
- Wrap in Cling Film: Wrap each chicken roll tightly in cling film, twist the ends to form a firm log shape.
- Freeze: Freeze the wrapped rolls for 30 minutes until firm but not completely frozen.
- Set up Breading Stations: Prepare three bowls with flour, whisked egg, and panko breadcrumbs respectively.
- Bread the Chicken Rolls: Remove cling film carefully. Dredge each roll in flour, shaking off excess. Dip into the egg, letting excess drip off. Coat evenly with panko breadcrumbs, pressing gently to adhere.
- Freeze Again: Return breaded rolls to the freezer for another 30 minutes to firm up.
- Preheat Oven: Set the oven temperature to 180°C (350°F).
- Heat Oil: In a heavy-based pot, heat approximately 1 liter of canola or vegetable oil to 190°C (375°F).
- Fry the Chicken: Carefully lower the chicken rolls into the hot oil and fry each side for about 2-3 minutes until golden brown and crispy.
- Drain and Transfer: Remove the fried chicken and place on a rack set over a baking sheet to drain excess oil.
- Bake: Bake in the preheated oven for 15 minutes or until the internal temperature reaches 65°C (150°F).
- Rest: Allow the chicken to rest for 2 minutes after baking to let juices redistribute.
- Serve: Garnish with finely chopped parsley and serve while hot.
Notes
- Ensure the butter filling is well chilled so that it does not melt too quickly during cooking.
- Use a thermometer to check that the internal temperature of the chicken reaches 65°C (150°F) for safe consumption.
- Pounding the chicken evenly helps it cook uniformly and prevents tearing.
- You can substitute panko breadcrumbs with regular breadcrumbs, but panko gives a crispier texture.
- After frying, placing chicken on a rack instead of paper towels prevents sogginess caused by trapped steam.


