
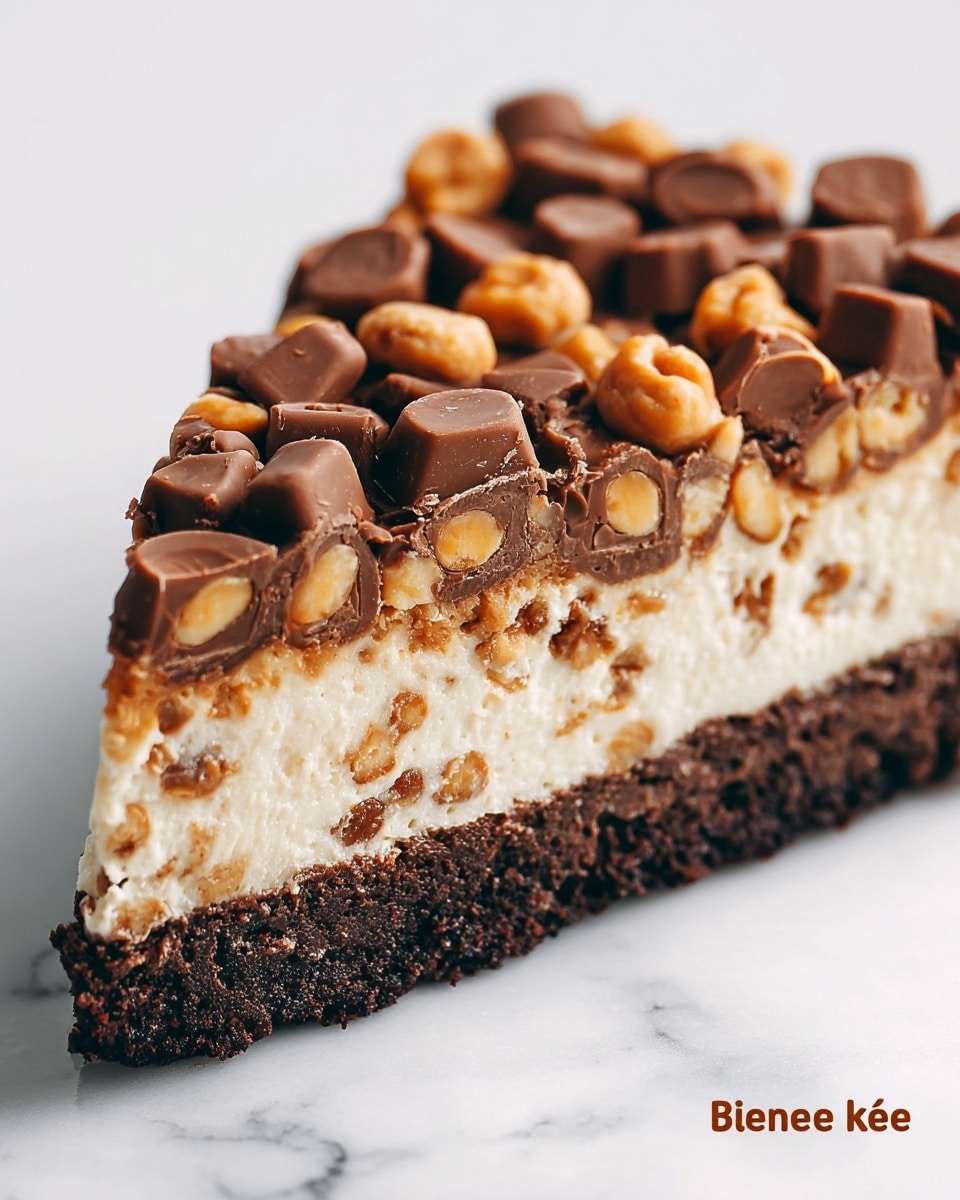
If you have a serious sweet tooth and a love for crunchy, peanut buttery treats, this Butterfinger Pie (No-Bake) Recipe is about to become your new best friend in the kitchen. Imagine a luscious, creamy filling packed with peanut butter goodness and bits of Butterfinger bars hugging a crisp graham cracker crust, all coming together without ever turning on the oven. It’s a perfectly balanced, delightfully easy dessert that’s as fun to make as it is to eat. Trust me, once you try this no-bake marvel, it’ll be a staple at your gatherings and a frequent answer to “What’s for dessert?”

Ingredients You’ll Need
Every ingredient in this Butterfinger Pie (No-Bake) Recipe plays a starring role, from the crunchy base to the creamy, dreamy filling. They’re simple pantry classics, but combined, they deliver an irresistible blend of textures and flavors that’s guaranteed to wow.
- Graham cracker crumbs: The perfect crunchy and slightly sweet foundation for the pie crust.
- Granulated sugar: Adds just enough sweetness to balance the crust’s flavor.
- Unsalted butter, melted: Binds the crust ingredients together for that satisfying snap.
- Cream cheese, softened: Brings rich creaminess and tang to the filling.
- Powdered sugar: Adds smooth sweetness without any graininess.
- Whipped topping (like Cool Whip): Lightens the filling for that fluffy, airy texture.
- Peanut butter: The star flavor, offering creamy, nutty richness.
- Heavy cream: Whipped into the filling, it adds luxurious smoothness and helps everything blend perfectly.
- Butterfinger bars, crushed: Infuses each bite with that beloved crispy, chocolatey crunch, plus a crunchy topping for extra fun.
How to Make Butterfinger Pie (No-Bake) Recipe
Step 1: Prepare the Crust
Start by combining the graham cracker crumbs, granulated sugar, and melted butter in a medium bowl. Mix until the crumbs are evenly coated and the mixture resembles wet sand. This step is crucial for achieving that signature sturdy yet crumbly crust that’ll hold all the delicious filling.
Step 2: Chill the Crust
Press the crust mixture firmly into the bottom of a 9-inch pie dish, making sure it’s evenly distributed. Pop it into the refrigerator to set up—this chill time helps the crust firm so it stays intact when you add the filling.
Step 3: Whip Up the Filling Base
In a large bowl, beat the softened cream cheese with the powdered sugar until silky smooth and lump free. This creamy base ensures every bite melts in your mouth with perfect sweetness.
Step 4: Blend in Peanut Butter and Cream
Add the peanut butter and heavy cream to the cream cheese mixture, then beat until fluffy and fully incorporated. The heavy cream is the secret to that cloud-like texture that makes this pie heavenly.
Step 5: Fold in Whipped Topping and Butterfinger Pieces
Gently fold in the whipped topping to keep the filling light and airy, then mix in most of the crushed Butterfingers, saving some to sprinkle on top. This step brings the iconic crunch and chocolate-peanut butter flavor into every spoonful.
Step 6: Assemble and Chill
Spread the luscious filling evenly over the chilled crust, then sprinkle the reserved Butterfinger pieces on top for an irresistible finish. Refrigerate the assembled pie for at least 3 to 4 hours, or better yet, overnight—this allows the flavors to meld and the pie to fully set.
Step 7: Slice and Serve
Once chilled and set, your Butterfinger Pie (No-Bake) Recipe is ready to impress. Slice it up and get ready for creamy, crunchy, peanut buttery bliss with every bite.
How to Serve Butterfinger Pie (No-Bake) Recipe
Garnishes
Adding a bit of garnish turns your pie into a showstopper. Consider a drizzle of chocolate syrup or a sprinkling of chopped peanuts for an extra nutty crunch. Whipped cream dollops or even a few whole Butterfinger pieces on top will amp up the visual appeal and taste.
Side Dishes
Though this pie is a complete dessert in itself, serving it alongside fresh berries like raspberries or sliced strawberries adds a pop of freshness that beautifully balances the richness. A scoop of vanilla ice cream on the side can also elevate the indulgence to new heights.
Creative Ways to Present
For a fun twist, serve individual portions in clear glasses layered with extra crushed Butterfingers or peanut butter drizzle. Or create mini no-bake versions using small tart pans or Mason jars—perfect for parties or gifting to friends!
Make Ahead and Storage
Storing Leftovers
This Butterfinger Pie (No-Bake) Recipe keeps well in the fridge for 3 to 4 days. Just cover it tightly with plastic wrap or a pie keeper to maintain moisture and freshness. It’s a great make-ahead dessert that stays just as delicious the next day.
Freezing
You can freeze the pie if you want to save it longer. Wrap it securely in plastic wrap and aluminum foil to prevent freezer burn. When you’re ready to enjoy it, thaw overnight in the fridge for best texture and flavor.
Reheating
This pie is best served chilled, so reheating is not recommended. Let it come to a perfect cool temperature in the fridge before slicing and serving to keep that creamy consistency intact.
FAQs
Can I use crunchy peanut butter instead of creamy?
Absolutely! Using crunchy peanut butter will add extra texture to the filling, complementing the Butterfinger pieces nicely. Just be sure to blend it well to keep the filling smooth.
Can I substitute the whipped topping with homemade whipped cream?
You can! Homemade whipped cream adds a fresh touch and fewer preservatives. Just whip it to soft peaks and fold it in gently to keep the light texture.
Is it necessary to chill the pie overnight?
While chilling for 3–4 hours is enough for the pie to set, overnight chilling intensifies the flavors and makes slicing cleaner and easier. It’s worth the wait!
Can I make this pie gluten-free?
Yes, simply swap the graham cracker crumbs for a gluten-free alternative or crushed gluten-free cookies. The rest of the ingredients are naturally gluten-free as long as you check the labels.
What is the best way to crush Butterfinger bars?
Place the Butterfinger bars in a sealed plastic bag and gently crush them with a rolling pin or use your hands for a coarser texture. This gives you control over the size of the pieces in your pie.
Final Thoughts
I hope you’re as excited as I am to dive into this Butterfinger Pie (No-Bake) Recipe because it really is a game changer for anyone who loves easy, no-fuss desserts packed with flavor and texture. Whether for a special occasion or just because, it’s the kind of recipe that brings smiles and requests for seconds. Give it a try—you might just find your new favorite sweet treat!
Print
Butterfinger Pie (No-Bake) Recipe
- Prep Time: 15 minutes
- Cook Time: 0 minutes
- Total Time: 3 hours 15 minutes (including chilling time)
- Yield: 8 servings
- Category: Dessert
- Method: No-Cook
- Cuisine: American
Description
This no-bake Butterfinger Pie is a creamy, sweet dessert featuring a crunchy graham cracker crust, a smooth peanut butter and cream cheese filling, and crushed Butterfinger candy bars for added texture and flavor. Perfectly chilled, it’s an easy-to-make indulgence ideal for gatherings or anytime you crave a rich, peanut buttery treat.
Ingredients
Crust
- 1 1/2 cups graham cracker crumbs
- 1/4 cup granulated sugar
- 1/2 cup unsalted butter, melted
Filling
- 1 package (8 oz) cream cheese, softened
- 1 cup powdered sugar
- 1 cup whipped topping (like Cool Whip)
- 1 cup peanut butter
- 1 cup heavy cream
- 3 Butterfinger bars, crushed (reserve some for topping)
Instructions
- Prepare the Crust: In a medium bowl, mix together the graham cracker crumbs, granulated sugar, and melted butter until the mixture is evenly combined and resembles wet sand.
- Form the Crust: Press the crumb mixture firmly into the bottom of a 9-inch pie dish to create an even crust layer. Place the crust in the refrigerator to chill and set while you prepare the filling.
- Make the Filling Base: In a large bowl, beat the softened cream cheese and powdered sugar together until smooth and creamy, ensuring no lumps remain.
- Add Peanut Butter and Cream: Add the peanut butter and heavy cream to the cream cheese mixture, then beat until the filling becomes fluffy and well combined.
- Incorporate Whipped Topping and Butterfingers: Gently fold in the whipped topping to maintain a light texture, then stir in the majority of the crushed Butterfinger bars, reserving some for garnish on top.
- Assemble the Pie: Spread the filling evenly over the chilled crust, smoothing the top with a spatula.
- Garnish: Sprinkle the reserved crushed Butterfinger bars over the surface to add crunch and decorative appeal.
- Chill the Pie: Refrigerate the assembled pie for at least 3 to 4 hours, or preferably overnight, to allow it to fully set and the flavors to meld.
- Serve: Slice the pie and serve chilled for a rich, creamy dessert with delightful crunch.
Notes
- For best results, soften the cream cheese to room temperature before mixing to ensure a smooth filling.
- Reserving some crushed Butterfingers for topping adds both texture and visual appeal.
- This pie is best served chilled and can be stored covered in the refrigerator for up to 3 days.
- Use natural peanut butter for a less sweet variation, or creamy for a smoother texture.
- If you prefer a stronger peanut butter flavor, gently increase the peanut butter by a few tablespoons.


