
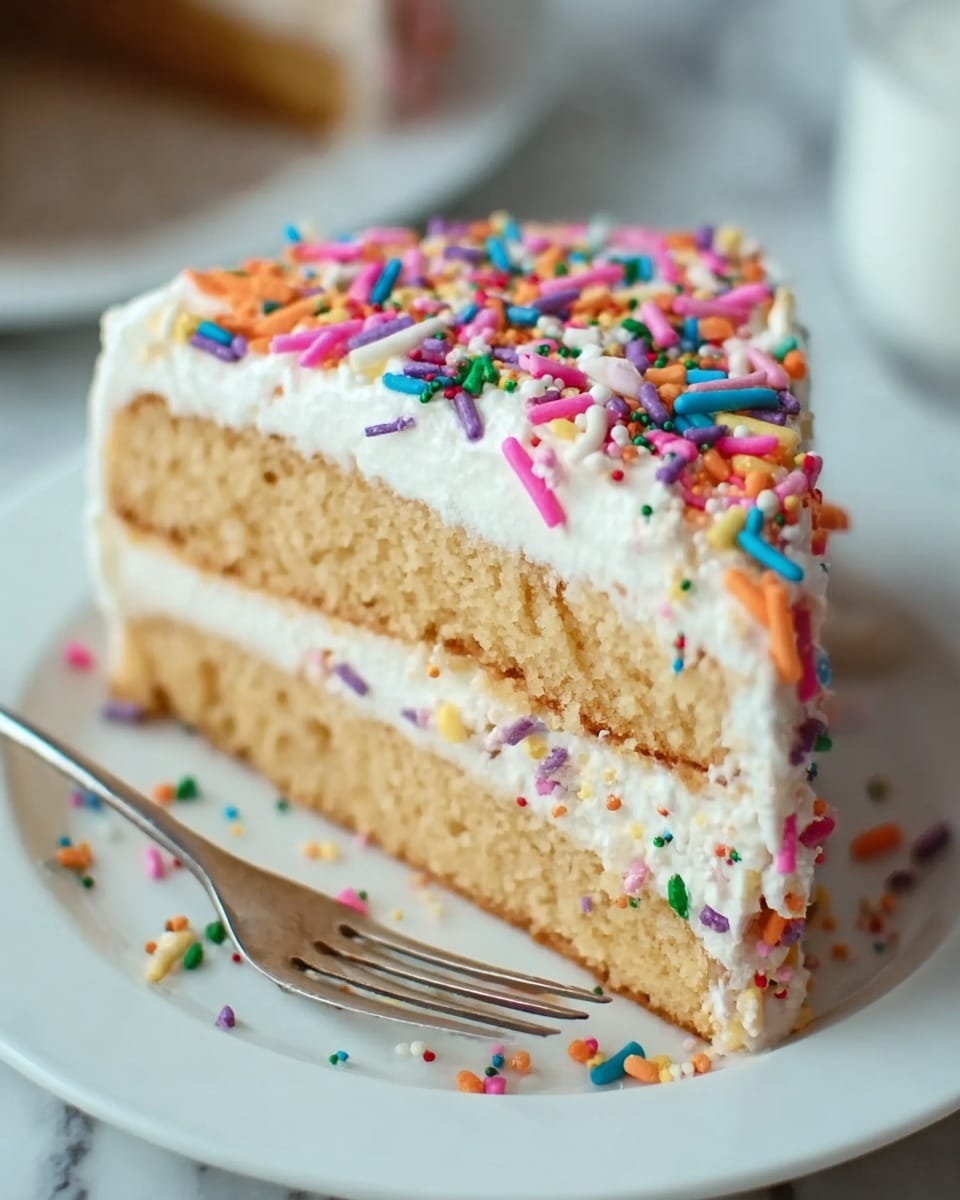
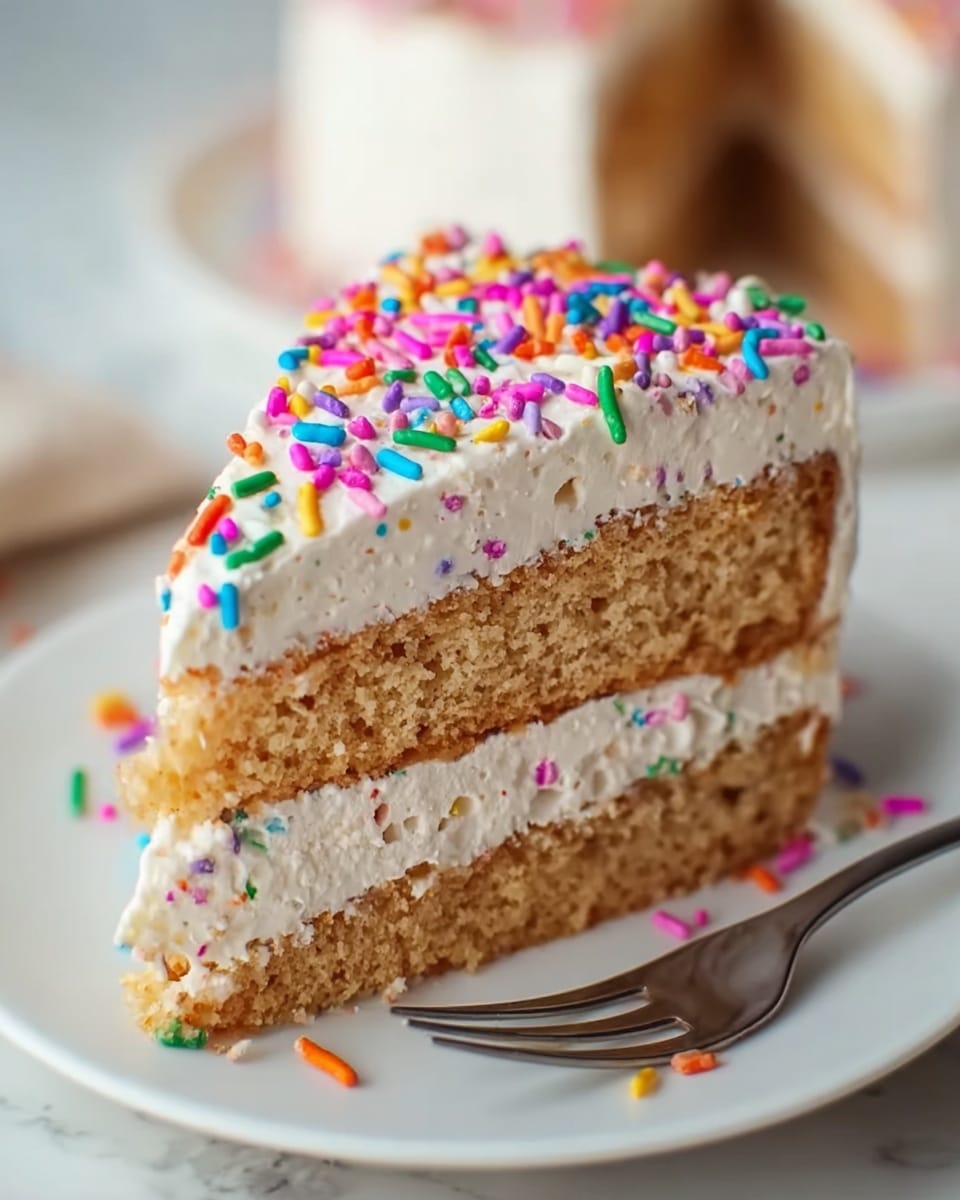
If you’re on the hunt for a fun, crowd-pleasing dessert that bursts with color and flavor without ever needing the oven, this No Bake Rainbow Birthday Cake Delight Recipe is going to become your new favorite. Combining the creamy richness of cream cheese and pudding with a crispy cookie crust and vibrant rainbow sprinkles, it’s a playful treat that’s as easy to make as it is to devour. Perfect for birthdays, celebrations, or just because, this dreamy dessert hits all the sweet spots with every spoonful.

Ingredients You’ll Need
Gathering your ingredients for this No Bake Rainbow Birthday Cake Delight Recipe is simple, yet each component plays an essential role in crafting its luscious texture and colorful appeal. From the cookie crust to the whipped layers, they come together to create a delightful balance of creamy, crunchy, and sweet flavors.
- Vanilla sandwich cookies (14.3 ounces): Crushed into crumbs, they form the crisp, buttery base that holds the dessert together.
- Salted butter (6 tablespoons): Adds richness and helps bind the cookie crust firmly in place.
- Cream cheese (16 ounces): Softened for smoothness, it brings a tangy creaminess that balances sweetness.
- Powdered sugar (¾ cup): Sweetens the cream cheese mixture evenly without a grainy texture.
- Vanilla extract (1 teaspoon): Enhances all the flavors with warm, inviting notes.
- Frozen whipped topping (16 ounces): Light and airy, folded in to give the dessert its delicate fluffiness, divided for layering.
- Rainbow sprinkles (¼ cup plus more): Adds the vibrant pops of color reminiscent of a birthday cake.
- Vanilla-flavored instant pudding mix (6.8 ounces): Creates the rich, velvety pudding layer that complements the cream cheese base.
- Whole milk (2 cups): Used to whisk with pudding mix for a smooth, thick consistency.
How to Make No Bake Rainbow Birthday Cake Delight Recipe
Step 1: Prepare the Cookie Crust
Start by greasing a 9×13-inch dish with butter to ensure the crust doesn’t stick. Crush the vanilla sandwich cookies until you have fine crumbs, either by pulsing in a food processor or placing them in a zip bag and smashing with a rolling pin. Mix the crumbs with melted butter so the mixture holds together well, then press firmly into the bottom of your baking dish. This crunchy crust will add the perfect foundation for all those creamy layers on top.
Step 2: Make the Cream Cheese Filling
Next, in a large bowl, beat the softened cream cheese until it’s smooth. Add powdered sugar and vanilla extract, continuing to whip until silky and perfectly sweetened. This luscious mixture is the heart of the cake, providing a tangy counterpoint to the sweeter layers to come.
Step 3: Fold in the First Whipped Topping Portion
Gently fold in 1 cup of the defrosted whipped topping into the cream cheese mixture. This step lightens the filling, making it fluffy and dreamy without losing any of its rich flavor.
Step 4: Create the Pudding Layer
In a separate bowl, whisk together the vanilla instant pudding mix and whole milk for about two minutes until it thickens nicely. Then, fold in the remaining 1 cup of whipped topping to make this layer extra creamy and smooth. This pudding is what elevates the dessert from a simple cheesecake to a multi-textured delight.
Step 5: Assemble the Layers
Spread the cream cheese filling evenly over the cooled cookie crust. Then carefully spoon the pudding mixture over the cream cheese layer, smoothing it out gently. Before moving on to chilling, sprinkle rainbow sprinkles evenly over the pudding to infuse that cheerful birthday vibe throughout the dessert.
Step 6: Chill the Cake
Refrigerate your wonderfully layered creation for at least four hours, though letting it sit overnight is even better. This step helps everything set up perfectly so that each slice holds its shape and offers the ideal contrast of textures from creamy to crunchy.
Step 7: Final Touch Before Serving
Just before serving, top your No Bake Rainbow Birthday Cake Delight Recipe with a generous sprinkle of more rainbow sprinkles. This final flourish not only looks festive and inviting but also adds a little extra crunch and color that will wow everyone at the table.
How to Serve No Bake Rainbow Birthday Cake Delight Recipe
Garnishes
To make your dessert pop even more, consider adding a few fresh berries like raspberries or blueberries next to the rainbow sprinkles for an added burst of color and freshness. You can also gently dust with a tiny bit of edible glitter if you’re feeling extra festive and want to elevate your birthday party vibe.
Side Dishes
This cake pairs beautifully with light, fruity sides such as a citrus salad or fresh fruit skewers. The acidity of the fruit cuts through the richness of the cream cheese and pudding, balancing every bite with a refreshing touch.
Creative Ways to Present
For an extra special presentation, serve this cake in individual clear cups to showcase the beautiful layers. You can also turn it into fun parfaits by layering cookie crumbs, cream cheese filling, and pudding alternately for mini No Bake Rainbow Birthday Cake Delight Recipe parfaits that are perfect for party favors or a grab-and-go treat.
Make Ahead and Storage
Storing Leftovers
Store leftover No Bake Rainbow Birthday Cake Delight Recipe in an airtight container in the refrigerator. It will keep its perfect texture and flavor for up to 3 days, which is great news if your celebration leaves you with leftovers to enjoy later.
Freezing
While this dessert is best enjoyed fresh, you can freeze it if needed. Wrap the whole dish tightly with plastic wrap and then foil, and freeze for up to one month. Let it thaw overnight in the fridge before serving to retain its creamy consistency.
Reheating
Since this is a chilled, no-bake dessert, reheating isn’t necessary. Simply serve straight from the fridge and enjoy the layers at their best texture and flavor.
FAQs
Can I use a different type of cookie for the crust?
Absolutely! While vanilla sandwich cookies add sweetness and a delicate flavor, you can substitute with chocolate wafer cookies or graham crackers to change up the flavor profile without compromising texture.
Is there a substitute for instant pudding mix?
If you don’t have instant pudding mix, you can try making a homemade vanilla pudding from scratch and chilling it until thickened before folding in the whipped topping. Just be sure it’s fully set to maintain the cake’s structure.
Can I make this dessert vegan or dairy-free?
This recipe relies heavily on dairy products like cream cheese, butter, and whipped topping, but you can experiment with vegan cream cheese, dairy-free pudding mixes, and plant-based whipped toppings for a vegan-friendly version, though textures and flavors may vary slightly.
How long does it take for the dessert to set properly?
Refrigerating for at least four hours is essential, but overnight chilling gives the best results for firm layers and perfect sliceability. Patience during this step really pays off!
Can I double this recipe for a bigger crowd?
Yes, this recipe scales up well. Just use a larger dish or multiple dishes, and keep the same ratios. Make sure to give it ample time to chill so that every portion sets perfectly.
Final Thoughts
There’s nothing quite like the joy that comes with sharing a vibrant, creamy, and unbelievably easy No Bake Rainbow Birthday Cake Delight Recipe with your loved ones. Its playful colors and comforting flavors bring smiles to every occasion, and once you try it, you’ll want to keep this recipe close for every special celebration. Give it a go, and watch how quickly it becomes a beloved staple in your dessert rotation!
Print
No Bake Rainbow Birthday Cake Delight Recipe
- Prep Time: 15 minutes
- Cook Time: 0 minutes
- Total Time: 4 hours 15 minutes (including chilling time)
- Yield: 4.4 servings
- Category: Dessert
- Method: No-Cook
- Cuisine: American
Description
A delightful no-bake birthday cake dessert featuring a crunchy vanilla cookie crust, creamy cream cheese filling, and a fluffy pudding layer topped with colorful rainbow sprinkles. Perfect for celebrations and easy to prepare without using the oven.
Ingredients
Crust
- 14.3 ounces vanilla sandwich cookies (approximately 36 cookies, 2 ½ cups when crushed)
- 6 tablespoons salted butter, melted and cooled (plus more for greasing dish)
Cream Cheese Filling
- 16 ounces cream cheese, softened to room temperature
- ¾ cup powdered sugar
- 1 teaspoon vanilla extract
- 1 cup frozen whipped topping (Cool Whip), defrosted
Pudding Layer
- 6.8 ounces vanilla-flavored instant pudding mix (or white chocolate pudding)
- 2 cups whole milk
- 1 cup frozen whipped topping (Cool Whip), defrosted
Garnish
- ¼ cup rainbow sprinkles, plus more for garnish
Instructions
- Prepare the crust: Grease a 9×13-inch baking dish with butter. Crush the vanilla sandwich cookies in a food processor or by hand until fine crumbs form. Mix the crumbs with melted butter and press them into the bottom of the prepared dish to form the crust.
- Make the cream cheese filling: In a large bowl, beat the softened cream cheese with powdered sugar and vanilla extract until smooth and creamy.
- Combine whipped topping: Fold in 1 cup of the defrosted Cool Whip into the cream cheese mixture until fully incorporated.
- Make the pudding layer: In a separate bowl, whisk together the instant pudding mix and whole milk for about 2 minutes, until it thickens. Once thickened, gently fold in the remaining 1 cup of Cool Whip.
- Assemble the dessert: Spread the pudding mixture over the cream cheese filling. Sprinkle rainbow sprinkles evenly on top.
- Chill and set: Refrigerate the dessert for at least 4 hours (preferably overnight) to allow the layers to set properly.
- Serve: Before serving, top with additional rainbow sprinkles for garnish.
Notes
- Make sure the cream cheese is fully softened to avoid lumps in the filling.
- For the best texture, press the cookie crust firmly and evenly into the pan.
- The dessert tastes best after chilling overnight, allowing flavors to meld and layers to set.
- You can substitute Cool Whip with homemade whipped cream if desired.
- Use vanilla-flavored instant pudding or white chocolate pudding for complementary flavors.
- This dessert is best served chilled and should be kept refrigerated until ready to serve.


