

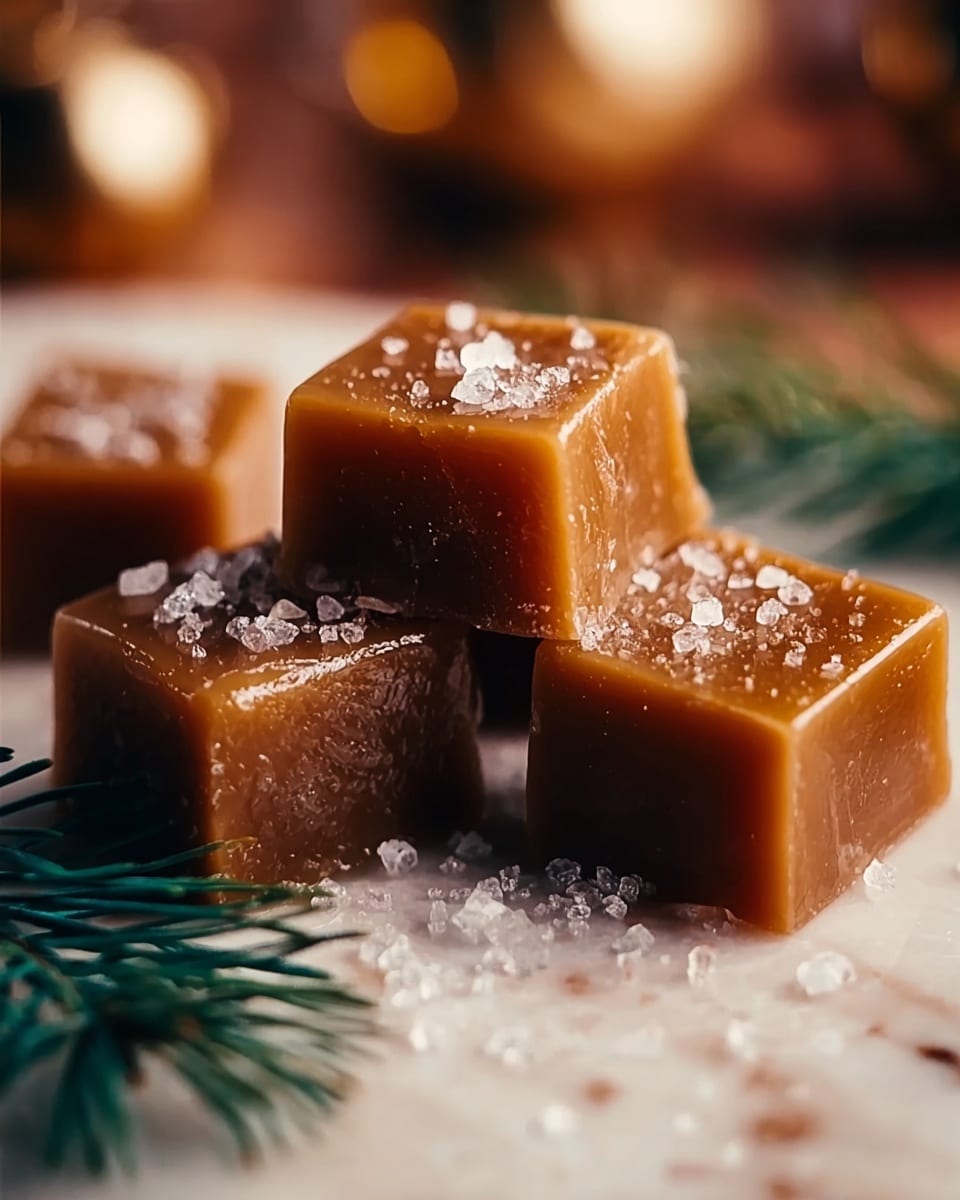
If you’ve ever dreamed of indulging in rich, buttery treats that melt delightfully on your tongue during the holiday season, this Homemade Christmas Caramels Recipe is your new go-to! With its perfect balance of sweet and salty notes and a luscious, chewy texture, these caramels bring cozy festive vibes straight to your kitchen. Whether you’re gifting them or sneaking a few for yourself, this recipe is a classic that captures the spirit of Christmas in every bite.

Ingredients You’ll Need
These ingredients might be simple, but each one plays a crucial role in creating the luxurious texture and comforting flavor of these caramels. From the creamy butter to the touch of vanilla, everything blends beautifully to make your Homemade Christmas Caramels Recipe unforgettable.
- Unsalted butter: 1 cup, helps create the smooth, rich base without overpowering saltiness.
- Brown sugar: 2 1/4 cups packed, adds deep caramel flavor with a hint of molasses.
- Light corn syrup: 1 cup, prevents crystallization for chewy, glossy caramels.
- Sweetened condensed milk: 1 (14 oz) can, makes the caramels delectably creamy and tender.
- Vanilla extract: 1 teaspoon, infuses a warm, aromatic note that complements the caramel perfectly.
- Salt: 1/4 teaspoon, balances sweetness and enhances flavor complexity.
- Optional sea salt: A sprinkle on top, adds a lovely contrast to the sweetness and a gourmet touch.
How to Make Homemade Christmas Caramels Recipe
Step 1: Prepare Your Pan
Start by lining an 8×8 inch baking pan with parchment paper, leaving some overhang on the sides. This clever step ensures you can lift the caramel block out easily when it’s time to cut, plus a light greasing of butter prevents any sticky surprises.
Step 2: Melt the Butter
Gently melt your unsalted butter over medium heat, being careful not to let it brown. This ensures a clean buttery flavor, which forms the foundation of the caramel’s luscious richness.
Step 3: Combine the Sugars and Milk
Once your butter is melted, add the packed brown sugar, light corn syrup, sweetened condensed milk, and salt. Stir everything together until fully combined. This blend is what gives your caramels that inviting golden color and perfect chewiness.
Step 4: Cook to Perfection
Turn the heat up slightly and bring the mixture to a gentle boil. Then reduce it to medium-low, insert a candy thermometer, and keep stirring until the temperature hits 245°F (118°C). This is the magical point where the caramel reaches that perfect, chewy consistency.
Step 5: Add Flavor
Remove the pan from heat and stir in the fragrant vanilla extract. This final touch infuses the caramel with warmth and depth, making it irresistibly comforting.
Step 6: Pour and Cool
Pour your caramel into the prepared pan and spread it evenly. Now comes the hardest part—let it cool at room temperature for at least two hours. This patient wait allows your caramel to set to the perfect firmness without becoming too hard.
Step 7: Cut into Squares
Once set, use the parchment overhang to lift the caramel block from the pan. Then cut it into small squares, about 64 pieces. You’ll love how each bite-sized morsel carries that handcrafted charm.
Step 8: Sprinkle with Sea Salt (Optional)
If you like a little elevated flavor play, sprinkle a pinch of sea salt on top of your caramel squares before they fully set. This subtle touch contrasts brilliantly with the rich sweetness and makes these caramels even more memorable.
How to Serve Homemade Christmas Caramels Recipe
Garnishes
Consider dusting your caramels lightly with powdered sugar or drizzling melted chocolate over the top for an elegant finish. Even a tiny sprinkle of crushed peppermint can bring festive flair and a refreshing twist.
Side Dishes
Pair these caramels with freshly brewed coffee or a cozy cup of hot cocoa to balance the sweetness with warm bitterness. They also work beautifully alongside a cheese platter, where salty and silky textures contrast deliciously.
Creative Ways to Present
Wrap each caramel in clear cellophane tied with festive ribbons, or stack them in decorative tins for charming edible gifts. You can even arrange the squares in small glass jars layered with sprigs of rosemary or holly for that perfect Christmas table centerpiece.
Make Ahead and Storage
Storing Leftovers
Keep your Homemade Christmas Caramels fresh by storing them in an airtight container at room temperature. They will stay soft and delightful for up to two weeks, making them ideal to prepare ahead for holiday gatherings.
Freezing
If you want to keep your caramels for longer, wrap each piece individually in wax paper and place them in a freezer bag. Frozen caramels can last for up to three months and thaw quickly at room temperature before enjoying.
Reheating
Caramel is best enjoyed as-is, but if your caramels become too firm, you can soften them slightly by warming gently in a low oven (around 200°F or 93°C) for a few minutes, or letting them sit in a warm spot. Just be careful not to overheat and lose that perfect chewy texture.
FAQs
Can I use salted butter instead of unsalted?
Using salted butter can work, but since this recipe already includes salt, it’s best to stick with unsalted butter for better control over the final flavor. If you do use salted butter, consider reducing the added salt slightly.
What’s the ideal size for cutting these caramels?
Cutting into 64 small squares is perfect for portion control and ease of eating, but you can adjust the size based on your preference. Just remember that thinner pieces will set firmer and thicker ones slightly chewier.
Can I add nuts or other mix-ins?
Absolutely! Chopped pecans or walnuts can be folded in after removing from heat for added texture and flavor. Just be mindful they may alter the cooking time slightly.
Why do I need a candy thermometer?
The thermometer ensures the caramel reaches the exact temperature for proper texture. Under or overcooking can lead to soft or overly hard caramels, so it’s a must for perfect results with the Homemade Christmas Caramels Recipe.
How do I prevent the caramel from sticking to my teeth?
Making sure you cook the caramel to the right firm-ball stage and allowing it to fully set helps reduce stickiness. Also, sprinkling a touch of sea salt on top can create a slight barrier that makes it less sticky and more enjoyable to bite into.
Final Thoughts
There’s something magical about the process and the final taste of this Homemade Christmas Caramels Recipe that makes the holiday season even cozier. It’s a recipe that invites sharing, gifting, and creating memories while delighting everyone lucky enough to try these soft, buttery squares of joy. So, don’t hesitate—roll up your sleeves and start cooking. Soon you’ll understand why this recipe is a treasured holiday classic in so many homes!
Print
Homemade Christmas Caramels Recipe
- Prep Time: 10 minutes
- Cook Time: 20 minutes
- Total Time: 2 hours 30 minutes
- Yield: 64 small caramels
- Category: Candy
- Method: Stovetop
- Cuisine: American
Description
Delight in these rich and buttery Homemade Christmas Caramels, perfectly soft and chewy with a hint of sea salt for that extra festive touch. Made from scratch with simple ingredients like brown sugar, butter, and sweetened condensed milk, these classic sweets are ideal for gifting or sharing during the holidays.
Ingredients
Caramel Ingredients
- 1 cup unsalted butter
- 2 1/4 cups packed brown sugar
- 1 cup light corn syrup
- 1 (14 oz) can sweetened condensed milk
- 1 teaspoon vanilla extract
- 1/4 teaspoon salt
Optional Topping
- Sea salt for sprinkling on top
Instructions
- Prepare the Pan: Line an 8×8 inch baking pan with parchment paper, leaving an overhang on each side for easy removal. Lightly grease the parchment with butter to prevent sticking.
- Melt Butter: In a large saucepan, melt the unsalted butter over medium heat, making sure not to brown it, which could alter the caramel’s flavor.
- Combine Ingredients: Add the packed brown sugar, light corn syrup, sweetened condensed milk, and salt to the melted butter. Stir until everything is fully combined and smooth.
- Cook Caramel: Increase the heat and bring the mixture to a gentle boil. Then reduce the heat to medium-low and attach a candy thermometer. Continue cooking and stirring the mixture until the temperature reaches 245°F (118°C), which ensures the perfect chewy texture.
- Flavor the Caramel: Remove the saucepan from heat and stir in the vanilla extract thoroughly for a lovely aroma and enhanced flavor.
- Pour and Cool: Pour the hot caramel mixture evenly into the prepared baking pan. Spread it out smoothly with a spatula. Allow it to cool completely at room temperature for at least 2 hours to set properly.
- Cut into Squares: Once set, carefully lift the caramel block out of the pan using the parchment overhangs and cut into approximately 64 small squares for easy serving.
- Optional Sea Salt: For an added flavor dimension, sprinkle sea salt over the caramels just before they are fully set to enhance the sweetness with a subtle salty crunch.
Notes
- Use a reliable candy thermometer to accurately monitor the caramel temperature for perfect texture.
- Line the pan with parchment paper for easy removal and clean-up.
- Store caramels in an airtight container at room temperature to maintain softness.
- Cut the caramels into bite-sized pieces for easier portioning and gifting.
- Sea salt topping is optional but highly recommended for a gourmet finish.


