

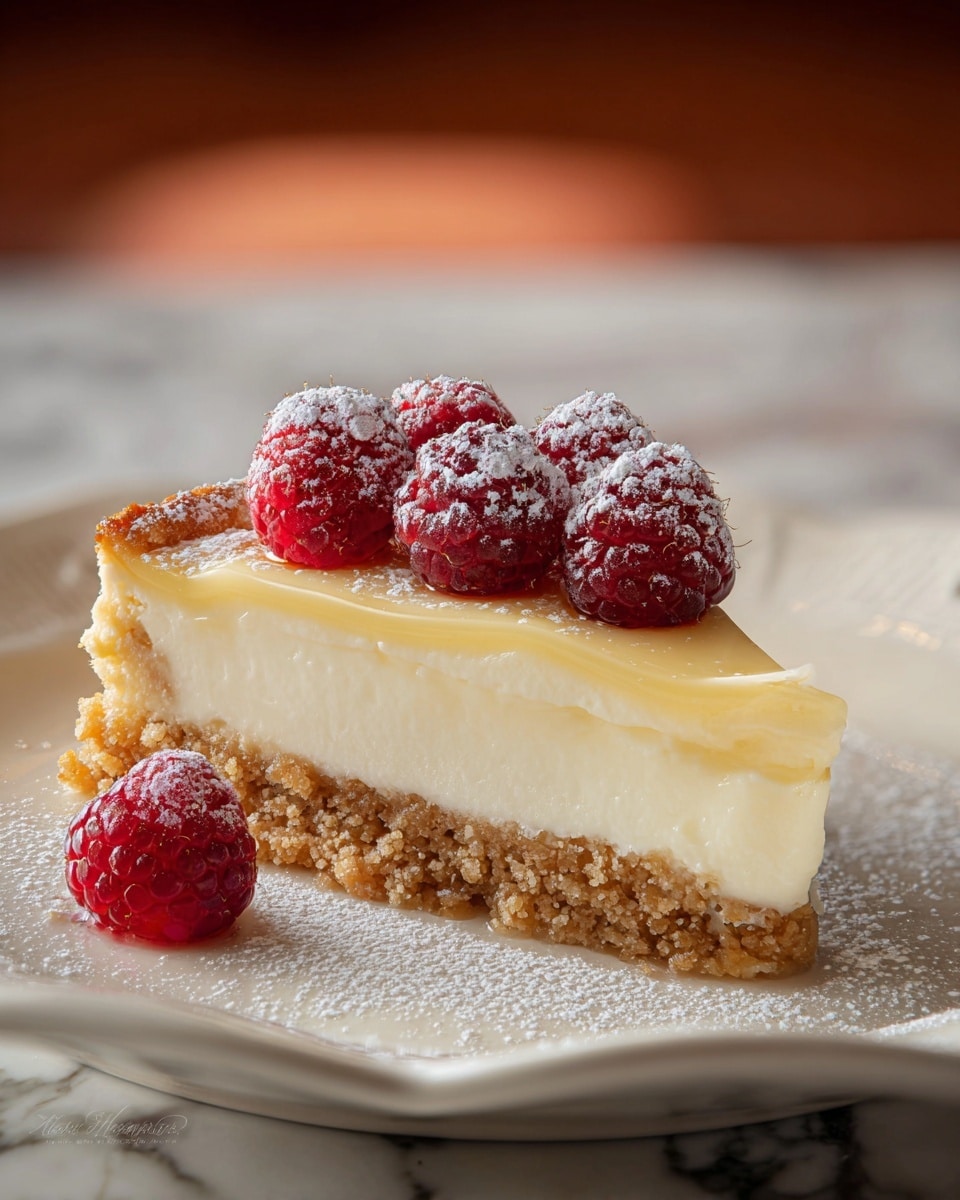
If you’ve ever wanted a dessert that’s delightfully creamy, perfectly portioned, and guaranteed to impress, then this Mini Cheesecakes Recipe is exactly what your kitchen needs. These bite-sized wonders combine a crisp vanilla wafer base with a luscious, smooth cream cheese filling that’s lightly sweetened and subtly tangy. With just a handful of simple ingredients and straightforward steps, these mini cheesecakes offer a crowd-pleasing treat that’s perfect for any occasion, from casual family dinners to festive celebrations. You’ll love how fun and easy they are to make, and even more how quickly they disappear!

Ingredients You’ll Need
Gathering the right ingredients is key to making your Mini Cheesecakes Recipe truly shine. Each component plays an essential role: the vanilla wafers provide a buttery, crunchy base, the cream cheese mixture delivers that signature creamy texture, and the sour cream adds a touch of tanginess to balance the sweetness perfectly.
- 12 vanilla wafer cookies: These form the delightful crunchy crust that’s better than a traditional graham cracker base in mini form.
- 2 (8-ounce) packages cream cheese, softened: The star ingredient, ensuring the filling is rich, creamy, and smooth.
- 1/2 cup granulated sugar: Adds just enough sweetness to keep the cheesecakes perfectly balanced, not overpowering.
- 2 large eggs: Help bind the filling so it sets beautifully without cracking.
- 1 teaspoon vanilla extract: Infuses warm, inviting flavor, elevating every bite.
- 1/4 cup sour cream: Introduces a subtle tang and silky texture that keeps the filling luscious.
- Fresh berries or fruit compote (optional): Provides a colorful, fresh topping that complements the rich cheesecake flavor.
How to Make Mini Cheesecakes Recipe
Step 1: Prepare Your Tin and Base
Start by preheating your oven to 350°F (175°C) and lining a muffin tin with paper cupcake liners. This step sets you up for success by ensuring your mini cheesecakes come out perfectly shaped. Next, place one vanilla wafer cookie at the bottom of each liner, which acts as the scrumptious base for your filling.
Step 2: Make the Cream Cheese Filling
In a mixing bowl, beat together the softened cream cheese and granulated sugar until the mixture is smooth and creamy. It’s important to avoid lumps here—this will give your cheesecakes that irresistibly silky texture. Now, add the eggs one at a time, mixing thoroughly after each addition to combine everything seamlessly.
Step 3: Add Flavor and Texture
Stir in the vanilla extract and sour cream until the mixture is uniformly combined. These two ingredients bring depth and richness to your cheesecake filling, making each bite both fluffy and flavorful.
Step 4: Assemble and Bake
Spoon the cream cheese mixture evenly over each vanilla wafer in the cupcake liners, filling each about three-quarters full. Place your tin in the oven and bake for 15-18 minutes. You’ll know they’re ready when the cheesecakes are set, with lightly golden edges—a sign that the magic inside has properly baked and is ready to delight.
Step 5: Cool and Chill
Remove your mini cheesecakes from the oven and let them cool in the muffin tin for about 15 minutes. Then transfer them to a wire rack to cool completely. For best results, refrigerate for at least two hours or even overnight. This chilling step allows the flavors to meld and the texture to firm up, giving you that classic cheesecake feel in every bite.
Step 6: Optional Toppings
Right before serving, feel free to add a topping of fresh berries or a spoonful of fruit compote. These toppings not only add a burst of color but also a refreshing contrast to the creamy sweetness of the cheesecake.
How to Serve Mini Cheesecakes Recipe
Garnishes
Fresh berries such as raspberries, blueberries, or sliced strawberries are a simple, colorful garnish that adds natural sweetness and a pop of freshness. A drizzle of fruit compote or even a sprinkle of chocolate shavings can elevate these mini cheesecakes from delightful to dazzling.
Side Dishes
Pair your mini cheesecakes with a cup of rich coffee or a glass of sparkling wine for a special treat. Light salads or fruit platters also complement their richness beautifully if you’re serving these as part of a larger dessert spread.
Creative Ways to Present
Serve the mini cheesecakes on a tiered dessert tray for a visually stunning display at parties or gatherings. You can also place them inside decorative mini cupcake wrappers or top each with a small edible flower to make them feel extra special and personalized.
Make Ahead and Storage
Storing Leftovers
Once your mini cheesecakes have cooled and chilled, store them in an airtight container in the refrigerator. They will stay fresh and creamy for up to 4 days, making them a convenient option for preparing dessert ahead of time.
Freezing
You can freeze these mini cheesecakes for up to 2 months. Place them on a baking sheet lined with parchment paper and freeze until firm, then transfer to a freezer-safe container. Thaw overnight in the refrigerator before serving to enjoy their fresh-baked taste.
Reheating
Since these are best enjoyed chilled, reheating is generally not recommended. However, if you prefer them at room temperature, simply let them sit out for 15-20 minutes before serving, allowing the rich texture to soften slightly without losing that classic cheesecake experience.
FAQs
Can I use a different cookie base instead of vanilla wafers?
Absolutely! Graham crackers, digestive biscuits, or even thin shortbread cookies can work beautifully as the base, each bringing their own unique flavor and texture to the mini cheesecakes.
What if I don’t have sour cream on hand?
You can substitute sour cream with an equal amount of Greek yogurt. It offers a similar tanginess and creaminess that helps balance the richness of the cream cheese filling.
How do I prevent cracks on the surface of mini cheesecakes?
Make sure to mix the eggs gently and avoid overbaking. Removing the cheesecakes from the oven as soon as they’re set with lightly golden edges helps keep that smooth, crack-free surface.
Can I make Mini Cheesecakes Recipe dairy-free?
For a dairy-free version, use plant-based cream cheese and sour cream alternatives, such as those made from almond or coconut milk. Keep in mind the texture and taste will vary slightly, but they can still be delicious!
How long should I chill mini cheesecakes before serving?
Chilling for at least 2 hours is essential to set the texture and enhance the flavors. Overnight refrigeration is even better if you have the time—it makes slicing and handling easier and the taste richer.
Final Thoughts
There’s something truly special about Mini Cheesecakes Recipe—they’re small in size but big in flavor and charm. Whether you’re a seasoned baker or a dessert newbie, these mini treats offer joy and satisfaction every time. With simple ingredients, straightforward preparation, and endless options for toppings and presentation, I highly encourage you to whip up a batch and share the deliciousness with friends and family. You might just find these mini marvels quickly becoming a new dessert favorite!
Print
Mini Cheesecakes Recipe
- Prep Time: 20 minutes
- Cook Time: 16 minutes
- Total Time: 2 hours 36 minutes
- Yield: 12 mini cheesecakes
- Category: Dessert
- Method: Baking
- Cuisine: American
Description
These Mini Cheesecakes are delightful individual treats featuring a crisp vanilla wafer base topped with a creamy, smooth cheesecake filling. Perfect for parties or a sweet snack, they are baked to perfection and can be garnished with fresh berries or fruit compote for a burst of fresh flavor.
Ingredients
Base
- 12 vanilla wafer cookies
Filling
- 2 (8-ounce) packages cream cheese, softened
- 1/2 cup granulated sugar
- 2 large eggs
- 1 teaspoon vanilla extract
- 1/4 cup sour cream
Topping (optional)
- Fresh berries or fruit compote
Instructions
- Preheat and Prepare Pan: Preheat your oven to 350°F (175°C) and line a muffin tin with paper cupcake liners to prepare for baking.
- Arrange Cookie Bases: Place one vanilla wafer cookie at the bottom of each cupcake liner, forming the base of each mini cheesecake.
- Mix Cream Cheese and Sugar: In a mixing bowl, blend the softened cream cheese and granulated sugar until the mixture becomes smooth and creamy, ensuring no lumps remain.
- Add Eggs: Add the eggs one at a time to the cream cheese mixture, mixing thoroughly after each addition to maintain a smooth consistency.
- Incorporate Flavorings: Stir in the vanilla extract and sour cream until fully combined, creating a creamy and uniform filling.
- Fill the Liners: Spoon the cream cheese mixture evenly over each vanilla wafer cookie in the cupcake liners, filling each about three-quarters full.
- Bake the Cheesecakes: Place the muffin tin in the oven and bake for 15-18 minutes, or until the cheesecakes are set with lightly golden edges.
- Cool in Pan: Remove the baked cheesecakes from the oven and allow them to cool in the muffin tin for 15 minutes to set further.
- Transfer to Wire Rack: Carefully move the mini cheesecakes to a wire rack to cool completely to room temperature.
- Chill: Refrigerate the cheesecakes for at least 2 hours or overnight to allow them to fully firm up.
- Add Toppings and Serve: Just before serving, optionally top each mini cheesecake with fresh berries or fruit compote for added flavor and decorative appeal.
Notes
- Using room temperature cream cheese ensures a smoother filling without lumps.
- Make sure not to overbake; the cheesecakes should be set but still slightly jiggly in the center.
- For easier removal, let the cheesecakes cool completely and chill thoroughly before peeling the liners.
- Feel free to experiment with different toppings like chocolate ganache or caramel sauce.
- This recipe can be doubled easily if you need more servings.


