

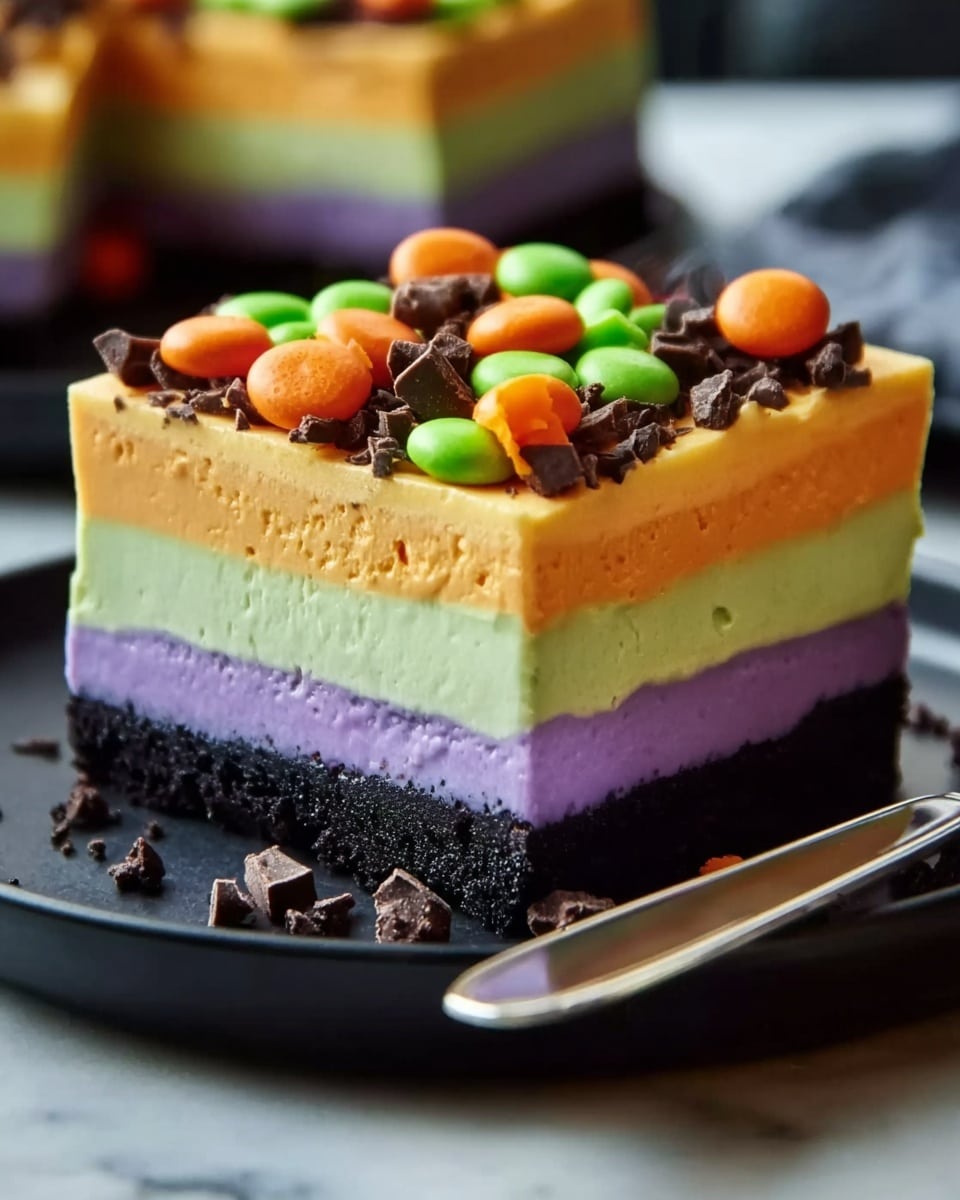
If you are craving a fun and festive treat that perfectly captures the spirit of the season, this Halloween Lush Dessert Recipe is just what you need. It’s a delightfully layered, colorful dessert that combines creamy textures with a subtle crunch, all wrapped up in vibrant Halloween hues. Whether you’re hosting a party or just want to enjoy a special sweet treat, this recipe brings a playful and delicious twist to your dessert table, promising smiles with every bite.

Ingredients You’ll Need
The ingredients for this Halloween Lush Dessert Recipe are refreshingly straightforward yet essential to create its signature layers and flavors. Each component plays a unique role, from the crunchy Oreo base to the fluffy, tinted whipped topping, which together create a memorable taste and striking appearance.
- 36 Oreo cookies: These form a rich, chocolatey crust that’s the perfect base for the dessert.
- 1/2 cup unsalted butter, melted: Helps bind the crust together and adds a pleasant buttery flavor.
- 8 oz cream cheese, softened: Adds a smooth, tangy richness in the creamy middle layer.
- 1 cup powdered sugar: Sweetens the cream cheese filling without making it overpowering.
- 1 cup whipped topping (Cool Whip): Lightens and softens the cream cheese mixture for a fluffy texture.
- Purple food coloring: Gives the cream cheese layer a spooky, festive look.
- 1 package (3.4 oz) instant vanilla pudding mix: Creates a smooth, luscious pudding layer that contrasts beautifully with the other textures.
- 2 cups cold milk: Used to prepare the vanilla pudding, ensuring it sets perfectly.
- Orange food coloring: Adds a vibrant hue to the pudding layer, infusing Halloween spirit.
- 2 cups whipped topping (Cool Whip): For the final light and fluffy green layer.
- Green food coloring: Colors the top whipped topping layer to complete the Halloween palette.
- Halloween-themed sprinkles: The fun finishing touch that adds color and festivity.
How to Make Halloween Lush Dessert Recipe
Step 1: Prepare the Crust
Start by crushing the Oreo cookies into fine crumbs using a food processor. This step is crucial to achieve that perfect crunchy base that adds texture to the dessert. Once crushed, mix the crumbs with the melted butter and press the mixture firmly into the bottom of a 9×13-inch baking dish. This creates a solid foundation for your luscious layers.
Step 2: Make the Cream Cheese Layer
Beat the softened cream cheese until smooth and creamy. Then add the powdered sugar and mix well to ensure the sweetness is evenly incorporated. Gently fold in the whipped topping along with a few drops of purple food coloring to transform this layer into a festive light purple shade. Spread this creamy mixture evenly over the Oreo crust, making sure it’s smooth and level.
Step 3: Prepare the Pudding Layer
Whisk the instant vanilla pudding mix with cold milk until the mixture thickens to a silky, smooth consistency. Add a few drops of orange food coloring and mix until the color distributes evenly, capturing that perfect Halloween orange glow. Spread this pudding layer carefully over the cream cheese layer, creating a vivid middle section for the dessert.
Step 4: Make the Whipped Topping Layer
Combine the remaining whipped topping with green food coloring to achieve a bright, festive green shade. This final topping adds a light, fluffy layer that contrasts both visually and texturally with the other layers. Spread this green whipped topping evenly over the pudding layer, preparing the dessert for its final decorative touches.
Step 5: Add the Garnish and Chill
Sprinkle Halloween-themed sprinkles generously over the top of the dessert to provide a fun, colorful finishing touch. Then refrigerate the assembled dish for at least 4 hours, allowing the layers to set properly. When chilled, the dessert will slice neatly into delicious, photogenic squares, ready to impress everyone at your table.
How to Serve Halloween Lush Dessert Recipe
Garnishes
Adding extra Halloween-themed sprinkles or edible decorations such as candy eyes or tiny gummy spiders can amp up the spooky fun. Using themed cupcake liners as individual serving dishes is another creative way to serve this dessert, enhancing its festive appeal.
Side Dishes
This lush dessert pairs wonderfully with light, refreshing sides like a crisp autumn apple salad or spiced pumpkin seeds. These sides balance the richness of the dessert and complement the seasonal flavors beautifully, creating a well-rounded Halloween spread.
Creative Ways to Present
Consider serving this Halloween Lush Dessert Recipe in a clear glass trifle bowl to showcase the distinct colorful layers. You can also create individual parfait cups for a more personalized and portable option, perfect for parties or potlucks. Decorating the serving table with small pumpkins and autumn leaves adds an inviting seasonal touch.
Make Ahead and Storage
Storing Leftovers
Leftovers of this dessert keep beautifully in the refrigerator. Cover the dish tightly with plastic wrap or transfer portions into airtight containers. This will help maintain the creamy texture and prevent the Oreo crust from becoming soggy.
Freezing
Although this dessert is best enjoyed fresh, you can freeze individual portions wrapped securely in plastic wrap and foil. Thaw them overnight in the refrigerator before serving to preserve the best texture and taste.
Reheating
This dessert is meant to be enjoyed cold, so reheating is not recommended. Instead, allow frozen portions to thaw properly to maintain the luscious layers and refreshing texture.
FAQs
Can I use a different cookie for the crust?
Absolutely! While Oreo cookies provide a classic flavor and color contrast, you could use chocolate graham crackers or chocolate wafer cookies for a slightly different taste and texture.
Is there a non-dairy alternative for the cream cheese and whipped topping?
Yes, look for non-dairy cream cheese and whipped topping substitutes available in many stores to make this dessert vegan or lactose-free without sacrificing creaminess.
Can I prepare this dessert the day before Halloween?
Definitely. In fact, making it the day before helps the layers set perfectly and meld flavors. Just be sure to keep it refrigerated and tightly covered.
How long does this dessert stay fresh?
When stored properly in the refrigerator, this dessert stays fresh and tasty for up to 3 days. After that, the textures may begin to change.
Can I add other flavors to the pudding layer?
Sure! Pumpkin spice or chocolate instant pudding mix can be substituted for vanilla if you want to experiment with flavors while keeping the Halloween vibe.
Final Thoughts
So there you have it—a simple yet show-stopping Halloween Lush Dessert Recipe that’s sure to be a crowd-pleaser at your next autumn gathering. It’s fun to make, bursting with flavor, and bright enough to light up any party table. Don’t wait; dive into this colorful treat and enjoy the magic of Halloween in every luscious bite!
Print
Halloween Lush Dessert Recipe
- Prep Time: 30 minutes
- Cook Time: 0 minutes
- Total Time: 4 hours 30 minutes
- Yield: 12 servings
- Category: Dessert
- Method: No-Cook
- Cuisine: American
- Diet: Vegetarian
Description
This festive Halloween Lush Dessert features layers of crushed Oreo cookie crust, creamy purple-tinted cream cheese mixture, orange-vanilla pudding, and green whipped topping, all garnished with colorful Halloween-themed sprinkles. Perfectly chilled, this no-bake dessert is a spooky and delicious treat ideal for Halloween parties and celebrations.
Ingredients
Crust
- 36 Oreo cookies
- 1/2 cup unsalted butter, melted
Cream Cheese Layer
- 8 oz cream cheese, softened
- 1 cup powdered sugar
- 1 cup whipped topping (Cool Whip)
- Purple food coloring, a few drops
Pudding Layer
- 1 package (3.4 oz) instant vanilla pudding mix
- 2 cups cold milk
- Orange food coloring, a few drops
Whipped Topping Layer
- 2 cups whipped topping (Cool Whip)
- Green food coloring, a few drops
Garnish
- Halloween-themed sprinkles
Instructions
- Prepare the Crust: Crush the Oreo cookies into fine crumbs using a food processor to form the base for your dessert.
- Form the Crust: Mix the Oreo crumbs with melted butter thoroughly, then press firmly into the bottom of a 9×13-inch baking dish, creating an even layer.
- Make the Cream Cheese Layer: Beat the softened cream cheese until smooth and creamy.
- Sweeten the Cream Cheese: Add powdered sugar to the cream cheese and mix well to combine evenly.
- Incorporate Whipped Topping and Color: Gently fold in the whipped topping and a few drops of purple food coloring until the mixture is uniform in color.
- Spread Over Crust: Evenly spread the purple cream cheese mixture over the Oreo crust layer.
- Prepare the Pudding Layer: Whisk the instant vanilla pudding mix with cold milk until it thickens to a creamy consistency.
- Add Color to Pudding: Mix in a few drops of orange food coloring, ensuring the color is evenly distributed throughout the pudding.
- Layer the Pudding: Spread the orange pudding mixture evenly over the cream cheese layer.
- Prepare the Whipped Topping Layer: Combine the whipped topping with green food coloring, mixing until the color is consistent.
- Top the Pudding: Spread the green whipped topping mixture in an even layer over the pudding.
- Add the Garnish: Sprinkle Halloween-themed sprinkles evenly on top of the green whipped topping layer for a festive look.
- Chill and Set: Refrigerate the assembled dessert for at least 4 hours to allow all layers to set properly.
- Serve: Cut into 12 squares and serve chilled for a delightful Halloween treat.
Notes
- You can substitute store-bought whipped topping with homemade whipped cream if preferred.
- For a richer crust, you can use chocolate sandwich cookies with cream filling or add a pinch of cinnamon for extra flavor.
- Adjust the amount of food coloring according to your desired intensity of colors.
- Make sure to chill the dessert long enough for clean slicing and best flavor layering.
- This dessert can be prepared a day ahead and stored covered in the refrigerator.


