
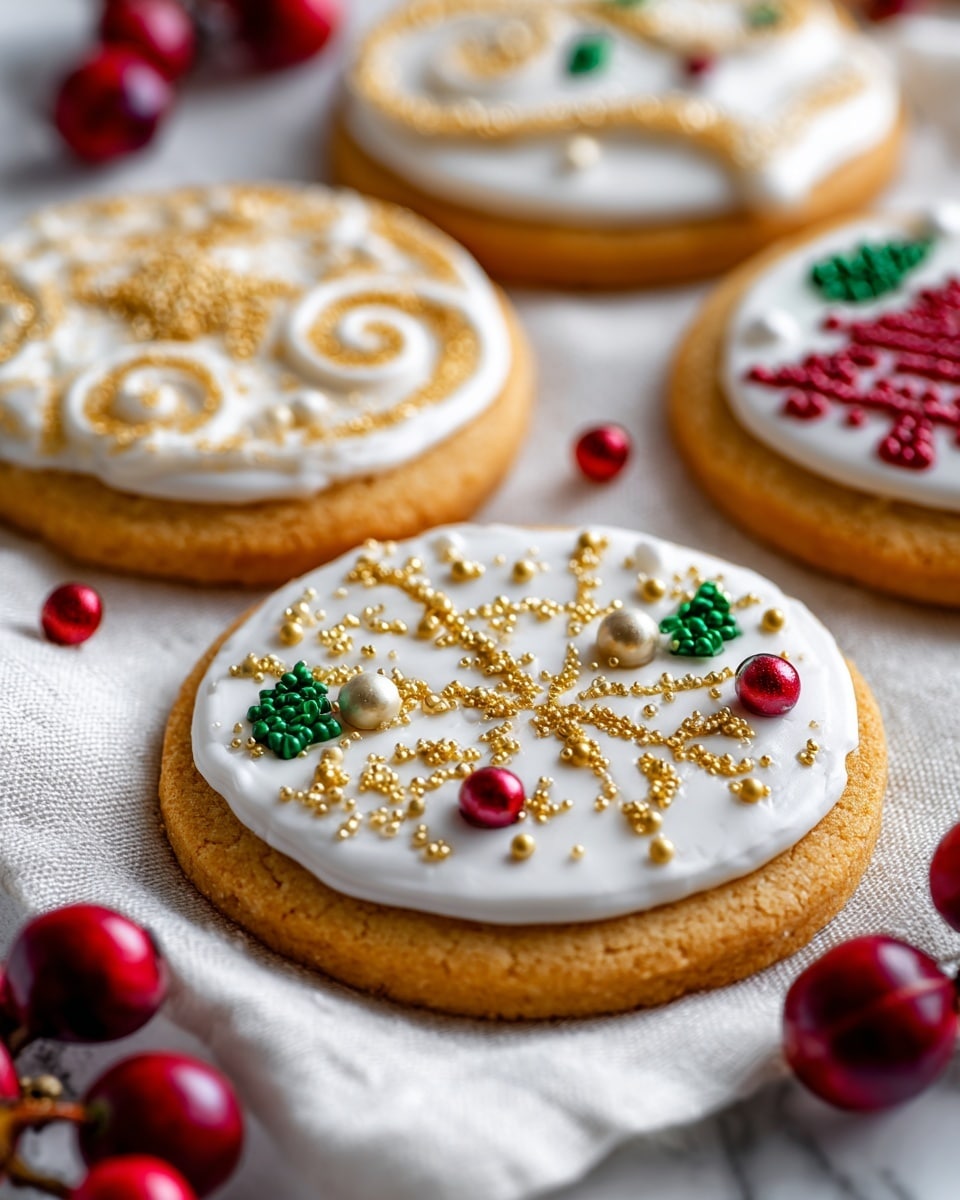
If you’re looking for a delightful baking project that fills your kitchen with the irresistible scent of buttery sweetness, then you will love this Easy Cut-Out Sugar Cookies with Icing Recipe. These cookies are soft yet sturdy, holding their adorable shapes perfectly as they bake, making them the ultimate canvas for colorful, glossy icing designs. Whether you’re preparing for a holiday gathering, a birthday celebration, or just a cozy day of creative fun, this recipe combines simplicity, taste, and fun decorating that everyone will adore.

Ingredients You’ll Need
The beauty of this recipe lies in its straightforward ingredients, each playing a vital role in producing the perfect cut-out sugar cookie. From the creamy butter that gives tenderness to the cookie, to the powdered sugar that makes the icing irresistibly smooth and sweet, these pantry staples come together in harmony for both delicious flavor and ideal texture.
- 1 cup unsalted butter (softened): Provides richness and ensures a tender crumb without overpowering saltiness.
- 1 cup granulated sugar: Sweetens the cookie and contributes to a slight crispness on the edges.
- 1 large egg: Adds moisture and helps bind the dough for easy handling.
- 1 ½ teaspoons vanilla extract: Infuses a warm, comforting depth of flavor.
- 2 ½ cups all-purpose flour: The base structure of the cookie, delivering just the right chewiness.
- ½ teaspoon baking powder: Provides a gentle lift for a soft, tender bite.
- ¼ teaspoon salt: Balances the sweetness and enhances the overall flavor.
- For the icing:
- 2 cups powdered sugar: Essential for a silky, sweet coating that hardens beautifully.
- 2–3 tablespoons milk: Adjusts the icing’s consistency for easy spreading or piping.
- 1 tablespoon light corn syrup: Adds shimmer and keeps icing glossy without cracking.
- ½ teaspoon vanilla or almond extract: Elevates the icing with aromatic flavor notes.
- Food coloring (optional): Perfect for adding vibrant hues and creative flair to your decorations.
How to Make Easy Cut-Out Sugar Cookies with Icing Recipe
Step 1: Creaming and Combining
Start in a large bowl by creaming the softened butter and granulated sugar together until light and airy—this usually takes 2 to 3 minutes, but the texture is key to tender cookies. Then, mix in the egg and vanilla extract until everything is beautifully combined and smooth. This creates a flavorful, rich base for your dough.
Step 2: Mixing Dry Ingredients
In a separate bowl, whisk the all-purpose flour with baking powder and salt, ensuring these dry components are evenly distributed. Gradually incorporate this flour mix into your wet ingredients, stirring gently but thoroughly until a soft dough forms. The dough should feel supple yet not sticky, perfect for rolling out.
Step 3: Chilling the Dough
Divide the dough into two equal portions, shape each into a flattened disc, and wrap them in plastic wrap. Chill your dough in the refrigerator for at least one hour. This step is essential because it prevents spreading during baking and helps you achieve those crisp, recognizable shapes.
Step 4: Shaping and Baking
Preheat your oven to 350°F and prepare baking sheets lined with parchment paper. Lightly flour your surface and roll one disc of chilled dough to about ¼-inch thickness for perfect cut-outs. Use your favorite cookie cutters for shapes, gently transferring each piece to the baking sheet. Bake for 8 to 10 minutes, watching for the edges just beginning to turn golden—this is your signal that they are perfectly baked.
Step 5: Preparing the Icing
While your cookies cool on a wire rack, whisk powdered sugar, milk, corn syrup, and your chosen extract in a small bowl until smooth and glossy. Adjust consistency: add more powdered sugar for thicker icing that holds shape well or more milk for a thinner glaze. Divide and add food coloring as you like, making decorating a chance to express your creativity.
Step 6: Decorating
Once cooled completely, decorate your cookies using piping bags for detailed designs or a spoon for a rustic spread. Let the icing set for several hours or overnight to achieve that signature glossy finish that holds up to stacking or packaging.
How to Serve Easy Cut-Out Sugar Cookies with Icing Recipe

Garnishes
Enhance your iced sugar cookies by adding small edible pearls, sprinkles, or finely chopped nuts right after applying icing for extra texture and vibrant color bursts. These tiny details make each cookie feel special and celebratory.
Side Dishes
Pair your cut-out cookies with warm tea, frothy hot chocolate, or even a tall glass of cold milk to balance the sweetness and provide a comforting contrast. These simple sides turn your cookie experience into a cozy treat break or party delight.
Creative Ways to Present
For gifting or displaying, stack cookies in clear cellophane bags tied with colorful ribbons, or arrange them on festive plates layered with parchment. You can also present them in decorated tins or boxes, turning your baking efforts into a heartwarming handmade gift anyone would cherish.
Make Ahead and Storage
Storing Leftovers
After your cookies have completely dried and the icing is set, keep them fresh by storing in an airtight container at room temperature. This method preserves softness and keeps the icing glossy for up to five days—perfect for enjoying through the week or sharing gradually.
Freezing
You can freeze undecorated cookies by wrapping them tightly in plastic wrap, then placing them in a freezer-safe container or bag. When ready to use, thaw completely before icing. For iced cookies, freeze them individually on a tray to harden the icing, then transfer to an airtight container between layers of parchment paper.
Reheating
These sugar cookies are best enjoyed as-is at room temperature. If you prefer a slightly warm cookie, heat them gently in a microwave for 8 to 10 seconds, but avoid warming iced cookies directly to prevent melting the decorations.
FAQs
Can I use salted butter instead of unsalted?
Yes, but reduce or omit any additional salt in the recipe to avoid an overly salty cookie. Unsalted butter lets you control the salt balance more precisely.
What if I don’t have light corn syrup for the icing?
You can substitute with an equal amount of honey or golden syrup; these alternatives will still add glossiness and help keep your icing from cracking.
How thick should I roll my dough?
Roll the dough to about ¼-inch thickness for the best balance of softness and structural integrity that holds cookie shapes while baking.
Can I use this recipe for other holidays or themes?
Absolutely! These cookies are a perfect blank canvas — just change your shapes and icing colors for birthdays, Halloween, or any celebration you desire.
How long does the icing take to set completely?
Set your decorated cookies on a flat surface for several hours or ideally overnight to allow the icing to fully dry and become firm to the touch.
Final Thoughts
Making these Easy Cut-Out Sugar Cookies with Icing Recipe is such a joyful experience, filled with moments of creativity and of course, delicious rewards. Whether you’re baking with kids, preparing for a special event, or simply indulging in a fun kitchen project, these cookies bring warmth, color, and smiles to any occasion. So grab your rolling pin and cookie cutters, and start creating your own sweet masterpieces today!
Print
Easy Cut-Out Sugar Cookies with Icing Recipe
- Prep Time: 20 minutes (plus 1 hour chill time)
- Cook Time: 10 minutes
- Total Time: 1 hour 30 minutes
- Yield: 24 cookies
- Category: Dessert
- Method: Baking
- Cuisine: American
- Diet: Vegetarian
Description
These Easy Cut-Out Sugar Cookies with Icing are soft, buttery, and perfect for decorating. They hold their shape beautifully while baking, making them ideal for holiday cookies, birthdays, or any fun baking day. Topped with a simple, glossy icing that sets firm, they’re as fun to make as they are to eat!
Ingredients
For the cookies:
- 1 cup unsalted butter (softened)
- 1 cup granulated sugar
- 1 large egg
- 1 ½ teaspoons vanilla extract
- 2 ½ cups all-purpose flour
- ½ teaspoon baking powder
- ¼ teaspoon salt
For the icing:
- 2 cups powdered sugar
- 2–3 tablespoons milk
- 1 tablespoon light corn syrup
- ½ teaspoon vanilla or almond extract
- Food coloring (optional)
Instructions
- Cream Butter and Sugar: In a large bowl, cream together the softened butter and granulated sugar until light and fluffy, about 2–3 minutes.
- Add Egg and Vanilla: Add the egg and vanilla extract to the creamed mixture, then beat until fully combined.
- Mix Dry Ingredients: In a separate bowl, whisk together the all-purpose flour, baking powder, and salt.
- Combine Wet and Dry: Gradually add the dry ingredients to the wet ingredients, mixing continuously until a soft dough forms.
- Chill Dough: Divide the dough in half, flatten each half into discs, wrap in plastic wrap, and chill for at least 1 hour to ensure dough is firm for cutting.
- Preheat and Prepare Baking Sheets: Preheat oven to 350°F (175°C) and line baking sheets with parchment paper.
- Roll and Cut Dough: Roll the chilled dough onto a lightly floured surface to about ¼-inch thickness. Use cookie cutters to cut out shapes and transfer them carefully to the prepared baking sheets.
- Bake Cookies: Bake the cookies for 8–10 minutes, or until the edges just start to turn golden brown.
- Cool Cookies: Allow cookies to cool on the baking sheet for 5 minutes, then transfer them to a wire rack to cool completely.
- Prepare Icing: In a small bowl, whisk together powdered sugar, milk, corn syrup, and vanilla or almond extract until smooth. Adjust consistency by adding more powdered sugar for thicker icing or milk for thinner icing. Tint with food coloring if desired.
- Decorate Cookies: Once cookies are fully cooled, decorate them with icing using piping bags or a spoon. Let the icing set for several hours or overnight for best results.
Notes
- Chilling the dough is key to achieving clean cookie shapes and even baking.
- Icing can be piped using piping bags or spread with a spoon depending on your preference.
- Store decorated cookies in an airtight container to keep them fresh for up to 5 days.


