

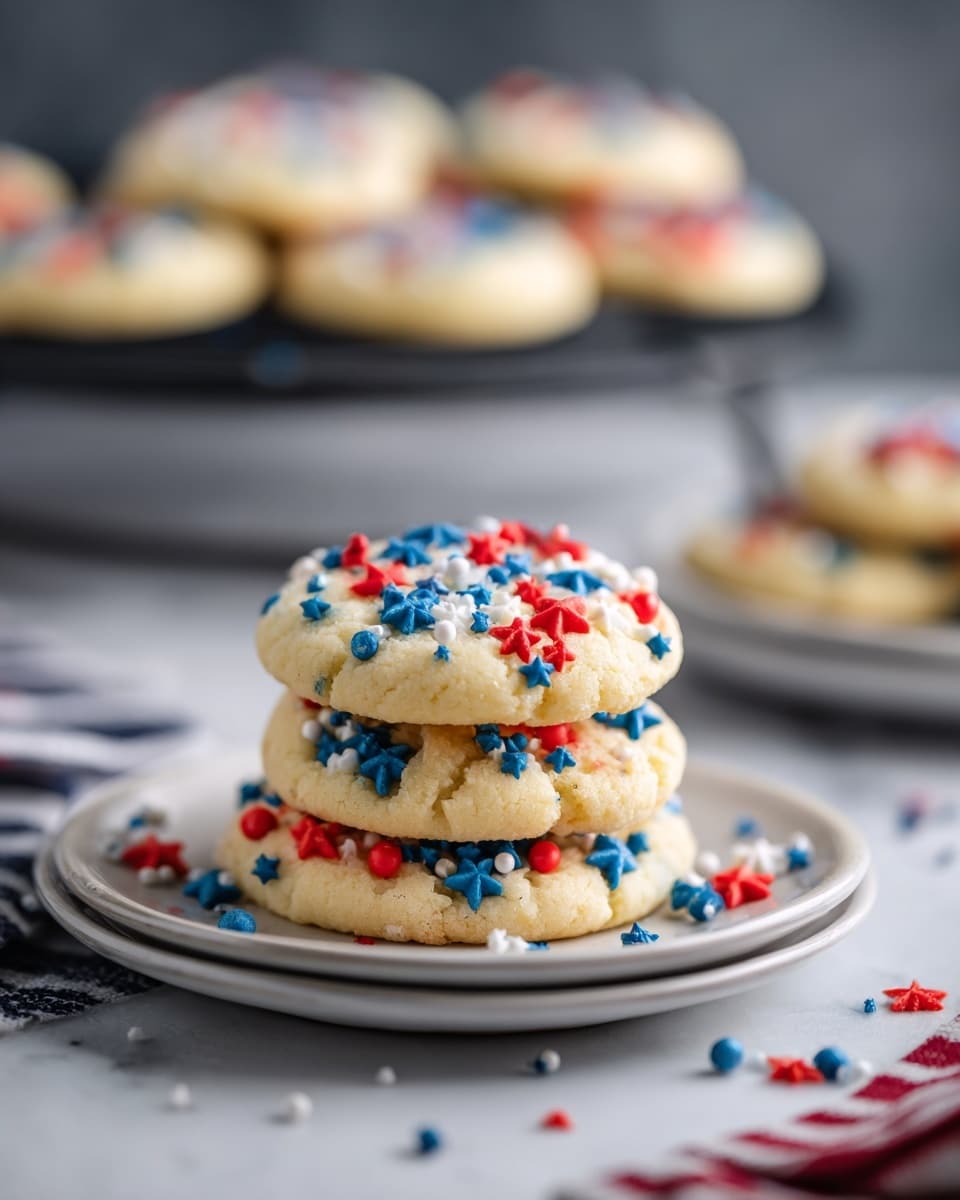
If you’re looking for a festive and delightful treat to celebrate the holiday in style, this 4th of July Marbled Cookies Recipe is an absolute must-try. These cookies capture the patriotic spirit with vibrant swirls of red, blue, and classic vanilla dough, creating a beautiful marbled effect that tastes as wonderful as it looks. Perfectly buttery and tender, each bite offers a playful mix of colors and sweet flavors, making them an irresistible centerpiece for any Independence Day gathering.

Ingredients You’ll Need
Getting the ingredients right is key to nailing the perfect marbled texture and flavor in these cookies. Each component plays a role, whether it’s giving the dough structure, sweetness, or those iconic colors that scream 4th of July fun.
- All-purpose flour: The foundation for a tender cookie with just the right chewiness to hold the marbled pattern.
- Granulated sugar: Sweetens the dough and helps create that lightly crisp edge.
- Unsalted butter (softened): Adds rich flavor and moisture, contributing to the cookie’s soft center.
- Large eggs: Bind the dough ingredients together, ensuring a perfect texture.
- Baking powder: Gives the cookies a gentle lift without making them cakey.
- Pure vanilla extract: Elevates the overall flavor with warm, familiar notes.
- Red and blue gel food coloring: Essential for creating those vibrant, eye-catching swirls.
- Red, white, and blue sprinkles: The final festive touch that adds crunch and patriotic flair.
How to Make 4th of July Marbled Cookies Recipe
Step 1: Preheat and Prepare
Start by setting your oven to 350°F (175°C) to ensure it’s nice and hot by the time your dough is ready. This step is essential for achieving cookies that bake evenly and develop a beautiful golden edge.
Step 2: Cream Butter and Sugar
In a large mixing bowl, beat the softened butter and granulated sugar together until the mixture becomes fluffy and light in color—about 3 to 5 minutes. This creaming process helps incorporate air, resulting in a delicate texture.
Step 3: Add Eggs and Vanilla
Next, add the eggs one at a time, mixing well after each addition, followed by the vanilla extract. This ensures the dough stays smooth and all flavors meld beautifully.
Step 4: Combine Dry Ingredients
In a separate bowl, whisk together the all-purpose flour and baking powder. Gradually add this dry mixture into your wet ingredients, stirring just until everything comes together. Overmixing can make the cookies tough, so keep it gentle.
Step 5: Divide and Color the Dough
Now for the fun part! Split your dough evenly into three portions. Leave one plain, then add red gel food coloring to the second and blue gel food coloring to the third. Mix each until the colors are deep and vibrant.
Step 6: Create the Marbled Effect
Gently combine the three dough colors in one bowl by swirling them together with a spatula or skewer. Don’t overwork it—you want distinct ribbons of color rather than a single blended tone.
Step 7: Scoop and Decorate
Scoop tablespoon-sized balls of your marbled dough onto parchment-lined baking sheets, carefully spacing them out. Before baking, sprinkle each cookie with festive red, white, and blue sprinkles for an extra pop of holiday spirit.
Step 8: Bake to Perfection
Bake your cookies for 10 to 12 minutes, until the edges turn a lovely golden brown. The centers should remain soft and slightly chewy, locking in that melt-in-your-mouth texture.
How to Serve 4th of July Marbled Cookies Recipe
Garnishes
While the sprinkles add instant charm, consider serving these cookies with a light dusting of powdered sugar or a drizzle of white chocolate for a sweet finish that complements their patriotic colors and buttery flavor.
Side Dishes
This recipe shines alongside classic summer treats like fresh fruit platters, cool lemonade, or even a cup of hot coffee or tea, balancing the cookies’ sweetness with refreshing or comforting accompaniments.
Creative Ways to Present
Make your 4th of July celebration memorable by stacking these marbled cookies on a tiered platter or arranging them around a small flag centerpiece. For a fun twist, package them in clear cellophane bags tied with red, white, and blue ribbons for guests to take home.
Make Ahead and Storage
Storing Leftovers
Keep any leftover cookies fresh by placing them in an airtight container at room temperature. They will stay soft and delicious for up to a week, perfect for savoring across the holiday weekend.
Freezing
If you want to prepare these cookies in advance, freeze the baked cookies in a sealed container or freezer bag. They’ll keep for up to three months and thaw quickly at room temperature whenever the craving strikes.
Reheating
To enjoy your cookies warm, simply pop them in a low oven (around 300°F) for a few minutes or microwave them briefly. This brings back that freshly baked softness and enhances the flavor.
FAQs
Can I use natural food coloring for the marbled effect?
Absolutely! Natural food colorings made from vegetable juices or powders can work well, though the colors might be less vibrant compared to gel food coloring. Just keep in mind the flavor they might add and adjust accordingly.
How do I prevent the colors from blending too much?
The key is to gently swirl the dough colors instead of mixing vigorously. Use a light hand with a spatula or skewer to create distinct ribbons of color for that authentic marbled look.
Can I make these cookies gluten-free?
You can substitute the all-purpose flour with a gluten-free blend designed for baking, but results may vary slightly in texture. Adding a bit of xanthan gum can help maintain structure in gluten-free versions.
What if I don’t have sprinkles—can I skip them?
Sprinkles add that extra festive flair and crunch, but the cookies are just as delightful on their own. You could also dust with colored sugar or crushed freeze-dried berries for another colorful touch.
Are these cookies suitable for kids to help bake?
Yes! The marbling and decorating steps are especially fun for little hands, making this recipe a great activity to share with kids while teaching them basic baking skills.
Final Thoughts
This 4th of July Marbled Cookies Recipe is a joyous mix of flavor, color, and holiday spirit that’s sure to impress friends and family alike. Baking and sharing these cookies is a wonderful way to add sweetness and creativity to your celebration, so go ahead and give the recipe a try—you’ll want to make them a new patriotic tradition!
Print
4th of July Marbled Cookies Recipe
- Prep Time: 15 minutes
- Cook Time: 12 minutes
- Total Time: 27 minutes
- Yield: 24 servings
- Category: Dessert
- Method: Baking
- Cuisine: American
Description
Celebrate the 4th of July with these festive marbled cookies featuring red, white, and blue swirls. Soft, buttery, and topped with patriotic sprinkles, these cookies are perfect for summer parties and holiday gatherings.
Ingredients
Dry Ingredients
- 2 ½ cups all-purpose flour
- 1 tsp baking powder
Wet Ingredients
- 1 cup unsalted butter (softened)
- 1 cup granulated sugar
- 2 large eggs
- 2 tsp pure vanilla extract
Color and Decoration
- Red gel food coloring
- Blue gel food coloring
- Red, white, and blue sprinkles
Instructions
- Preheat oven: Preheat your oven to 350°F (175°C) to ensure it is hot and ready for baking your cookies evenly.
- Cream butter and sugar: In a mixing bowl, beat the softened unsalted butter and granulated sugar together until the mixture becomes fluffy and light in color, about 3 to 5 minutes.
- Add eggs and vanilla: Incorporate the eggs one at a time into the butter and sugar mixture, mixing well after each addition. Then stir in the pure vanilla extract to add flavor.
- Combine dry ingredients: In a separate bowl, whisk together the all-purpose flour and baking powder to evenly distribute the leavening agent.
- Mix dry and wet ingredients: Gradually add the flour mixture to the wet ingredients, stirring gently until just combined. Avoid overmixing to keep cookies tender.
- Divide and color dough: Split the dough into three equal portions. Add red gel food coloring to one portion, blue gel food coloring to another, and leave the third plain.
- Create marbled effect: Gently swirl the red, blue, and plain dough portions together by folding them lightly to form a marbled pattern without fully blending the colors.
- Shape and decorate: Scoop tablespoon-sized balls of the marbled dough onto baking sheets lined with parchment paper. Sprinkle the tops with red, white, and blue sprinkles for a patriotic touch.
- Bake the cookies: Place the baking sheets in the preheated oven and bake for 10-12 minutes, until the edges turn golden brown but the centers remain soft.
- Cool and serve: Remove the cookies from the oven and let them cool on the baking sheets for a few minutes before transferring to a wire rack to cool completely.
Notes
- Use gel food coloring to avoid changing dough consistency.
- Do not overmix the dough to ensure cookies remain tender and soft.
- For best results, chill the dough for 30 minutes before baking to prevent spreading.
- Store cookies in an airtight container for up to 5 days.
- These cookies freeze well, both before and after baking.


