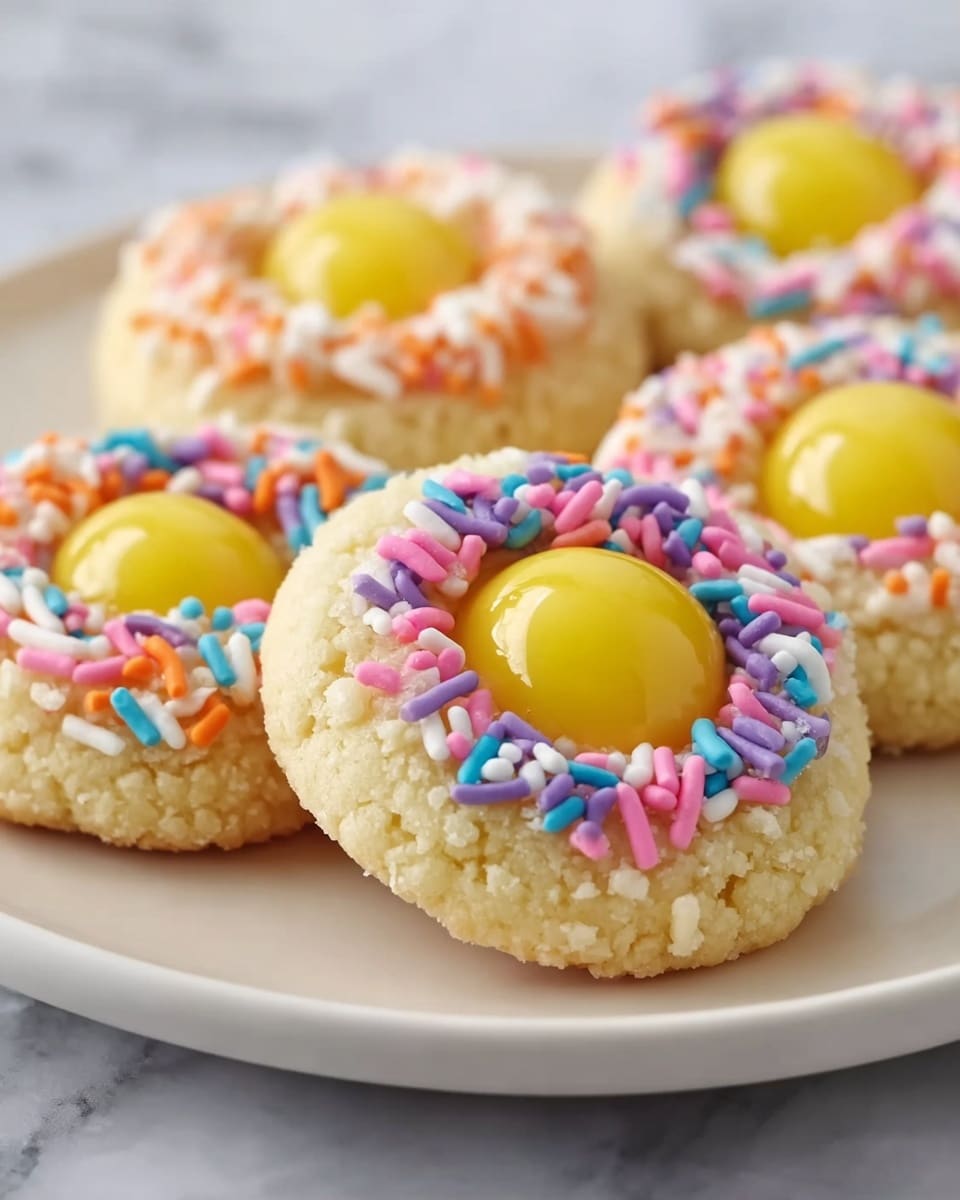
If you’re looking for a charming and delicious treat to brighten up your spring celebrations, then this Easter Thumbprint Cookies Recipe is exactly what you need. These delightful cookies are buttery, tender, and perfectly sweet with a playful pastel chocolate center that’s both eye-catching and indulgent. They’re a fantastic way to celebrate the season, combining simple ingredients with a whimsical presentation that’s sure to bring smiles to any dessert table or Easter basket. Trust me, once you make these, Easter won’t be the same without them!
Ingredients You’ll Need
This recipe calls for simple, pantry-friendly ingredients that combine to create a cookie with wonderful texture and flavor. Each component plays an essential role to give you that buttery softness, subtle sweetness, and that beautiful pastel pop that makes these cookies so festive.
- 1 cup unsalted butter, softened: Provides the rich, creamy base and tender crumb essential to thumbprint cookies.
- 2/3 cup granulated sugar: Adds just the right amount of sweetness without overpowering the buttery flavor.
- 2 large egg yolks: Bring moisture and richness while helping to bind the dough together perfectly.
- 1 teaspoon vanilla extract: Imparts a warm, rounded flavor that complements both dough and filling beautifully.
- 2 cups all-purpose flour: The structure of the cookies, giving enough heft while keeping them soft.
- 1/4 teaspoon salt: Enhances all the flavors and balances the sweetness with a subtle contrast.
- 1/2 cup assorted pastel-colored candy melts or white chocolate: The star of the show for that colorful, creamy filling that makes these cookies instantly festive.
- Pastel sprinkles or mini chocolate eggs for decoration: Add extra texture and whimsical charm that screams Easter celebration.
How to Make Easter Thumbprint Cookies Recipe
Step 1: Prepare Your Oven and Baking Sheet
Start by preheating your oven to 350°F (175°C) and line a baking sheet with parchment paper. This ensures your cookies bake evenly and won’t stick, setting a smooth stage for the rest of the process.
Step 2: Cream Together Butter and Sugar
In a large bowl, beat the softened butter and granulated sugar together until they become light and fluffy. This step is key because it aerates the butter which gives the cookies that buttery softness and slight lift.
Step 3: Add Egg Yolks and Vanilla
Mix in the egg yolks and vanilla extract until everything is well combined. The egg yolks enrich the dough without making it too wet, and the vanilla adds that comforting, classic cookie aroma.
Step 4: Incorporate Flour and Salt
Gradually blend in the all-purpose flour and salt until a soft dough forms. Don’t overmix here; you want the dough just combined and tender to ensure that melt-in-your-mouth texture.
Step 5: Form the Cookie Balls and Make Indentations
Scoop 1-tablespoon portions of dough and roll them gently into balls. Place them on your prepared baking sheet spaced about 2 inches apart. Then use your thumb or the back of a rounded spoon to gently press an indentation in the center of each ball. This will hold the luscious chocolate filling after baking.
Step 6: Bake to Golden Perfection
Bake the cookies for 12 to 14 minutes, just until the edges start turning golden. Keep a close eye to avoid overbaking because you want tender, not crisp. If the indentations disappear during baking, press them again gently to reshape.
Step 7: Add the Chocolate Filling and Decorations
Allow the cookies to cool completely on a wire rack. While cooling, melt the candy melts or white chocolate in a microwave-safe bowl in 20-second intervals, stirring until silky smooth. Spoon or pipe a bit of the melted chocolate into each thumbprint center, then sprinkle with pastel sprinkles or top with mini chocolate eggs for that perfect Easter vibe. Let the chocolate set before serving.
How to Serve Easter Thumbprint Cookies Recipe

Garnishes
The fun part about serving these cookies is the decorating! Pastel sprinkles add delightful crunch and color, and mini chocolate eggs bring in playful Easter charm. For an elegant twist, you could dust the edges lightly with edible glitter or crushed freeze-dried berries to brighten the visuals even more.
Side Dishes
These cookies go wonderfully alongside a hot beverage like a creamy latte or a lightly brewed tea. They’re also great paired with a scoop of vanilla ice cream or a small bowl of fresh strawberries to complement the sweet and buttery flavors without overpowering them.
Creative Ways to Present
Present your Easter Thumbprint Cookies Recipe by arranging them on a pastel-colored platter or a rustic wooden board. Adding fresh spring flowers or edible blossoms around the tray can make your dessert table irresistible. Another idea is to individually wrap cookies in clear bags tied with pastel ribbon for charming party favors or Easter basket treats everyone will love.
Make Ahead and Storage
Storing Leftovers
You can store these thumbprint cookies in an airtight container at room temperature for up to 4 days. Keeping them sealed this way preserves their softness and stops the chocolate centers from drying out so they stay just as delightful as when freshly made.
Freezing
If you want to prepare these festive cookies in advance, freeze the baked and cooled cookies without filling. Once you’re ready to serve, thaw them at room temperature, then add the melted candy or chocolate filling and decorations. This way, your presentation stays fresh and the chocolate looks perfect.
Reheating
If your cookies have been stored and feel a bit firm, gently warm them in a low-temperature oven (around 300°F / 150°C) for 3 to 5 minutes to soften slightly before serving. Avoid microwaving as it may make the chocolate filling too soft or melt completely.
FAQs
Can I use regular chocolate instead of candy melts for the filling?
Absolutely! White chocolate or milk chocolate chips work great if you prefer. Just melt them carefully and decorate as you like. For pastel colors, white chocolate is easier to tint with gel food coloring.
Are these cookies gluten-free?
This particular recipe calls for all-purpose flour, which contains gluten. However, you can experiment with gluten-free flour blends suited for baking, though texture may vary slightly.
Can I make the dough ahead of time?
Yes! You can prepare the dough and refrigerate it for up to 24 hours before baking. This can actually help the flavors develop even more and make the dough easier to handle.
How do I prevent the chocolate filling from melting or getting sticky?
Make sure the cookies are completely cooled before adding the melted chocolate. Store finished cookies in a cool place away from direct sunlight to maintain the chocolate’s shape and texture.
What if I don’t have pastel sprinkles or mini eggs?
No worries! You can use colored sugar crystals, chopped nuts, dried fruit bits, or even small candy pearls to add some texture and festive flair to the centers.
Final Thoughts
Making this Easter Thumbprint Cookies Recipe is such a joyful experience that brings warmth, color, and sweetness to any occasion. Whether it’s a festive dessert table or a gift for loved ones, these cookies are bound to be loved by all ages. Give this recipe a try, and I promise it’ll become a beloved staple in your holiday baking traditions!
Print
Easter Thumbprint Cookies Recipe
- Prep Time: 20 minutes
- Cook Time: 14 minutes
- Total Time: 34 minutes
- Yield: 24 cookies
- Category: Dessert
- Method: Baking
- Cuisine: American
- Diet: Vegetarian
Description
These Easter Thumbprint Cookies are buttery, tender treats perfect for spring celebrations. Topped with colorful pastel candy melts or white chocolate and festive sprinkles or mini eggs, they’re ideal for Easter baskets or dessert tables.
Ingredients
Cookie Dough
- 1 cup unsalted butter, softened
- 2/3 cup granulated sugar
- 2 large egg yolks
- 1 teaspoon vanilla extract
- 2 cups all-purpose flour
- 1/4 teaspoon salt
Filling and Decoration
- 1/2 cup assorted pastel-colored candy melts or white chocolate
- Pastel sprinkles or mini chocolate eggs for decoration
Instructions
- Preheat Oven and Prepare Baking Sheet: Preheat your oven to 350°F (175°C) and line a baking sheet with parchment paper to ensure the cookies don’t stick and bake evenly.
- Mix Butter and Sugar: In a large bowl, beat the softened butter and granulated sugar together until the mixture is light and fluffy, which helps give the cookies a tender texture.
- Add Egg Yolks and Vanilla: Incorporate the egg yolks and vanilla extract into the butter mixture and mix until everything is fully combined, adding richness and flavor to the dough.
- Combine Dry Ingredients: Gradually add the all-purpose flour and salt into the wet ingredients, mixing gently until a soft dough forms without overworking it to keep the cookies tender.
- Shape Cookies and Make Indentations: Scoop out 1-tablespoon portions of dough and roll into balls. Place them about 2 inches apart on the prepared baking sheet. Use your thumb or the back of a rounded spoon to create a gentle indentation in the center of each dough ball for the filling.
- Bake Cookies: Bake the cookies for 12 to 14 minutes, or until the edges start to turn golden. If the indentations soften during baking, gently press them again to maintain the thumbprint shape.
- Cool Cookies: Transfer the baked cookies to a wire rack and let them cool completely before adding the filling to prevent melting.
- Melt Candy Melts or Chocolate: Melt the pastel candy melts or white chocolate in a microwave-safe bowl by heating in 20-second intervals, stirring well between each until smooth and creamy.
- Fill and Decorate: Spoon or pipe a small amount of the melted candy or chocolate into the thumbprint indentations on each cookie. Top with pastel sprinkles or place a mini chocolate egg on each for a festive touch.
- Set and Serve: Allow the filled cookies to sit until the chocolate sets firmly before serving or storing in an airtight container.
Notes
- You can color white chocolate using pastel gel food coloring to customize the centerpiece filling.
- Store these cookies in an airtight container at room temperature for up to 4 days to maintain freshness.
- These cookies make delightful additions to Easter baskets or dessert tables, adding seasonal charm.


