
If you’ve ever dreamed of filling your kitchen with the irresistible aroma of fresh bread, this Homemade Sourdough Batard Bread Recipe is your gateway to that delicious experience. This loaf boasts a perfectly crisp crust with a chewy, flavorful crumb that develops over time thanks to a thoughtful blend of ingredients and fermentation techniques. From the bubbling poolish starter to the final golden bake, every step is a rewarding journey into the heart of traditional bread making. Whether you’re a seasoned baker or just starting out, this recipe offers a hands-on, heartfelt way to enjoy truly artisanal bread crafted right at home.

Ingredients You’ll Need
Every ingredient in this recipe plays a pivotal role in crafting that quintessential sourdough batard. These basics may seem straightforward, but their quality and balance shape the texture, rise, and flavor that make this bread so incredibly special.
- 500 g bread flour: Choose unbleached, high-protein flour like King Arthur for strong gluten development and a chewy crumb.
- 350 g water: Using room temperature water helps hydrate the flour evenly and kickstarts the yeast activity.
- 10 g fine sea salt: Essential for enhancing flavor and controlling yeast fermentation.
- 2.5 g instant yeast: Provides a gentle boost to fermentation alongside natural sourdough development.
- 5 g diastatic malt powder: Adds sugars that feed yeast and improve crust coloration.
- 0.5 g ascorbic acid powder: Acts as a dough improver, strengthening gluten and boosting oven spring.
- 100 g bread flour (for poolish): Creates the flavorful pre-ferment that deepens taste complexity.
- 100 g water (for poolish): Hydrates the poolish, allowing yeast to awaken and bubbles to form.
- 0.5 g instant yeast (for poolish): Gives just enough rise and activity to the poolish without overpowering the sourdough character.
How to Make Homemade Sourdough Batard Bread Recipe
Step 1: Prepare the Poolish
Begin by mixing 100 g bread flour, 100 g water, and 0.5 g instant yeast in a bowl until smooth. Cover and rest at room temperature for 12 hours. This poolish will bubble and dome, signaling that it’s alive and full of flavor, setting a robust foundation for your dough.
Step 2: Autolyse the Dough
Combine 400 g bread flour and 250 g water in a large bowl, whisking until no dry spots remain. Cover and let rest for 30 minutes. This step hydrates the flour and aligns gluten strands, making the dough easier to stretch and fold later.
Step 3: Incorporate Remaining Ingredients
Sprinkle 10 g fine sea salt, 2 g instant yeast, 5 g diastatic malt powder, and 0.5 g ascorbic acid powder over the autolysed dough. Add the entire poolish mixture and fold everything together until you have a uniform, tacky dough. This blending unites flavor and structure elements efficiently.
Step 4: Perform Stretch-and-Folds During Bulk Fermentation
Over approximately 2 hours at 75°F, perform four stretch-and-fold cycles every 30 minutes. Reach under the dough’s edge, stretch it up gently, fold it over itself, and turn the bowl 90°. This process builds strength and traps air, resulting in an open crumb with beautiful texture.
Step 5: Cold Ferment in The Refrigerator
Transfer the dough to a lightly oiled container, cover it, and refrigerate for 12 to 18 hours. This slow fermentation deepens flavor and offers schedule flexibility, letting the dough develop complex sour notes and a wonderfully chewy texture.
Step 6: Shape the Dough
After cold fermentation, turn the dough onto a floured surface and gently flatten it into a rectangle. Fold the top third down, the bottom third up, then rotate 90° and repeat. Let the dough rest seam side up for 15 minutes to relax, preparing it for final shaping.
Step 7: Final Shaping Into Batard
Flour your surface again and flatten the dough into a 10 by 8-inch rectangle. Fold the sides toward the center, sealing seams with your fingertips. Roll it up into a tight 12-inch long batard, place on parchment, and cover with a proofing basket liner or towel. Proof at room temperature for 60 to 75 minutes until the dough passes the poke test, demonstrating readiness.
Step 8: Bake Your Batard Bread
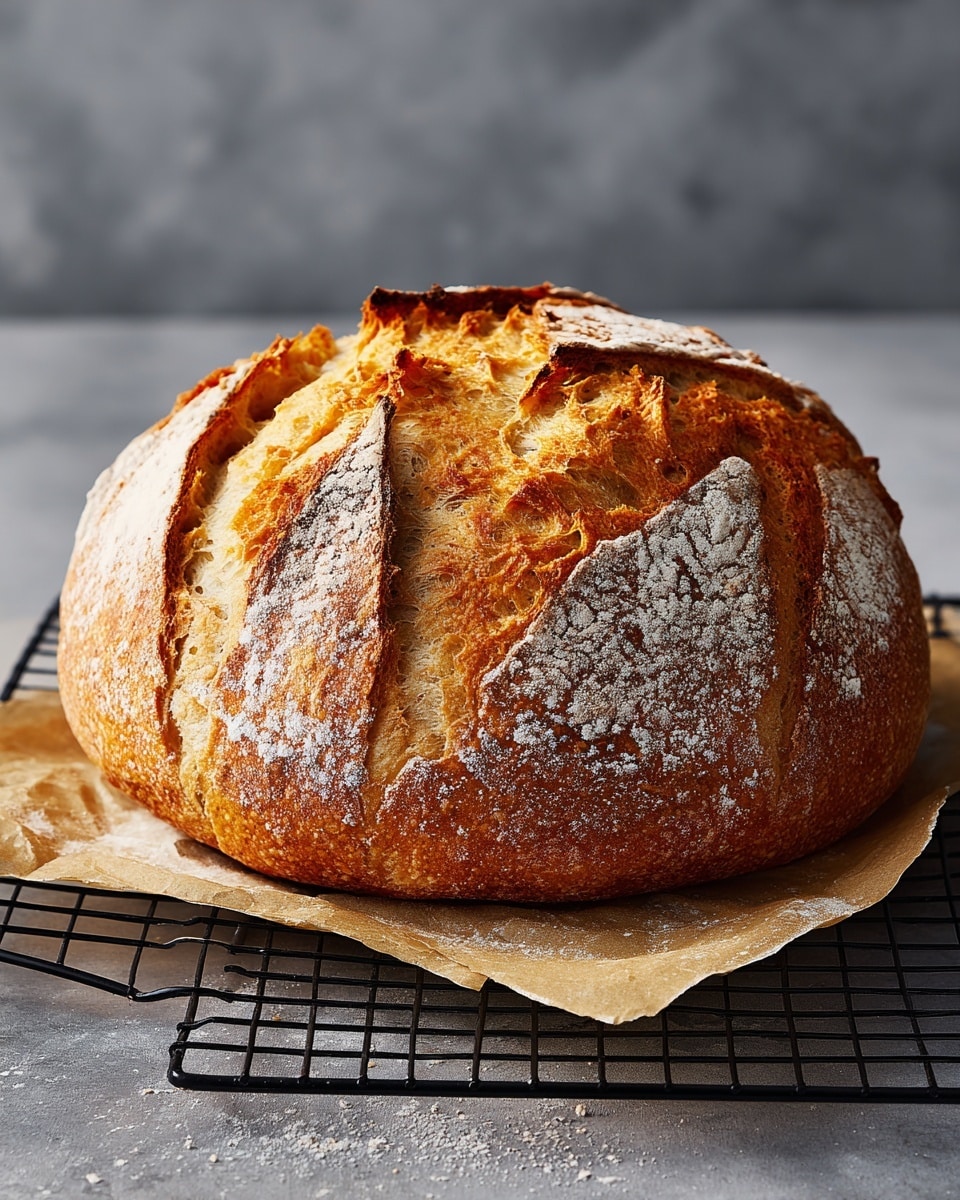
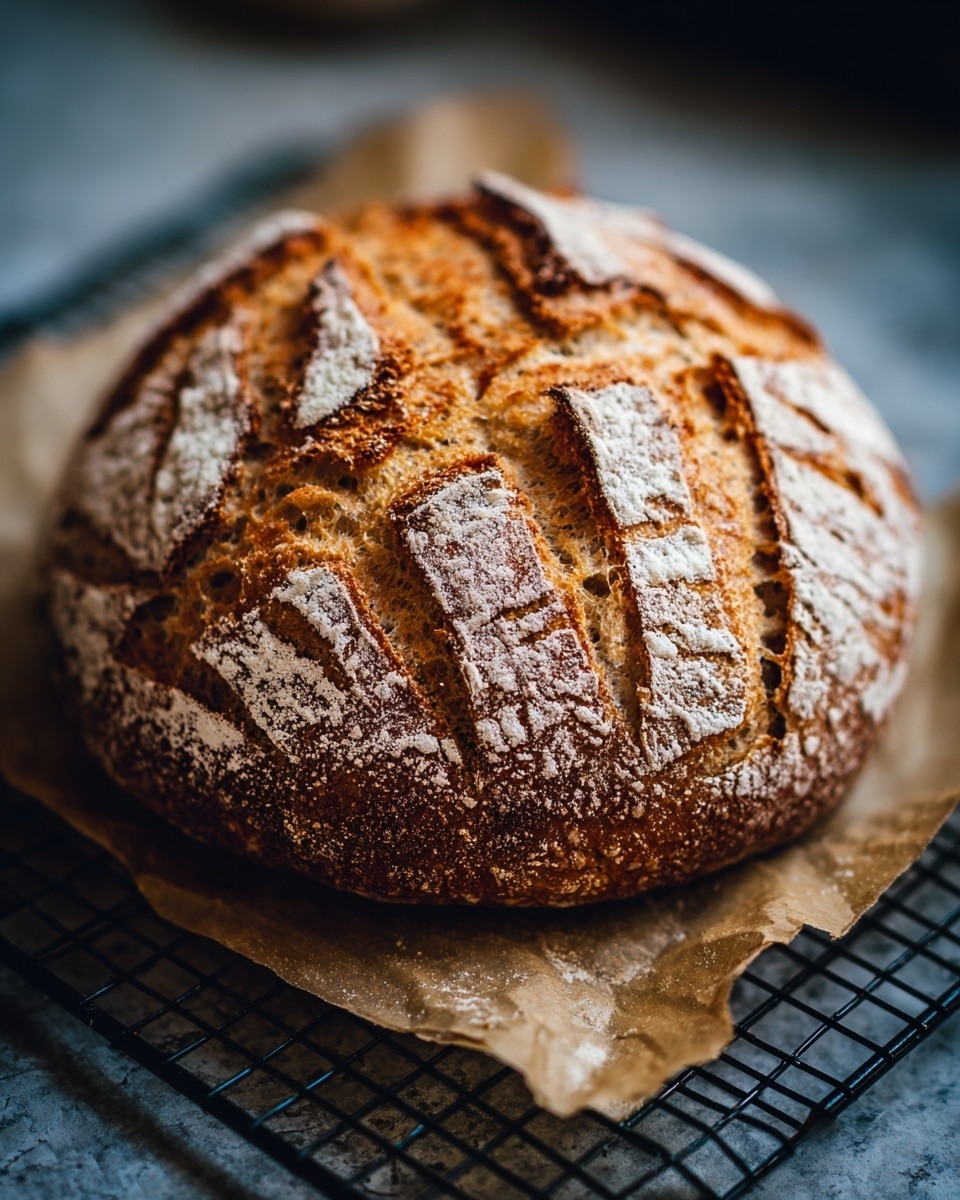
Preheat your oven to 475°F. Place a baking stone or steel on the middle rack and a steam pan on the oven floor, heating both for at least 45 minutes. Transfer the loaf with parchment onto the stone, score a 6-inch slash, then pour one cup of hot water into the steam pan and close the door swiftly to trap steam. Bake 15 minutes, reduce heat to 440°F, bake 15 more minutes removing the steam tray afterward, then continue until a deep golden crust forms.
Step 9: Cool Before Slicing
Carefully remove your freshly baked batard with the parchment and set it on a cooling rack. Let it cool completely for about 2 hours. Patience here is key; slicing too soon can compromise crumb texture and moisture balance.
How to Serve Homemade Sourdough Batard Bread Recipe
Garnishes
This rustic batard shines with simple garnishes like a spread of high-quality butter or a drizzle of extra virgin olive oil sprinkled with flaky sea salt. You can also enjoy it lightly toasted with a smear of herbed cream cheese or smashed avocado topped with chili flakes for an extra flavor kick.
Side Dishes
Serve your homemade batard alongside hearty soups, fresh salads, or rich cheese boards. It pairs beautifully with roasted vegetables or a bowl of steaming chili—its sturdy crust and open crumb are perfect for dipping and soaking up delicious juices.
Creative Ways to Present
Cut thick slices and use them as bases for open-faced sandwiches layered with fresh tomatoes, basil, and mozzarella. You can also hollow out the center slightly and turn the loaf into a rustic bread bowl, perfect for soups or creamy dips at your next gathering.
Make Ahead and Storage
Storing Leftovers
Wrap leftover batard tightly in a clean kitchen towel and store it in a paper bag to maintain the crust’s crispness while keeping the crumb soft. It’s best consumed within 2 days to enjoy peak freshness.
Freezing
If you want to enjoy your Homemade Sourdough Batard Bread Recipe later, slice the loaf before freezing for easy thawing. Wrap slices in plastic wrap and place in a freezer bag. Frozen bread stays delicious for up to 3 months.
Reheating
To revive your bread’s crust and flavor, reheat slices in a toaster or warm the whole loaf in the oven at 350°F for 10 to 15 minutes. Avoid microwaving, which can make bread chewy and dense rather than crusty and light.
FAQs
Can I skip the poolish and just make dough directly?
While you can skip the poolish, it’s crucial for developing complex flavor and open crumb structure. The poolish adds fermentation depth that a direct dough often lacks. It’s worth the overnight wait!
What if I don’t have diastatic malt powder or ascorbic acid?
You can still bake great bread without these specialty ingredients. They help with crust color and dough strength, but omitting them won’t ruin your bread. Your sourdough batard will just be a little different in texture and appearance.
Can I use all instant yeast instead of the small amounts here?
This recipe balances yeast to allow natural sourdough character and long fermentation. Using more instant yeast may speed fermentation but sacrifice the nuanced flavors and chewiness unique to this batard.
Why is resting dough during autolyse important?
Autolyse hydrates flour fully and lets gluten develop naturally without kneading. This makes dough easier to handle, improves extensibility, and ultimately results in a superior texture.
How do I know when the dough is proofed enough?
The poke test is your best friend: gently press the dough with a finger; if the indentation springs back slowly without disappearing completely, it is properly proofed and ready to bake.
Final Thoughts
Making your own Homemade Sourdough Batard Bread Recipe is more than just baking; it’s a fulfilling experience that connects you to centuries of bread tradition. The anticipation of those first slices, the crackling crust, and the tangy yet mellow crumb are truly rewarding. Don’t hesitate to dive in and bake this beautiful loaf—your kitchen and taste buds will thank you!
Print
Homemade Sourdough Batard Bread Recipe
- Prep Time: 30 minutes active plus 12 hours poolish fermentation
- Cook Time: 35 to 40 minutes
- Total Time: 12 hours 30 minutes plus 12 to 18 hours cold ferment, approximately 25 to 31 hours including resting and proofing
- Yield: 1 loaf (one 12-inch batard)
- Category: Bread
- Method: Baking
- Cuisine: French
- Diet: Vegetarian
Description
This Homemade Sourdough Batard Bread recipe guides you through creating a flavorful, artisan-style loaf with a crisp crust and tender crumb. Utilizing a poolish starter for enhanced texture and taste, this recipe employs traditional sourdough fermentation techniques combined with a cold ferment to develop deep, complex flavors. Perfect for bread enthusiasts looking to bake a classic French batard at home, it includes steps for mixing, folding, proofing, and baking to achieve bakery-quality results.
Ingredients
Poolish
- 100 g bread flour (unbleached, high-protein)
- 100 g water (room temperature)
- 0.5 g instant yeast
Main Dough
- 500 g bread flour (unbleached, high-protein flour like King Arthur)
- 350 g water (room temperature)
- 10 g salt (fine sea salt)
- 2.5 g instant yeast
- 5 g diastatic malt powder
- 0.5 g ascorbic acid powder
Instructions
- Prepare the Poolish: In a bowl, combine 100 g bread flour, 100 g water, and 0.5 g instant yeast. Stir until smooth, cover, and let it rest at room temperature for 12 hours until bubbly and slightly domed.
- Autolyse: In a large bowl, whisk together 400 g bread flour and 250 g water until no dry flour remains. Cover and rest for 30 minutes to allow gluten alignment.
- Add Remaining Ingredients and Mix: Sprinkle 10 g salt, 2 g instant yeast, 5 g diastatic malt powder, and 0.5 g ascorbic acid powder over the autolysed dough. Add the poolish. Fold and mix until a uniform dough forms.
- Bulk Fermentation with Stretch-and-Folds: At 75°F, perform four stretch-and-fold cycles every 30 minutes for 2 hours total. This strengthens the dough and develops air pockets without kneading.
- Cold Fermentation: Transfer dough to a lightly oiled container, cover, and refrigerate for 12 to 18 hours to deepen flavor and allow flexible timing.
- Pre-shaping: Turn dough onto a floured surface, flatten into a rectangle, fold top third down and bottom third up, rotate 90°, and repeat. Let rest seam side up for 15 minutes.
- Shaping: Dust surface with flour, flatten dough into a 10×8-inch rectangle, fold sides to center sealing seams, turn seam side down, roll into a 12-inch batard loaf. Place on parchment, cover, and proof at 70–75°F for 60 to 75 minutes until passing the poke test.
- Baking Preparation and Baking: Preheat oven to 475°F with a baking stone or steel on middle rack and steam pan on bottom for at least 45 minutes. Transfer loaf on parchment to stone, score a 6-inch slash down center, pour 1 cup hot water into steam pan, close oven, and bake 15 minutes. Reduce temperature to 440°F, bake 15 more minutes, remove steam pan, and bake until crust is deep golden brown.
- Cooling: Remove loaf carefully with parchment onto a cooling rack. Cool completely, about 2 hours, before slicing to ensure optimal crumb texture.
Notes
- Use high-protein bread flour for best gluten development and structure.
- Maintaining correct fermentation temperature (around 75°F) is key to dough development.
- Diastatic malt powder enhances crust color and fermentation activity.
- Ascorbic acid powder strengthens dough, improving rise and texture.
- Cold ferment in the refrigerator allows flexible baking schedule and flavor enhancement.
- Use a lame or sharp blade to score the bread for controlled expansion in the oven.
- Ensure the oven and baking surface are fully preheated to achieve a good oven spring and crust.
- Cooling the bread completely before slicing prevents gummy crumb texture.


