
“`html
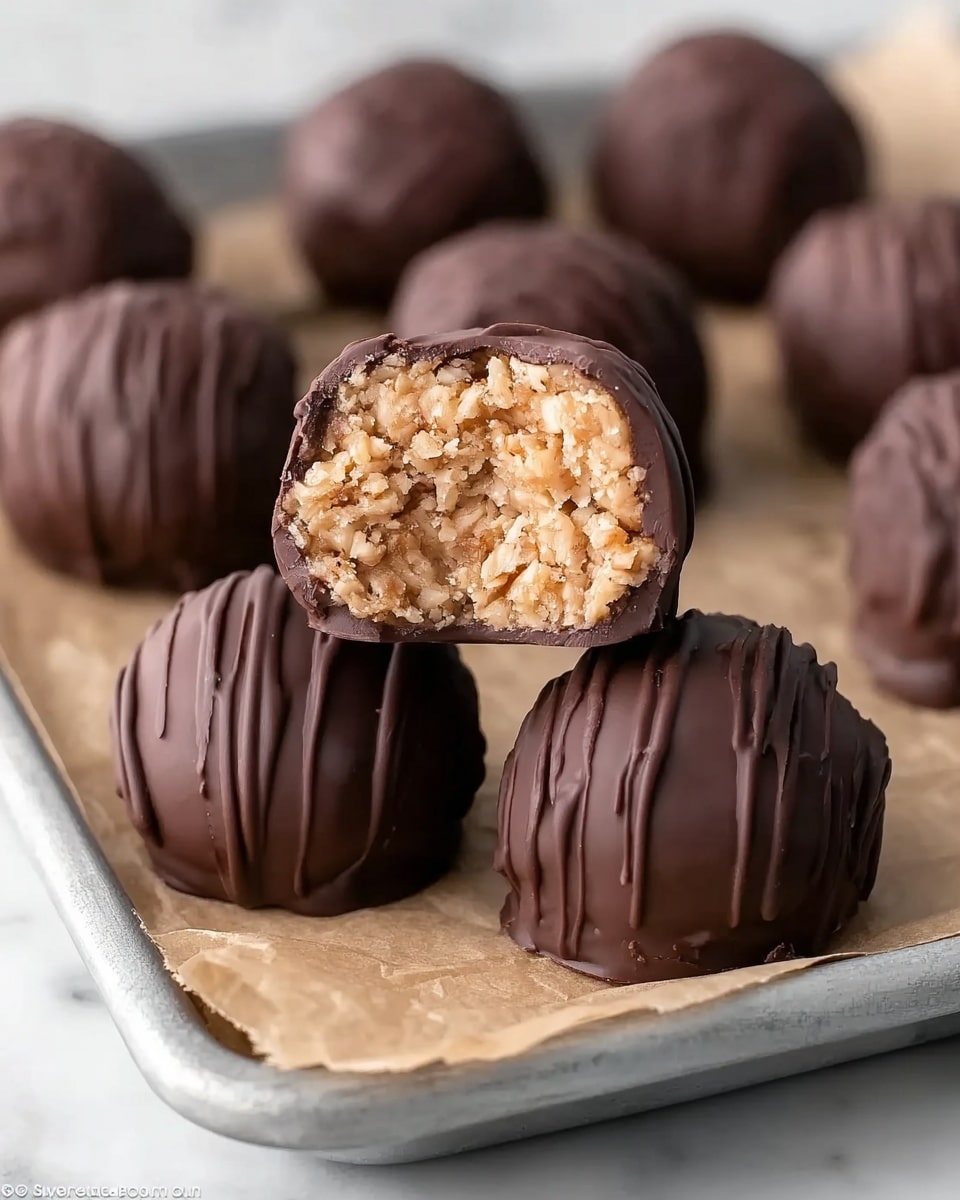
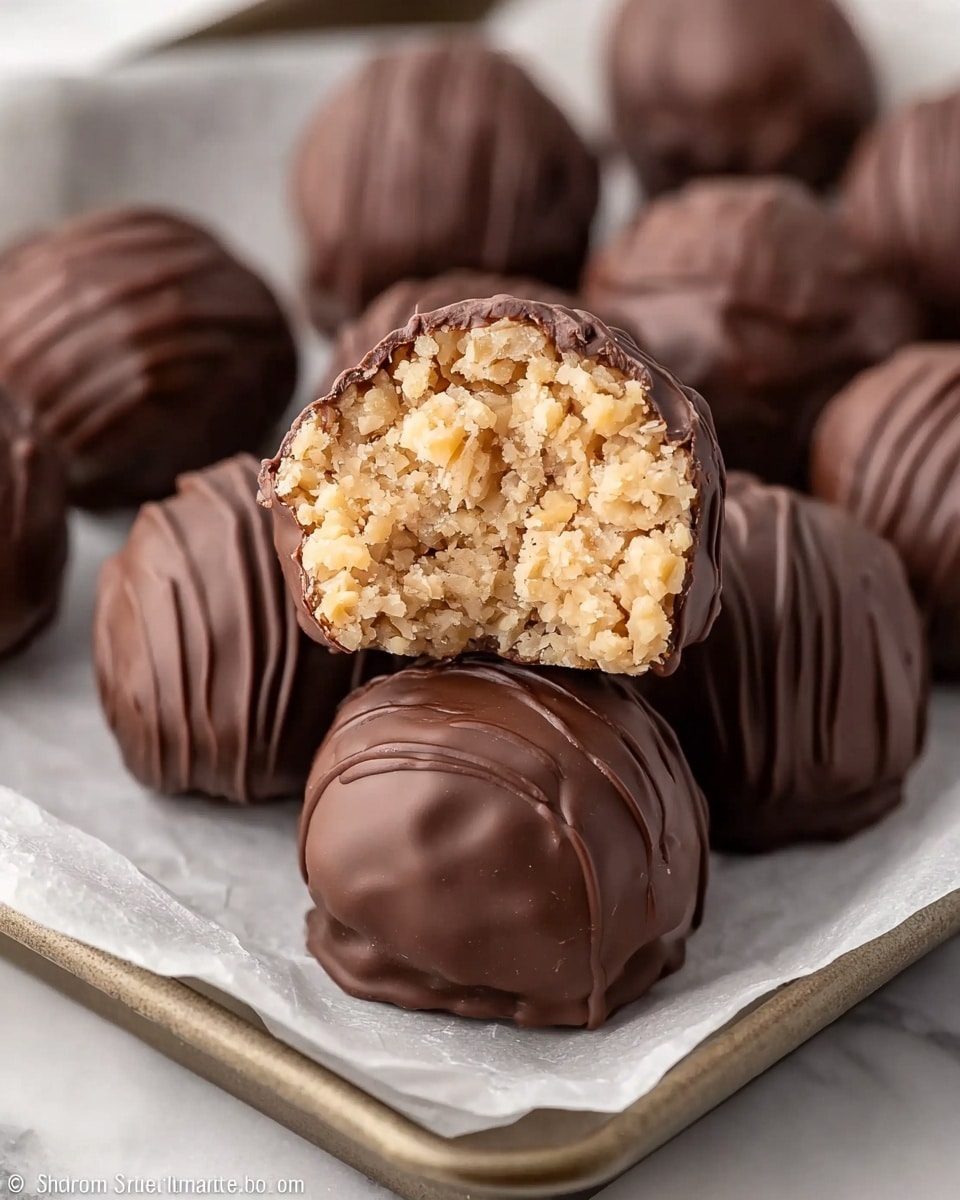
If you’re on the hunt for a delightful treat that combines peanut butter’s creamy richness with the satisfying crunch of Rice Krispies, this Chocolate-Coated Peanut Butter Rice Krispies Balls Recipe is exactly what you need. These little bites pack a punch of flavor and texture, with a luscious chocolate coating that adds an irresistible finishing touch. Perfect for a quick snack, a festive party treat, or a sweet surprise for your loved ones, this recipe brings together simple ingredients to create a truly memorable dessert experience.

Ingredients You’ll Need
Gathering the right ingredients is key to making these Chocolate-Coated Peanut Butter Rice Krispies Balls truly shine. Each component plays an essential role, from the creamy peanut butter that provides depth and richness, to the crispy Rice Krispies that deliver a perfect crunch, and finally the smooth chocolate that ties it all together deliciously.
- 1 cup creamy peanut butter: The flavorful, creamy base that gives these balls their signature nutty taste.
- ¼ cup softened butter: Adds silkiness and helps bind the mixture seamlessly.
- 1 cup powdered sugar: Sweetens and balances the peanut butter’s natural saltiness perfectly.
- 2 cups Rice Krispies cereal (slightly crushed): Provides that iconic crisp texture that makes each bite delightful.
- 2 cups semi-sweet chocolate chips: The star ingredient for the luscious chocolate coating that makes these treats irresistible.
- 2 tablespoons vegetable shortening: Helps melt the chocolate smoothly and gives a shiny finish to the coating.
How to Make Chocolate-Coated Peanut Butter Rice Krispies Balls Recipe
Step 1: Prepare Your Workspace
Start by lining a baking sheet with parchment or wax paper. This simple step ensures your peanut butter balls won’t stick and makes cleanup a breeze.
Step 2: Cream the Peanut Butter and Butter
In a large bowl, blend the creamy peanut butter, softened butter, and powdered sugar together. Keep mixing until the mixture is perfectly smooth and inviting — this is where the magic really starts.
Step 3: Fold in the Rice Krispies
Gently fold the slightly crushed Rice Krispies into your peanut butter mixture. Taking care not to crush the cereal too finely helps keep that satisfying crunch intact.
Step 4: Shape into Balls and Chill
Roll the mixture into small, bite-sized balls and place them carefully on your prepared baking sheet. Pop them into the refrigerator for at least 30 minutes. This chilling step is essential to firm up the centers before they get coated in chocolate.
Step 5: Melt the Chocolate and Shortening
In a microwave-safe bowl, combine the semi-sweet chocolate chips with vegetable shortening. Microwave in 1-minute intervals, stirring after each, until the chocolate is fully melted and smooth. This mixture will bring that luscious, glossy coat your peanut butter balls deserve.
Step 6: Dip and Coat
Take each chilled ball and dip it into the melted chocolate, ensuring it’s thoroughly coated. Allow any excess chocolate to drip off before placing the balls back on your baking sheet.
Step 7: Set the Chocolate
Refrigerate the chocolate-coated peanut butter balls for about 10 to 15 minutes until the chocolate hardens into a shiny, firm shell. Then, your delicious treats are ready to enjoy!
How to Serve Chocolate-Coated Peanut Butter Rice Krispies Balls Recipe
Garnishes
Want to add a personal twist? Sprinkle a pinch of crushed peanuts, flaky sea salt, or even colorful sprinkles on the chocolate before it sets. These little touches add both visual appeal and enhance the flavor with exciting textures and contrasts.
Side Dishes
Pair these peanut butter rice krispies balls with a cold glass of milk or a cup of rich coffee. They also complement fresh fruit or a light salad, balancing the sweetness while keeping the indulgence going strong.
Creative Ways to Present
Present these treats in mini cupcake liners or arrange them on a pretty platter layered with fresh mint leaves. For gifting, pack them in a decorative box with parchment paper or tie a ribbon around a jar filled with these goodies for a heartfelt homemade gift.
Make Ahead and Storage
Storing Leftovers
Once made, store your chocolate-coated peanut butter balls in an airtight container in the refrigerator. They’ll keep well for up to a week, maintaining that perfect balance of creamy interior and crisp chocolate exterior.
Freezing
If you want to save them for longer, freeze the balls in a single layer on a baking sheet before transferring them to a freezer-safe container or bag. When stored this way, they’ll stay fresh for about 2 months and thaw quickly when you want a treat.
Reheating
To enjoy after freezing, simply let the balls thaw in the refrigerator or at room temperature. Avoid microwaving as it can melt the chocolate shell unevenly and change the texture inside.
FAQs
Can I use crunchy peanut butter instead of creamy?
Absolutely! Crunchy peanut butter adds an extra layer of texture, but keep in mind it will make the mixture a bit more textured rather than smooth.
What if I don’t have vegetable shortening for the chocolate coating?
You can substitute with coconut oil, which also helps create a smooth, shiny chocolate coating with a slight coconut flavor twist.
How do I crush the Rice Krispies without turning them into powder?
Place the cereal in a zip-top bag and gently crush with your hands or a rolling pin. Aim for mostly whole or slightly broken pieces rather than fine crumbs.
Can these be made nut-free?
For a nut-free version, you could try using sunflower seed butter instead of peanut butter, but be sure to check your cereal and chocolate for any cross-contamination.
Are these suitable for parties and kids?
Definitely! These bite-sized treats are always a hit with both kids and adults, thanks to their fun texture and irresistible flavor combo.
Final Thoughts
If you want to make a dessert that’s as fun to eat as it is to make, this Chocolate-Coated Peanut Butter Rice Krispies Balls Recipe is the one to try next. With simple ingredients and easy steps, you get a treat that’s bursting with flavor, texture, and a glossy chocolate finish that’s sure to impress. Go ahead, dive in and share these delightful bites with your friends and family—you won’t regret it!
“`
Print
Chocolate-Coated Peanut Butter Rice Krispies Balls Recipe
- Prep Time: 15 minutes
- Cook Time: 0 minutes
- Total Time: 45 minutes
- Yield: 12 servings (1 ball per serving)
- Category: Dessert
- Method: No-Cook
- Cuisine: American
Description
These Peanut Butter Balls with Rice Krispies are a delightful no-bake treat combining creamy peanut butter, crunchy Rice Krispies cereal, and a luscious chocolate coating. Perfect for quick snacks or parties, they are easy to prepare and require no cooking, just chilling and dipping. The crunchy texture with a smooth chocolate finish makes them irresistibly delicious.
Ingredients
Peanut Butter Mixture
- 1 cup creamy peanut butter
- ¼ cup softened butter
- 1 cup powdered sugar
- 2 cups Rice Krispies cereal (slightly crushed)
Chocolate Coating
- 2 cups semi-sweet chocolate chips
- 2 tablespoons vegetable shortening
Instructions
- Prepare baking sheet: Line a baking sheet with parchment or wax paper to prevent the peanut butter balls from sticking and set it aside for later.
- Mix peanut butter base: In a large bowl, cream together the peanut butter, softened butter, and powdered sugar until the mixture is smooth and well combined, ensuring the sugar is thoroughly integrated.
- Combine with cereal: Gently fold the slightly crushed Rice Krispies cereal into the peanut butter mixture, taking care not to crush the cereal too much. Mix until the cereal is evenly distributed.
- Form balls and chill: Roll the mixture into small bite-sized balls and place them on the prepared baking sheet. Chill in the refrigerator for at least 30 minutes to let them firm up, making them easier to dip in chocolate.
- Melt chocolate coating: Place the semi-sweet chocolate chips and vegetable shortening in a microwave-safe bowl. Heat in 1-minute intervals, stirring thoroughly after each, until the chocolate is fully melted and smooth without lumps.
- Dip and coat balls: Take each chilled peanut butter ball and dip it into the melted chocolate, making sure it is completely covered. Allow any excess chocolate to drip back into the bowl before returning the coated ball to the baking sheet.
- Set chocolate coating: Refrigerate the chocolate-coated peanut butter balls for about 10-15 minutes or until the chocolate is firm and set, then they are ready to serve.
Notes
- Use creamy peanut butter for a smooth texture; crunchy peanut butter may make rolling more difficult.
- Slightly crushing the Rice Krispies helps them mix better without losing all their crunch.
- Vegetable shortening helps the chocolate coating set up smooth and shiny; you can substitute with coconut oil if preferred.
- Store the peanut butter balls in an airtight container in the refrigerator to keep them firm and fresh.
- For a festive touch, sprinkle crushed peanuts or colorful sprinkles on the balls before the chocolate sets.


