

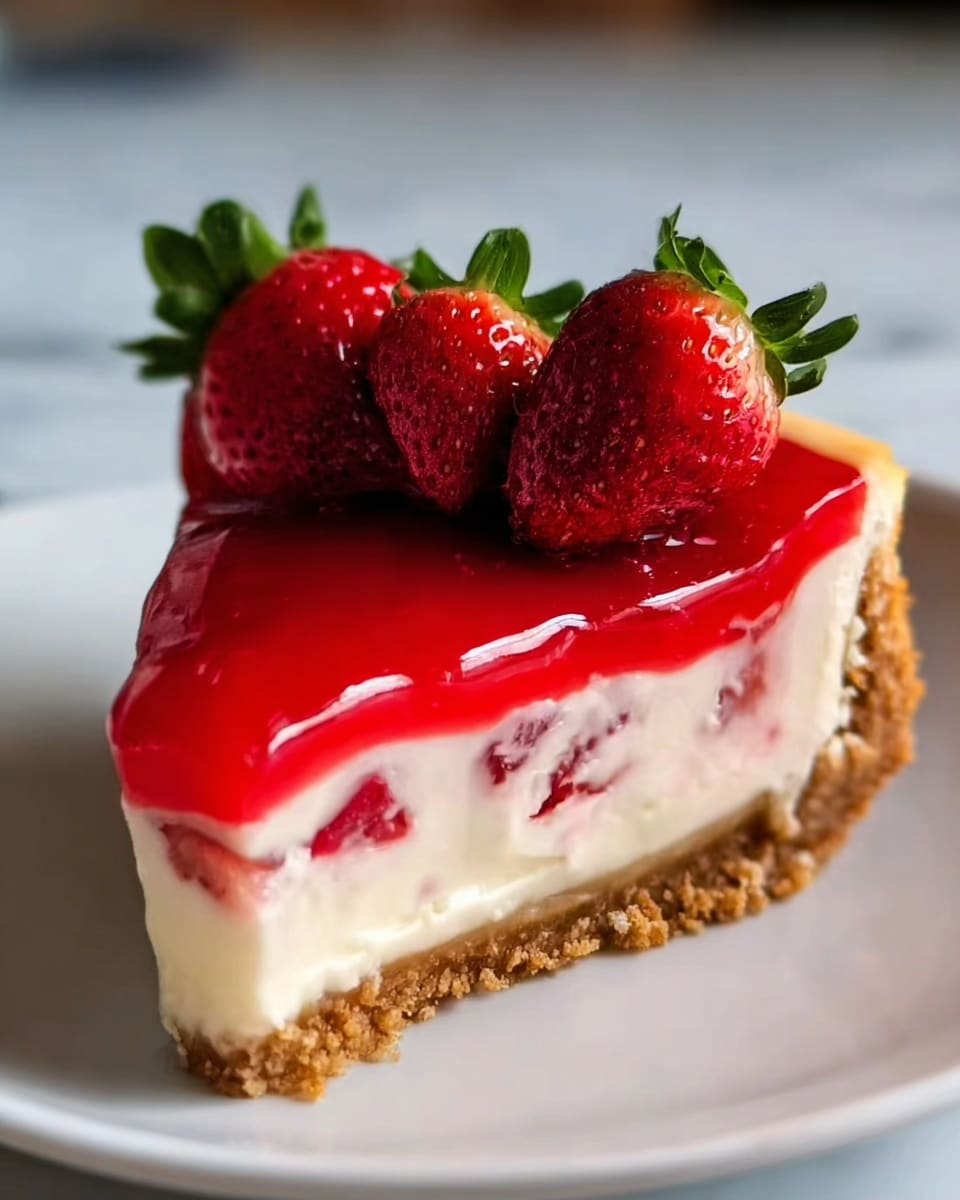
If you’re craving a luscious dessert that fits perfectly into your low-carb lifestyle, this Keto Strawberry Cheesecake Recipe is a dream come true. Creamy, tangy cream cheese swirled with fresh strawberries and set on a buttery almond flour crust makes for a treat that’s every bit as indulgent as traditional cheesecake—without the sugar overload. Whether you’re a long-time keto enthusiast or just looking to try a healthier dessert, this recipe balances rich textures and natural sweetness beautifully, promising a crowd-pleaser every time.

Ingredients You’ll Need
The beauty of this Keto Strawberry Cheesecake Recipe lies in its simplicity and the quality of each ingredient. From the nutty almond flour crust to the fresh strawberries, every element works harmoniously to create vibrant flavors and satisfying textures.
- Almond flour: Provides a grain-free, low-carb base with a naturally buttery flavor that crisps up nicely when baked.
- Granulated erythritol: A carb-free sweetener that adds just the right amount of sweetness without any aftertaste.
- Unsalted butter: Adds richness to the crust and helps it hold together perfectly.
- Vanilla extract: Infuses both the crust and filling with warm, comforting notes.
- Cream cheese: The star of the filling, providing that smooth and creamy texture cheesecake is famous for.
- Heavy cream: Whipped to fluffy perfection, it lightens the cheesecake for a melt-in-your-mouth finish.
- Fresh strawberries: Pureed and chopped, they bring natural sweetness, vibrant color, and a refreshing strawberry punch.
- Lemon juice: Balances the sweetness in the topping with a subtle tang.
How to Make Keto Strawberry Cheesecake Recipe
Step 1: Prep and Bake the Crust
Start by preheating your oven to 350°F (175°C). In a medium bowl, combine the almond flour, erythritol, melted unsalted butter, and vanilla extract. Mix until the mixture feels like damp sand. Press it evenly into the bottom of a 9-inch springform pan to create a firm, even crust. Bake for about 10 to 12 minutes or until lightly golden and fragrant. Set aside to cool completely before adding the filling—this cooling step is crucial to keep the crust intact once the creamy filling hits it.
Step 2: Whip Up the Cheesecake Filling
Using softened cream cheese makes all the difference in ensuring a silky smooth filling. Beat the cream cheese until creamy, then gradually add erythritol and vanilla extract, continuing to blend until perfectly combined. In a separate bowl, whip the heavy cream until you see stiff peaks—this gives the filling its signature light and airy texture. Gently fold the whipped cream into the cream cheese mixture, careful not to deflate the fluffiness.
Step 3: Add the Strawberries
Next, incorporate the star ingredient—fresh strawberries. Fold in the pureed strawberries first, which infuse the filling with natural sweetness and color. Then add the chopped strawberries to introduce lovely bursts of texture and more berry flavor in each bite. This two-fold approach gives your cheesecake that irresistible combination of creamy and fruity perfection.
Step 4: Assemble and Chill
Pour the luscious cheesecake filling over your cooled crust, smoothing the surface with a spatula for a polished look. Refrigerate this beauty for at least four hours, preferably overnight if you can wait, so it sets firm enough to slice without a hitch. Patience here is rewarded with blissfully creamy slices every time.
Step 5: Make the Strawberry Topping
While the cheesecake chills, prepare the topping by combining sliced strawberries, erythritol, and lemon juice in a small saucepan. Warm over medium heat, stirring occasionally until the strawberries release their juices and the mixture thickens just slightly—about 5 to 7 minutes. Allow this topping to cool to room temperature so it doesn’t melt your perfectly set cheesecake layers.
Step 6: Final Assembly and Serving
Once cooled, gently spread the strawberry topping evenly over the chilled cheesecake. Carefully remove the springform pan sides to reveal your masterpiece. For an extra touch, add a few fresh strawberries or some mint leaves on top—these little garnishes make it almost too pretty to eat, but trust me, you won’t be able to resist.
How to Serve Keto Strawberry Cheesecake Recipe
Garnishes
Simple garnishes like fresh strawberry slices and a sprig of fresh mint immediately elevate the presentation and add a burst of fresh flavor. You can also sprinkle some crushed pistachios or a light dusting of powdered erythritol for a finished look. These little touches show off the vibrant colors and layers of your cheesecake beautifully.
Side Dishes
This cheesecake pairs wonderfully with a cup of robust coffee or a refreshing herbal tea to balance its creamy richness. If you want to serve alongside a light snack, crisp keto-friendly biscotti or buttery roasted nuts create a delightful contrast without overpowering the delicate strawberry notes.
Creative Ways to Present
If you’re feeling fancy, slice the cheesecake into mini portions and serve in small jars or cups topped with the strawberry sauce. You can also layer the crust, filling, and topping in clear glasses for a stunning parfait-style presentation, perfect for parties or special occasions. Either way, the vibrant colors and luscious texture will wow your guests.
Make Ahead and Storage
Storing Leftovers
Leftover slices of your Keto Strawberry Cheesecake Recipe should be stored in an airtight container in the refrigerator. This will keep it fresh and creamy for up to one week. Be sure to cover it well to prevent it from absorbing any fridge odors, and always serve chilled for the best texture.
Freezing
If you want to enjoy this cheesecake later on, it freezes beautifully. Wrap the whole cheesecake or individual slices tightly with plastic wrap and then a layer of foil before placing them in the freezer. Freeze for up to two months. When you’re ready to indulge, thaw overnight in the fridge to maintain the perfect consistency.
Reheating
Because this is a no-bake cheesecake after the crust is done, reheating is not necessary or recommended. Instead, simply allow the cheesecake slices to come to room temperature for 10 to 15 minutes before serving if you prefer a softer texture. This keeps the cheesecake’s luxurious texture and fresh strawberry flavor intact.
FAQs
Can I use frozen strawberries for this recipe?
Frozen strawberries can be used, but make sure to thaw and drain any excess liquid before pureeing or slicing. Using fresh strawberries gives the cheesecake a brighter flavor and better texture, especially in the topping.
Is this recipe suitable for other ketogenic sweeteners?
Yes! While erythritol is the go-to here, you can swap it with monk fruit sweetener or allulose depending on your taste preferences. Just be mindful of the sweetness levels as they vary slightly between sweeteners.
Can I make this cheesecake dairy-free?
This cheesecake relies heavily on cream cheese and heavy cream for its creamy texture, so dairy-free alternatives may change the texture quite a bit. However, using full-fat coconut cream and dairy-free cream cheese substitutes can be experimented with if you’re adventurous, keeping in mind the final texture might be different.
How long does the cheesecake need to set?
For best results, chill the cheesecake for a minimum of four hours, but overnight is even better. This gives enough time for the filling to firm up and allows the flavors to meld perfectly.
Can I make this cheesecake without a springform pan?
While a springform pan makes it easier to remove the cheesecake without damage, you can use a regular 9-inch cake pan lined with parchment paper. Just be extra gentle when removing, or serve the cheesecake straight from the pan with a spatula.
Final Thoughts
There’s something truly special about a dessert that feels indulgent yet fits seamlessly into a keto lifestyle—and this Keto Strawberry Cheesecake Recipe hits all the right notes. The balance of creamy, tangy, and fruity flavors wrapped in a buttery crust is guaranteed to become one of your go-to recipes. So grab those fresh strawberries and get ready to wow yourself and your loved ones with this spectacular low-carb treat. Happy baking!
Print
Keto Strawberry Cheesecake Recipe
- Prep Time: 20 minutes
- Cook Time: 12 minutes (crust baking) + 5-7 minutes (topping cooking)
- Total Time: 4 hours 40 minutes (including chilling time)
- Yield: 8 servings
- Category: Dessert
- Method: Baking
- Cuisine: American
- Diet: Low Carb
Description
This Keto Strawberry Cheesecake is a creamy, low-carb dessert perfect for those following a ketogenic lifestyle. With a buttery almond flour crust, rich cream cheese filling mixed with fresh strawberry puree and chunks, and a lightly sweetened strawberry topping, it combines the classic flavor of strawberry cheesecake without the sugar and carbs. Ready in about 4 hours and 20 minutes, this dessert is perfect for a special occasion or a guilt-free treat.
Ingredients
For the Crust:
- 1 1/2 cups almond flour
- 1/4 cup granulated erythritol (or your preferred keto sweetener)
- 1/4 cup unsalted butter, melted
- 1/2 teaspoon vanilla extract
For the Cheesecake Filling:
- 16 oz cream cheese, softened
- 1/2 cup granulated erythritol (or your preferred keto sweetener)
- 1 cup heavy cream
- 1 teaspoon vanilla extract
- 1 cup fresh strawberries, pureed (about 1/2 cup pureed strawberries + 1/2 cup chopped strawberries for mixing in)
For the Strawberry Topping:
- 1/2 cup fresh strawberries, sliced
- 2 tablespoons granulated erythritol (or your preferred keto sweetener)
- 1 tablespoon lemon juice
Instructions
- Prepare the Crust: Preheat your oven to 350°F (175°C). This temperature ensures the crust bakes evenly and develops a nice golden color.
- Mix Crust Ingredients: In a medium bowl, combine the almond flour, erythritol, melted butter, and vanilla extract. Stir until the mixture is well combined and crumbly but holds together when pressed.
- Press into Pan: Firmly press the crust mixture into the bottom of a 9-inch springform pan, spreading it evenly to form a solid base for the cheesecake.
- Bake the Crust: Bake the crust in the preheated oven for 10-12 minutes or until it becomes lightly golden. Once done, remove the crust and allow it to cool completely to prevent the cheesecake filling from melting.
- Beat Cream Cheese: In a large bowl, beat the softened cream cheese using a mixer until smooth and creamy. This ensures no lumps and a silky cheesecake texture.
- Add Sweetener and Vanilla: Add erythritol and vanilla extract to the cream cheese and continue beating until thoroughly combined and smooth.
- Whip Heavy Cream: In a separate bowl, whip the heavy cream until stiff peaks form. This adds airiness to the filling, making it light and fluffy.
- Fold Whipped Cream: Gently fold the whipped cream into the cream cheese mixture using a spatula to maintain the light texture while fully incorporating the ingredients.
- Add Strawberries: Fold in the pureed strawberries followed by the chopped strawberries, mixing gently until they are evenly distributed throughout the cheesecake filling.
- Assemble Cheesecake: Pour the cheesecake filling over the cooled crust in the springform pan and smooth the top evenly with a spatula.
- Chill Cheesecake: Refrigerate the cheesecake for at least 4 hours or until it is fully set and firm enough to slice cleanly.
- Prepare Strawberry Topping: In a small saucepan, combine sliced strawberries, erythritol, and lemon juice. Cook over medium heat for 5-7 minutes, stirring occasionally, until the strawberries release their juices and the mixture thickens slightly.
- Cool Topping: Remove the strawberry topping from heat and allow it to cool to room temperature before spreading it on the cheesecake, preventing melting or runoff.
- Remove Cheesecake from Pan: Carefully loosen and remove the sides of the springform pan to reveal the set cheesecake.
- Apply Topping: Spread the cooled strawberry topping evenly over the surface of the chilled cheesecake.
- Optional Garnish: Optionally garnish the cheesecake with additional fresh strawberries or mint leaves for an elegant presentation and extra flavor.
- Store Leftovers: Store any leftover cheesecake in an airtight container in the refrigerator for up to one week to keep it fresh.
Notes
- Ensure the cream cheese is softened at room temperature for easier mixing and a smoother texture.
- For a firmer crust, press it down firmly and bake it thoroughly until golden.
- The cheesecake needs adequate chilling time to fully set, so plan ahead.
- If you prefer a sweeter topping, adjust the erythritol amount to taste.
- This cheesecake is best served chilled and can be stored in the refrigerator for up to a week.


