

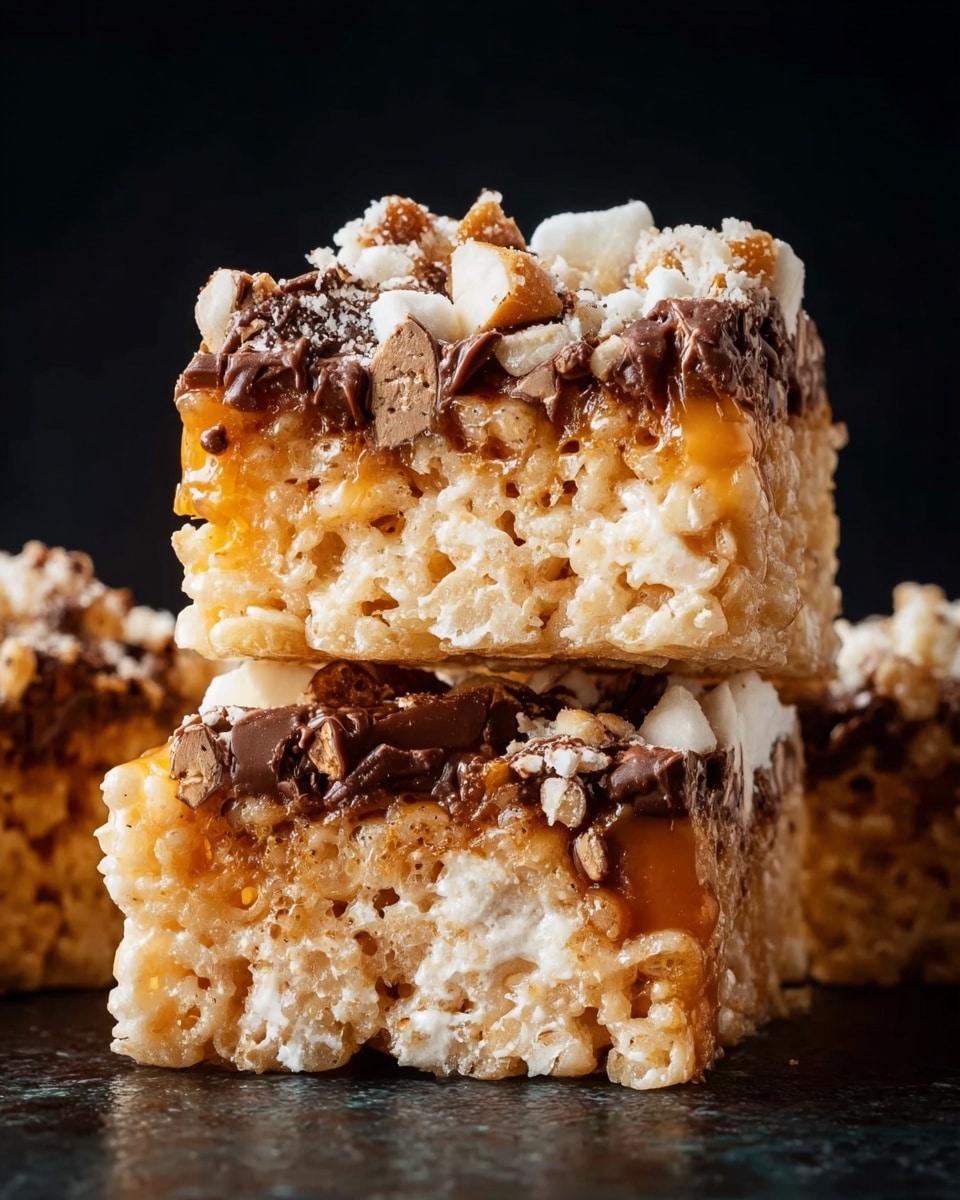
If you love the combination of crunchy, chewy, and irresistibly sweet treats, then this Samoa Rice Krispie Treats Recipe is about to become your new favorite go-to dessert. Imagine the classic Rice Krispies transformed with layers of toasted coconut, luscious caramel, and a glossy chocolate drizzle that brings all the flavors of those beloved Samoa cookies to life. This recipe is a fun, homemade twist that’s surprisingly simple to make, and perfect for sharing — whether it’s a weekend treat or a delightful party dessert.

Ingredients You’ll Need
These ingredients are straightforward but essential, each one playing a key role in creating the perfect balance of texture and flavor in your Samoa Rice Krispie Treats Recipe. From the classic cereal base to the rich toppings, they come together effortlessly for big taste.
- 6 cups Rice Krispies cereal: The crispy foundation that brings light crunch and classic nostalgia.
- 3 tablespoons unsalted butter: Adds richness and helps melt the marshmallows smoothly without overpowering flavors.
- 1 package (10 oz) marshmallows: Provides that signature gooey, chewy texture to bind everything together.
- 1/2 teaspoon vanilla extract: Enhances the sweetness with a gentle aromatic touch.
- 1 1/2 cups sweetened shredded coconut: Toasted to golden perfection for that iconic Samoa cookie flavor and a delightful chew.
- 1/2 cup caramel sauce: Adds lush, sticky sweetness that contrasts beautifully with the coconut and cereal.
- 1/2 cup chocolate chips: Melted and drizzled for rich chocolate notes, the finishing flourish you’ll crave.
- 1 tablespoon coconut oil (for the chocolate drizzle): Helps create a smooth, glossy chocolate drizzle that sets nicely.
How to Make Samoa Rice Krispie Treats Recipe
Step 1: Melt the Butter and Marshmallows
Start by melting the butter gently over low heat in a large pan. Once melted, add the marshmallows and stir steadily until they melt completely into a silky, smooth mixture. This step sets the stage for that perfectly chewy texture you want in every bite.
Step 2: Add Vanilla Extract
Remove the pan from heat and stir in the vanilla extract. This little splash of vanilla beautifully enhances the flavor and takes your treats from simple to sensational.
Step 3: Combine with Rice Krispies Cereal
Slowly add your Rice Krispies cereal to the marshmallow mixture. Stir carefully but thoroughly so that each crisp is fully coated — this ensures every bite has that perfect chewy crunch.
Step 4: Press Into Baking Dish
Turn your mixture out into a greased 9×13-inch baking dish. Use a spatula or clean hands to press it down gently and evenly. This forms the sturdy base for the scrumptious toppings to come.
Step 5: Toast the Shredded Coconut
In a dry skillet over medium heat, toast the shredded coconut for about 3–4 minutes until it turns golden brown. Keep stirring so it doesn’t burn—this step adds nuttiness and depth that evoke the beloved Samoa cookie’s signature charm.
Step 6: Layer the Coconut
Spread the toasted coconut evenly over your Rice Krispies base. This layer adds both texture and a beautiful golden color that makes your treats visually irresistible.
Step 7: Drizzle the Caramel
Pour the caramel sauce evenly over the coconut layer. Let the bars set at room temperature for about 15 minutes so the caramel can stick and meld all those fabulous flavors together.
Step 8: Melt Chocolate and Coconut Oil
In a small microwave-safe bowl, heat the chocolate chips and coconut oil in 30-second bursts, stirring between each until the mixture is smooth and glossy. This ensures your chocolate drizzle is perfectly luscious and easy to spread.
Step 9: Drizzle Chocolate and Let Set
Generously drizzle the melted chocolate over the caramel-coconut layer. Let your Samoa Rice Krispie Treats Recipe chill and set completely before cutting into squares. This final step creates the classic chocolate finish everyone will adore.
How to Serve Samoa Rice Krispie Treats Recipe
Garnishes
Sprinkle a little extra toasted coconut or a few chocolate curls on top for a polished look that impresses even before the first bite. A light dusting of sea salt can add a lovely contrast to the caramel’s sweetness and ramp up the flavor complexity.
Side Dishes
These treats shine as a stand-alone dessert, but they pair fantastically with a scoop of vanilla ice cream or a simple cup of milk or coffee. The creamy coolness balances the rich, chewy bar, making every bite feel like a special occasion.
Creative Ways to Present
Cut into bite-sized squares for party platters or use cookie cutters to shape them for themed gatherings. Wrapping individual pieces in wax paper or cellophane tied with a ribbon turns your Samoa Rice Krispie Treats Recipe into a charming homemade gift your friends and family won’t stop talking about.
Make Ahead and Storage
Storing Leftovers
Keep leftovers fresh by storing your treats in an airtight container at room temperature. They stay deliciously chewy for about 3-4 days, making sure you have a perfect grab-and-go snack anytime cravings hit.
Freezing
If you want to save your Samoa Rice Krispie Treats Recipe for longer, wrap individual squares tightly in plastic wrap and place them in a freezer-safe container or bag. They freeze beautifully for up to a month without losing their flavor or texture.
Reheating
For a warm, melty treat, unwrap a frozen square and microwave it for 10-15 seconds. This brings back the gooey marshmallow softness with a gentle warmth that’s hard to resist.
FAQs
Can I use different cereal instead of Rice Krispies?
While Rice Krispies offer the classic light crunch, you can experiment with similar puffed rice cereals. Just keep in mind that the texture and flavor balance might shift slightly from the traditional Samoa-style treat.
Is it necessary to toast the coconut?
Toasting the coconut isn’t required but highly recommended; it deepens the flavor, adds a wonderful aroma, and gives that signature golden color that makes these treats so irresistible.
Can I make these treats nut-free?
Absolutely! This recipe is naturally nut-free, but be sure to check that your caramel sauce and other ingredients are labeled as nut-free if allergies are a concern.
How long will these treats stay fresh at room temperature?
Stored in an airtight container, these treats stay fresh and chewy for up to four days. After that, their texture may start to harden, so it’s best to enjoy them sooner rather than later.
Can I double the recipe for a larger batch?
Yes! Just double all ingredients and use a larger pan or two baking dishes to accommodate the increased volume. Make sure to keep the layers even to maintain the signature texture and taste.
Final Thoughts
Sharing the Samoa Rice Krispie Treats Recipe with you has been such a joy because it melds simple ingredients into something truly magical. Whether you’re making it for a casual snack or a festive celebration, these treats bring comfort, sweetness, and a touch of indulgence that everyone will love. Don’t hesitate — gather your ingredients and dive in. You’ll be so glad you did!
Print
Samoa Rice Krispie Treats Recipe
- Prep Time: 10 minutes
- Cook Time: 10 minutes
- Total Time: 20 minutes
- Yield: 12 to 16 squares
- Category: Snack
- Method: Stovetop
- Cuisine: American
Description
Delight in these irresistible Samoa Rice Krispie Treats, a luscious twist on the classic marshmallow snack. With layers of toasted coconut, gooey caramel, and rich chocolate drizzle atop crispy Rice Krispies, this treat perfectly mimics the flavors of the beloved Samoa cookie in an easy, no-bake bar form. Perfect for parties or a sweet snack, these bars combine crunchy, chewy, and creamy textures in every bite.
Ingredients
Main Ingredients
- 6 cups Rice Krispies cereal
- 3 tablespoons unsalted butter
- 1 package (10 oz) marshmallows
- 1/2 teaspoon vanilla extract
Toppings
- 1 1/2 cups sweetened shredded coconut
- 1/2 cup caramel sauce
- 1/2 cup chocolate chips
- 1 tablespoon coconut oil (for the chocolate drizzle)
Instructions
- Melt butter and marshmallows: In a large pan over low heat, melt the unsalted butter. Add the marshmallows and stir continuously until completely melted and the mixture is smooth.
- Add vanilla extract: Remove the pan from heat and stir in the vanilla extract to infuse flavor.
- Mix in Rice Krispies: Gradually add the Rice Krispies cereal to the marshmallow mixture, stirring thoroughly to coat every piece.
- Press mixture into pan: Transfer the coated cereal into a greased 9×13-inch baking dish, spreading it out evenly and pressing gently to form a compact layer.
- Toast shredded coconut: In a dry skillet over medium heat, toast the shredded coconut for about 3–4 minutes while stirring frequently to achieve a golden brown color without burning.
- Layer toasted coconut: Evenly spread the toasted coconut over the Rice Krispies layer in the baking dish.
- Add caramel layer: Drizzle caramel sauce evenly over the coconut layer. Allow the bars to set at room temperature for approximately 15 minutes to help the layers adhere.
- Melt chocolate drizzle: In a small microwave-safe bowl, combine the chocolate chips and coconut oil. Microwave in 30-second intervals, stirring in between until the mixture is smooth and melted.
- Drizzle chocolate over bars: Pour the melted chocolate evenly over the caramel-coconut layer. Let the bars set fully before cutting into 12 to 16 squares for serving.
Notes
- Ensure the shredded coconut is stirred constantly while toasting to prevent burning.
- Use a greased baking dish to make removing the treats easier.
- Allow the bars to cool and set completely before cutting to avoid crumbling.
- Store leftovers in an airtight container to maintain freshness.
- Caramel sauce can be homemade or store-bought depending on preference.


