

“`html
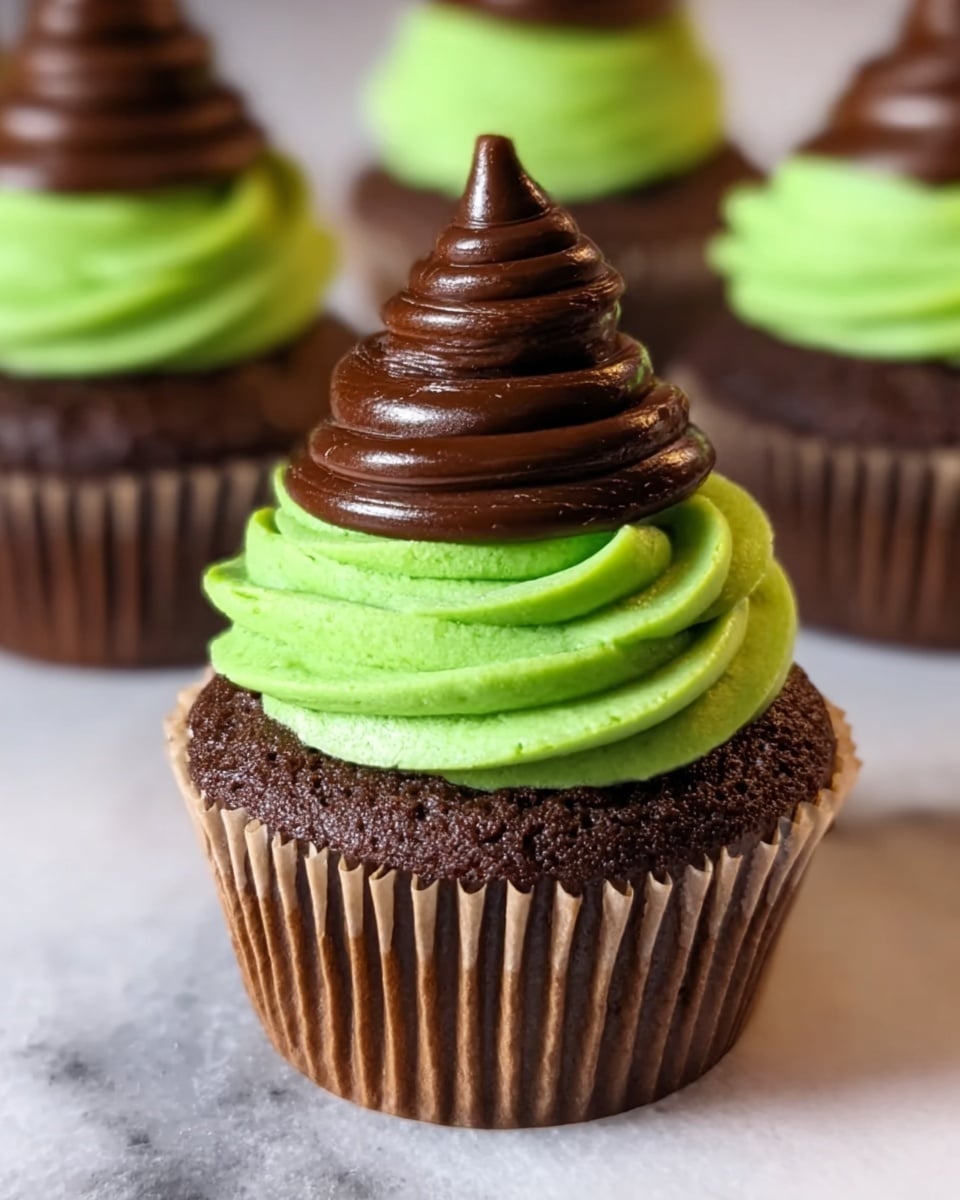
If you’re looking for a festive and fun treat that will definitely cast a spell on your guests, look no further than this Halloween Witch Hat Cupcakes Recipe. These charming cupcakes combine rich dark chocolate flavors with a playful cream cheese filling and the iconic witch hat decoration that’s perfect for any Halloween celebration. With their vibrant green accents and decadent frosting, these cupcakes are as delightful to eat as they are to look at, making them an irresistible party centerpiece or a cozy treat to enjoy with friends and family.

Ingredients You’ll Need
These ingredients are refreshingly simple but each one plays a crucial role in making these cupcakes both flavorful and visually striking. From the dark chocolate cake mix that brings a deep cocoa richness, to the optional cream cheese filling that adds a smooth, tangy surprise inside, every component has its place in this enchanting recipe.
- Dark Chocolate Cake Mix: The base for your cupcakes providing a rich and moist chocolate foundation, making the recipe approachable and delicious.
- Eggs: Essential for structure and moisture, helping the cupcakes rise perfectly.
- Oil: Keeps the cupcakes tender and adds to the moist texture everyone loves.
- Water: Ensures the batter is the right consistency for baking without drying out.
- Cream Cheese (Optional): Adds a creamy, tangy filling that contrasts beautifully with the chocolate exterior.
- Sugar (for filling): Sweetens the cream cheese filling just right.
- Vanilla Extract: Enhances all the flavors and deepens the sweetness of the filling.
- Green, Yellow, and Blue Food Coloring: Mixed to achieve that perfect spooky green shade for the cream cheese filling, adding a Halloween vibe.
- Chocolate Sandwich Cookies: The base of your witch hats, perfect for that crunchy contrast and chocolate kick.
- Chocolate Kisses Candy: The pointed hat tops that make these cupcakes utterly charming.
- Dark Chocolate Frosting: Lusciously rich frosting to cover the cupcakes and hold the witch hats in place.
- Green Frosting (tube): Used to add the finishing band detail on each witch hat for a fun pop of color and extra Halloween flair.
How to Make Halloween Witch Hat Cupcakes Recipe
Step 1: Preheat and Prepare Batter
Start by preheating your oven to 350°F, or follow the cake mix package’s suggested temperature. Preparing the batter first ensures the cupcake mixture is fresh and ready to go once your oven reaches the right heat level.
Step 2: Mix the Cake Batter
Follow the directions on your dark chocolate cake mix box to combine eggs, oil, water, and cake mix until smooth. This step ensures you get that perfect, chocolaty batter that is the star of these cupcakes.
Step 3: Make the Cream Cheese Filling
In a separate bowl, whip together cream cheese, sugar, egg, and vanilla extract until silky smooth. This rich filling enhances the cupcakes with a tangy surprise inside, taking the flavor layers to a whole new level.
Step 4: Color Your Filling
Add your green, yellow, and blue food coloring to the cream cheese mixture one drop at a time until you achieve the ideal eerie green color. Pop it into the fridge for about 10 to 15 minutes to firm up the filling, making it easier to dollop into your cupcake liners.
Step 5: Ready Your Cupcake Liners
Line two 12-cup muffin pans with black cupcake liners for that classic Halloween vibe. These liners not only look great but also make cleanup a breeze.
Step 6: Layer the Batter and Filling
Fill each cupcake liner about one-third full with the chocolate batter, then add a spoonful of the chilled green cream cheese filling in the center. Cover with more batter to seal in the filling—this layering technique guarantees a delightful surprise inside every bite.
Step 7: Bake to Perfection
Bake your cupcakes for 13 to 16 minutes or until a toothpick inserted in the center comes out clean. The warm, rich scent that fills your kitchen is a wonderful sign that the magic is happening!
Step 8: Cool Completely
Allow the cupcakes to cool in their pans for 30 minutes before transferring them to a wire rack to cool fully. This step is key to keep your cupcakes moist and ready for decorating without melting the frosting.
Step 9: Assemble the Witch Hats
While the cupcakes cool, get crafty assembling the witch hats. Use a dab of chocolate frosting to attach a chocolate kiss candy to the center of each chocolate sandwich cookie. This creates that instantly recognizable witch hat shape full of charm.
Step 10: Add the Green Frosting Band
Use your green frosting tube to pipe a small band around the base of each chocolate kiss. This simple detail really pulls the witch hats together and adds a festive pop of color.
Step 11: Frost the Cupcakes
Once the cupcakes are fully cooled, slather the tops with the rich chocolate frosting. This luscious layer not only tastes divine but also serves as the perfect “glue” to hold the witch hats securely on top.
Step 12: Top with Witch Hats
Crown each frosted cupcake with one of your handcrafted witch hats, completing the look and making these treats an unforgettable Halloween delight.
How to Serve Halloween Witch Hat Cupcakes Recipe
Garnishes
For an extra festive touch, sprinkle edible glitter or Halloween-themed sprinkles around the base of the witch hats after frosting. A little eyeball candy near the cupcakes makes for a spooky surprise and keeps things playful and fun.
Side Dishes
Serve these cupcakes alongside classic Halloween treats like caramel apples or spiced pumpkin cookies to round out your dessert table with a variety of flavors and textures. A warm cup of mulled cider or hot chocolate also pairs beautifully with the chocolatey richness of the cupcakes.
Creative Ways to Present
Display your Halloween Witch Hat Cupcakes Recipe on a tiered platter surrounded by fake spider webs, mini pumpkins, or candlelight for atmosphere. Placing them inside mini cauldron props or on orange and black napkins will make your presentation even more magical.
Make Ahead and Storage
Storing Leftovers
Leftover cupcakes should be stored in an airtight container at room temperature for up to two days or in the refrigerator for up to five days. Keeping them covered ensures they stay moist and the frosting doesn’t dry out.
Freezing
You can freeze baked and cooled cupcakes without the witch hat decorations to maintain freshness. Wrap them tightly in plastic wrap and then place in a freezer-safe container for up to three months. Thaw overnight in the fridge before decorating and serving.
Reheating
To gently warm your cupcakes after storage, place them at room temperature and enjoy as-is for moistness. Avoid microwaving with the decorations to prevent melting; instead, warm just the cupcake base separately if desired.
FAQs
Can I make these cupcakes without the cream cheese filling?
Absolutely! The cream cheese filling is optional but adds a wonderful creaminess and surprise center. You can skip it and just fill the liners fully with cake batter for a simpler, still delicious cupcake.
What type of chocolate frosting works best?
Dark chocolate frosting works wonderfully for this recipe as it complements the cake’s rich flavor and holds the witch hats in place perfectly. Feel free to use homemade or store-bought for convenience.
Can I use a different cake flavor if I don’t like chocolate?
While dark chocolate gives these cupcakes their signature richness, you can experiment with other flavors like vanilla or pumpkin spice. Just keep in mind that the witch hat decorations may stand out differently with other flavors.
Is it necessary to refrigerate the cupcakes?
Since these cupcakes contain cream cheese filling, refrigeration is recommended if you don’t plan to eat them within a day or two. Otherwise, they can be stored at room temperature if eaten quickly.
How do you prevent the witch hats from sliding off?
Applying a generous layer of chocolate frosting and gently pressing the assembled witch hats on top helps them stick securely. Chilling the cupcakes for a bit before serving also helps the frosting firm up and hold everything in place.
Final Thoughts
This Halloween Witch Hat Cupcakes Recipe is truly a joyful way to bring a bit of magic to your holiday gatherings. The mix of chocolatey goodness, playful green filling, and whimsical witch hat decorations will enchant kids and adults alike. Don’t hesitate to try this recipe and watch as it becomes one of your all-time favorite Halloween treats to bake, share, and enjoy year after year!
“`
Print
Halloween Witch Hat Cupcakes Recipe
- Prep Time: 20 minutes
- Cook Time: 14 minutes
- Total Time: 34 minutes
- Yield: 24 cupcakes
- Category: Dessert
- Method: Baking
- Cuisine: American
Description
Celebrate Halloween with these fun and festive Halloween Witch Hat Cupcakes. Rich dark chocolate cupcakes filled with a creamy, colorful green-tinted cream cheese filling and topped with whimsical witch hat decorations made from chocolate sandwich cookies and chocolate kisses. Perfect for parties or spooky treats!
Ingredients
Cupcakes
- 1 (15.25 oz) box Dark Chocolate Cake Mix
- 3 Eggs (or follow package instructions)
- ½ cup Oil (or follow package instructions)
- 1 ¼ cups Water (or follow package instructions)
Cream Cheese Filling (Optional)
- 8 oz Cream Cheese (room temperature)
- ½ cup Sugar
- 1 Egg
- 1 tsp Vanilla Extract
- 34 drops Green Food Coloring
- 3 drops Yellow Food Coloring
- 2 drops Blue Food Coloring
Witch Hats & Frosting
- 24 Chocolate Sandwich Cookies (with green/mint filling or your choice)
- 24 Dark Chocolate Kisses Candy
- 1 (16 oz) tub Dark Chocolate Frosting
- 1 small Squeeze Tube of Green Frosting
Instructions
- Prepare the Cupcake Batter: Preheat your oven to 350°F (or follow the instructions on your cake mix box). Prepare the dark chocolate cake mix according to the package directions, combining eggs, oil, and water as suggested. Set the batter aside once mixed.
- Make the Cream Cheese Filling: In a mixing bowl, use a hand mixer to beat the room temperature cream cheese, sugar, egg, and vanilla extract until the mixture is smooth and creamy.
- Add Green Food Coloring: Incorporate the green, yellow, and blue food coloring drops into the cream cheese filling, blending thoroughly until the color is evenly distributed. Refrigerate the filling for 10-15 minutes to allow it to firm up.
- Assemble the Cupcakes: Line two 12-cup cupcake pans with black cupcake liners. Fill each liner about one-third full with the prepared cupcake batter.
- Add Cream Cheese Filling: Spoon a dollop of the green cream cheese filling into the center of each cupcake liner, then cover with more cake batter until the liners are about three-quarters full, sealing the filling inside.
- Bake the Cupcakes: Place the pans in the oven and bake for 13-16 minutes, or until a toothpick inserted into the cupcake (avoiding the filling) comes out clean.
- Cool the Cupcakes: Remove the cupcake pans from the oven and let them cool for 30 minutes in the pans. Then transfer the cupcakes to a wire rack to cool completely.
- Assemble the Witch Hats: While the cupcakes are cooling, attach a dark chocolate kiss candy to the center of each chocolate sandwich cookie using a small amount of dark chocolate frosting to act as glue.
- Add the Hat Bands: Use the green frosting to pipe a small band around the base of each chocolate kiss on the cookie, creating the witch hat look.
- Frost the Cupcakes: Once fully cooled, frost the tops of the cupcakes with the remaining dark chocolate frosting.
- Decorate with Witch Hats: Place a witch hat cookie on top of each frosted cupcake to complete each festive treat.
Notes
- You can omit the cream cheese filling if you prefer simpler cupcakes.
- Mixing the green food coloring yourself lets you customize the exact shade of green you want for the filling.
- Use black cupcake liners to enhance the spooky Halloween vibe.
- If you want a dairy-free option, substitute ingredients accordingly and check candy ingredients.
- Ensure cupcakes are fully cooled before frosting to prevent melting.
- Store cupcakes in an airtight container for up to 3 days for best freshness.

