

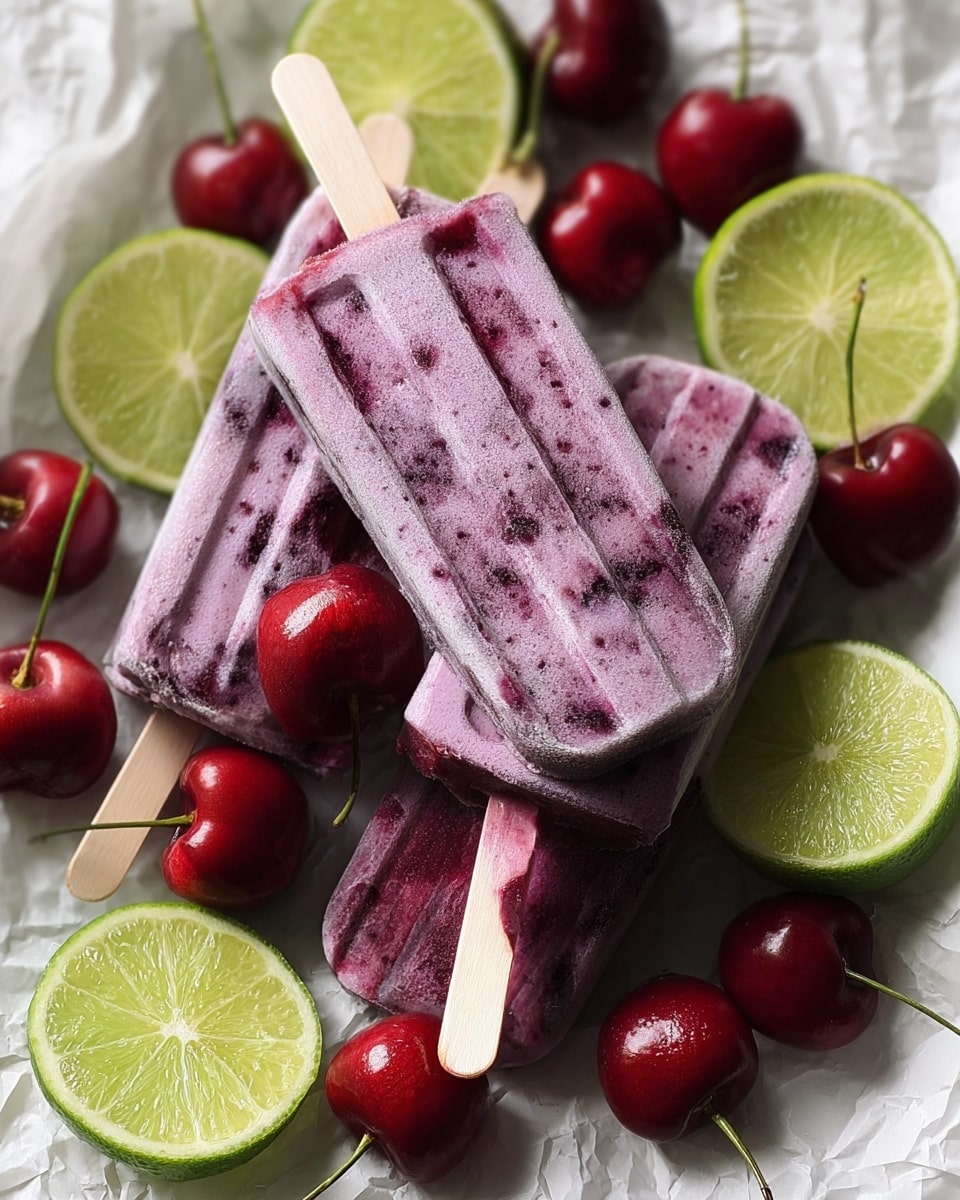
There is nothing quite as refreshing and vibrant as a homemade Cherry Lime Ice Pops Recipe on a warm day. Bursting with the natural sweetness of ripe cherries combined with the zesty brightness of lime, these icy treats are the perfect balance of tart and sweet, delivering a pop of color and flavor in every lick. Whether you’re craving a cool snack after a sunny afternoon or planning a festive addition to your next backyard gathering, this Cherry Lime Ice Pops Recipe is simple, fun, and irresistibly delicious.

Ingredients You’ll Need
Gathering a handful of fresh, quality ingredients is the key to making these ice pops stand out. Each component plays an important role: from the juicy cherries that give a rich fruit base and bright red color, to the lime juice and zest that inject a zesty crunch of citrus flavor, balanced gently by the sweetness from sugar and the smooth texture added by water.
- 2 cups fresh or frozen cherries, pitted: Choose ripe cherries for natural sweetness or frozen for convenience and year-round availability.
- 1 cup lime juice: Freshly squeezed lime juice offers tartness that perfectly contrasts with the cherries’ sweetness.
- 1/2 cup water: Helps to balance the concentration of flavors and makes the mixture easy to blend.
- 1/2 cup sugar: The right amount of sweetness that enhances the fruit without overpowering it.
- 1 tbsp lime zest: Adds an aromatic citrus punch and a bit of texture that makes every bite interesting.
How to Make Cherry Lime Ice Pops Recipe
Step 1: Blend the Ingredients
Start by combining your cherries, lime juice, water, sugar, and lime zest in a blender. Blend everything until you get a completely smooth mixture. This step is crucial because blending well ensures every ice pop is full of consistent fruit flavor and that the sugar dissolves evenly.
Step 2: Pour Into Molds
Once blended, pour the mixture into your ice pop molds. Be sure to leave a little bit of space at the top – this allows the liquid to expand as it freezes, keeping your pops perfectly shaped and avoiding any messy overflow.
Step 3: Insert Sticks and Freeze
Place the sticks into the molds securely and pop your mold in the freezer. Let the mixture freeze for at least four hours, or until completely solid, so you get that blissfully cold and firm texture that ice pops are famous for.
Step 4: Unmold and Enjoy
When you’re ready to eat, run warm water briefly over the outside of the molds. This simple trick loosens the frozen pops and allows you to slide them out easily without any fuss. Now they’re ready to cool you down instantly!
How to Serve Cherry Lime Ice Pops Recipe
Garnishes
To make your Cherry Lime Ice Pops Recipe even more enticing, consider garnishing with fresh mint leaves or a sprinkle of extra lime zest. These little touches not only add a pop of color but also elevate the citrus and herbal notes in every bite, giving your pops a fresh, summer-ready vibe.
Side Dishes
Pair these ice pops with light snacks like a crisp cucumber salad or tangy yogurt dips. The coolness and tartness of the ice pops cut through creamy or savory bites beautifully, creating a well-rounded treat experience that feels like a mini celebration with every lick.
Creative Ways to Present
For a fun twist, arrange your Cherry Lime Ice Pops Recipe in a colorful mason jar or a festive tray with crushed ice and fresh fruit slices. You can also drizzle a bit of honey or a sprinkle of chili powder for an unexpected yet delightful flavor contrast that will wow your guests.
Make Ahead and Storage
Storing Leftovers
If you don’t finish all your ice pops in one sitting, no worries! Keep the leftovers in the molds, covered tightly with plastic wrap, inside the freezer to maintain their freshness and protect them from freezer burn.
Freezing
These ice pops freeze beautifully and can be stored in the freezer for up to 2 weeks. Just ensure the molds are placed on a flat surface so the pops freeze evenly and retain their shape perfectly.
Reheating
Reheating isn’t really part of the equation here since these are meant to be enjoyed frozen. However, if your pops get too icy, you can let them sit at room temperature for a couple of minutes before eating to soften them just enough for a smooth, creamy bite.
FAQs
Can I use frozen cherries instead of fresh in the Cherry Lime Ice Pops Recipe?
Absolutely! Frozen cherries work just as well and make this recipe conveniently year-round. Just thaw slightly before blending for the smoothest result.
How sweet should the ice pops be?
The sugar helps balance the tartness of the lime and the natural tanginess of the cherries. You can adjust the quantity to suit your taste, but 1/2 cup is a well-balanced starting point.
Can I make these ice pops without a blender?
While a blender is ideal for smooth consistency, you can mash the ingredients by hand and strain them if necessary; just expect a chunkier texture.
What are some good alternatives to lime zest in this recipe?
If you don’t have lime zest on hand, lemon zest is a great substitute that still adds bright citrus notes without overwhelming the cherry flavor.
How long do the Cherry Lime Ice Pops Recipe last in the freezer?
For the best flavor and texture, enjoy your ice pops within two weeks. After that, they may start to lose their vibrant taste and develop freezer burn.
Final Thoughts
Making the Cherry Lime Ice Pops Recipe is one of the simplest ways to bring a burst of fresh, fruity goodness into your day. These pops are not only delightful to eat but also incredibly easy to make, which makes them an excellent treat for any occasion. Give this recipe a try, share it with friends, and enjoy the sweet, tangy magic of cherries and lime in every icy bite!
Print
Cherry Lime Ice Pops Recipe
- Prep Time: 10 minutes
- Cook Time: 0 minutes
- Total Time: 4 hours 10 minutes
- Yield: 8 servings
- Category: Dessert
- Method: Blending
- Cuisine: American
- Diet: Vegetarian
Description
These Cherry Lime Ice Pops are a refreshing and tangy frozen treat perfect for hot days. Made with fresh or frozen cherries, zesty lime juice, and a hint of sweetness, they are easy to prepare using a blender and ice pop molds. Naturally vibrant and bursting with flavor, these homemade ice pops offer a delicious way to cool down and enjoy a fruity dessert.
Ingredients
Ingredients
- 2 cups fresh or frozen cherries, pitted
- 1 cup lime juice
- 1/2 cup water
- 1/2 cup sugar
- 1 tbsp lime zest
Instructions
- Blend Ingredients: In a blender, combine the cherries, lime juice, water, sugar, and lime zest. Blend the mixture until smooth and well combined, ensuring no large chunks remain.
- Fill Molds: Pour the blended mixture into ice pop molds, making sure to leave a little space at the top of each mold to allow for expansion as the mixture freezes.
- Insert Sticks and Freeze: Place the ice pop sticks into the molds, then freeze for at least 4 hours or until the ice pops are fully solidified.
- Release Ice Pops: To remove the ice pops from the molds, run warm water over the outside of the molds for a few seconds to loosen them, then gently pull out the pops to serve.
Notes
- You can substitute fresh cherries with frozen ones if fresh are not available, no need to thaw before blending.
- Adjust the amount of sugar based on the sweetness of the cherries or your personal preference.
- If you prefer a chunkier texture, pulse the blender instead of blending until completely smooth.
- For an adult twist, consider adding a splash of lime-infused vodka or tequila before freezing.
- Make sure molds are suitable for freezing and insert sticks securely to avoid tipping in freezer.


