

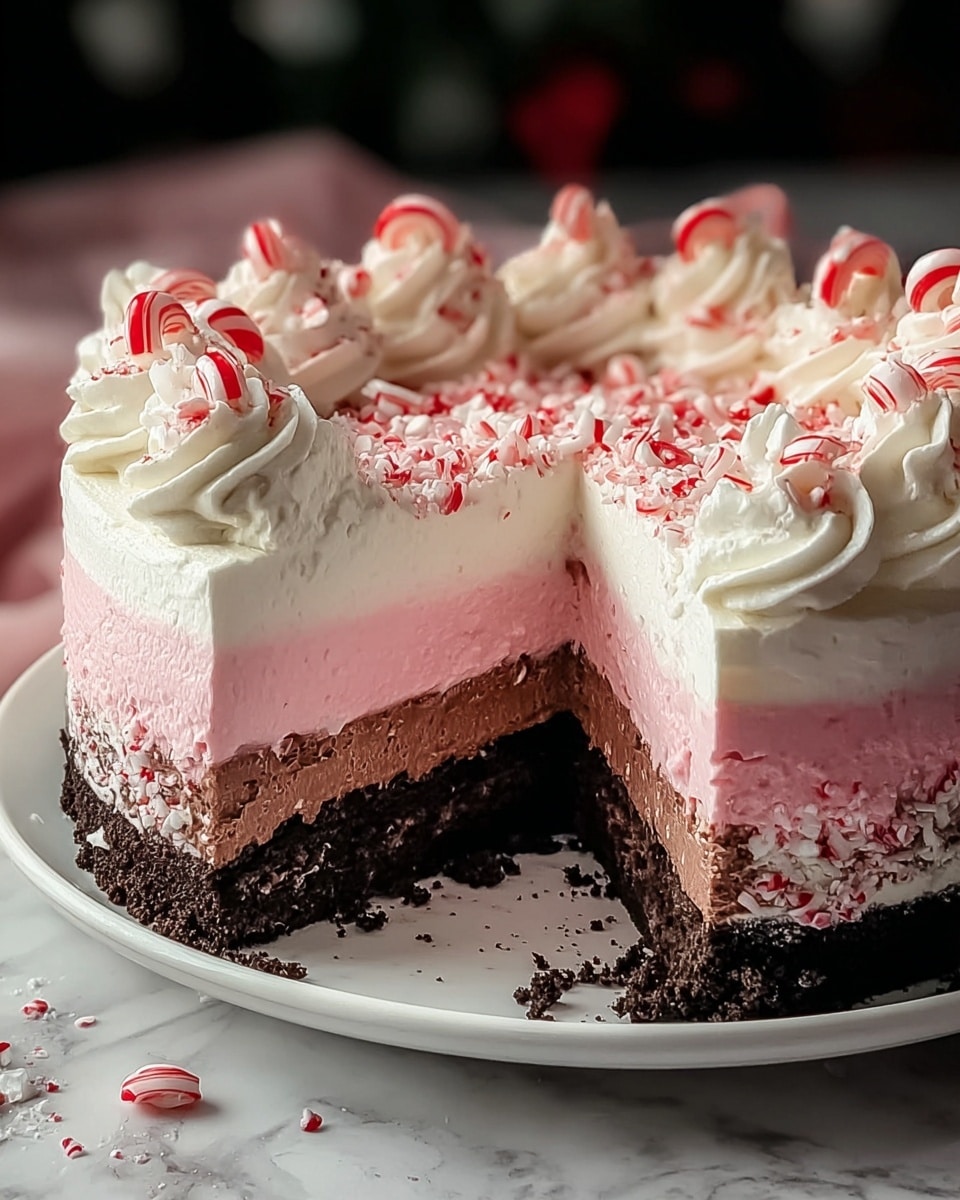
If you are looking to wow your holiday guests with something cool, creamy, and irresistibly festive, let me introduce you to the Ultimate Festive Peppermint Ice Cream Cake Recipe. This dreamy dessert layers rich chocolate cookie crust, refreshing peppermint ice cream, and fluffy whipped cream, all sprinkled with crushed candy canes and chocolatey goodness. It’s the perfect blend of minty freshness and chocolate indulgence that will have everyone asking for seconds, making your festive celebrations truly unforgettable.

Ingredients You’ll Need
This Ultimate Festive Peppermint Ice Cream Cake Recipe uses simple yet essential ingredients that come together effortlessly to create a show-stopping dessert. Each element brings its own magic—the chocolate cookie crumbs lay a crunchy, flavorful foundation, while the peppermint ice cream adds that unmistakable holiday cheer, and the whipped cream topping ties everything together with silky smoothness.
- Chocolate cookie crumbs: Use about 2 cups of crushed chocolate cookies, preferably Oreos without the filling, for the perfect crumbly crust base.
- Unsalted butter, melted: 6 tablespoons to bind the cookie crumbs and create a firm crust.
- Peppermint ice cream: 1 ½ quarts of slightly softened peppermint ice cream brings the star minty flavor to this cake.
- Crushed peppermint candies or candy canes: ½ cup adds a delightful crunch and festive flair inside and on top of the cake.
- Heavy whipping cream: 2 cups whipped to soft peaks to provide a light, airy topping.
- Powdered sugar: 3 tablespoons sweeten the whipped cream just right with no grit.
- Vanilla extract: Half a teaspoon to enhance the creaminess and balance peppermint sharpness.
- Chocolate shavings or mini chocolate chips: For garnish, to add a touch of elegance and chocolate texture.
How to Make Ultimate Festive Peppermint Ice Cream Cake Recipe
Step 1: Prepare the Crust
Start by mixing your chocolate cookie crumbs with melted butter until every crumb is coated and the mixture feels like damp sand. Press this mixture firmly into the bottom of a springform pan or pie dish to create that essential crunchy base layer. Pop it in the fridge for at least 30 minutes so the crust can set tight and hold its shape when the creamy layers come on top.
Step 2: Make the Ice Cream Layer
While the crust chills, let your peppermint ice cream sit out for a few minutes until it softens just enough to spread without melting completely. This is key to creating smooth layers later. Spread the softened peppermint ice cream evenly over the cold crust, creating a thick, luscious middle layer. Then sprinkle the crushed peppermint candies evenly over the ice cream for bursts of sweet, minty crunch. Place the cake in the freezer and allow it to set completely for 3 to 4 hours before moving on.
Step 3: Prepare the Whipped Topping
Time to make that cloud-like whipped cream topping! In a chilled bowl, beat the heavy cream along with powdered sugar and vanilla extract until soft peaks form. This light, fluffy topping will complement the denser ice cream beautifully. Spread it gently and evenly over the frozen ice cream layer, smoothing it out like frosting on a cake.
Step 4: Garnish
Now for the finishing touches! Sprinkle additional crushed candy canes, peppermint candies, and mini chocolate chips or chocolate shavings on top of the whipped cream. These garnishes don’t just look festive, they provide an extra burst of texture and flavor when you bite in. After garnishing, freeze your cake again for at least 2 hours so everything is set and ready to impress.
Step 5: Serve Your Ultimate Festive Peppermint Ice Cream Cake Recipe
When it’s time to share this delicious creation, remove the cake from the freezer and let it sit at room temperature for just a few minutes to make slicing easier. Serve chilled to enjoy that perfect balance of creamy, crunchy, minty, and chocolatey layers—your guests will be delighted by every spoonful!
How to Serve Ultimate Festive Peppermint Ice Cream Cake Recipe
Garnishes
To keep the festive spirit alive, top each slice with a tiny sprig of fresh mint or a dusting of cocoa powder alongside the crushed peppermint pieces. A drizzle of chocolate syrup can also add a delightful rich note that complements the mint beautifully without overpowering it.
Side Dishes
This ice cream cake is rich and festive enough to stand on its own, but pairing it with light, fruity sides like fresh berries or citrus segments can balance the cool creaminess. For a cozy holiday spread, serve alongside hot cocoa or a warm cup of spiced tea to contrast the chilly cake temperature.
Creative Ways to Present
Try serving your Ultimate Festive Peppermint Ice Cream Cake Recipe in individual clear glasses or parfait jars layered with the crumb crust, ice cream, and whipped topping for a twist on the classic presentation. You can also add candy cane sticks or small edible glitter to the top for an extra sparkle that delights both kids and adults alike.
Make Ahead and Storage
Storing Leftovers
If you have any leftovers, keep your ice cream cake stored tightly covered in the freezer. An airtight container or wrapping it well with plastic wrap will protect it from freezer burn and keep the flavors fresh for up to a week.
Freezing
This dessert freezes beautifully, making it a perfect make-ahead treat. Just follow the recipe steps through freezing after assembly, and keep it frozen until you plan to serve. Thaw it briefly at room temperature before slicing for the best texture.
Reheating
Since this is a cold dessert, reheating is not needed—in fact, it’s best enjoyed chilled. Let it sit out just a few minutes to soften slightly for easier serving but keep it cold to preserve that creamy texture.
FAQs
Can I use store-bought peppermint ice cream?
Absolutely! Using store-bought peppermint ice cream is a great time-saver and tastes wonderful. Just make sure it’s softened slightly before spreading so it layers smoothly on the crust.
What if I don’t have a springform pan?
No worries—you can use any pie dish or cake pan you have on hand. Just press the crust firmly and be gentle when removing or serving since the slice shapes might differ.
Can I make this cake dairy-free?
You can substitute dairy-free ice cream and coconut cream for the whipping cream to accommodate dietary needs. The texture might vary slightly but the festive flavors will still shine through!
How far in advance can I prepare this cake?
This cake can be made up to 2 days ahead, kept frozen and well covered. Just remember to give it a few minutes on the counter before serving for the ideal sliceability and creamy texture.
What are some good alternate garnishes?
If you want to switch things up, try crushed wintergreen candies, white chocolate curls, or even a sprinkle of edible glitter to keep that festive sparkle going strong while bringing different flavor accents.
Final Thoughts
There’s something truly magical about this Ultimate Festive Peppermint Ice Cream Cake Recipe that captures the spirit of the season with every spoonful. It’s easy to make, visually stunning, and tastes even better than it looks. I can’t wait for you to try it and share this delightful dessert with those you love—because the holidays deserve a sweet treat as joyful as the moments we spend together.
Print
Ultimate Festive Peppermint Ice Cream Cake Recipe
- Prep Time: 15 minutes
- Cook Time: 0 minutes
- Total Time: 5 hours 45 minutes (including freezing time)
- Yield: 12 servings
- Category: Dessert
- Method: No-Cook
- Cuisine: American
Description
This Ultimate Festive Peppermint Ice Cream Cake is a delightful no-bake dessert perfect for holiday celebrations. It features a rich chocolate cookie crumb crust, a creamy peppermint ice cream layer, and a fluffy whipped cream topping garnished with crushed peppermint candies and chocolate shavings. Easy to assemble and sure to impress, this cake brings refreshing minty flavors with a perfect blend of textures.
Ingredients
Crust
- 2 cups (200g) chocolate cookie crumbs (e.g., Oreos, without filling)
- 6 tbsp (85g) unsalted butter, melted
Ice Cream Layer
- 1 ½ quarts (1.4 liters) peppermint ice cream, slightly softened
- ½ cup (50g) crushed peppermint candies or candy canes
Whipped Topping
- 2 cups (480ml) heavy whipping cream
- 3 tbsp powdered sugar
- ½ tsp vanilla extract
Garnish
- Crushed candy canes or peppermint candies
- Chocolate shavings or mini chocolate chips
Instructions
- Prepare the Crust: In a medium bowl, mix the chocolate cookie crumbs with the melted butter thoroughly. Press this mixture firmly into the bottom of a springform pan or pie dish to create an even crust. Place it into the refrigerator for at least 30 minutes to firm up.
- Make the Ice Cream Layer: Allow the peppermint ice cream to soften slightly at room temperature for a few minutes to make spreading easier. Evenly spread the softened ice cream over the chilled cookie crust, smoothing the surface with a spatula. Sprinkle the crushed peppermint candies or candy canes evenly on top. Freeze for 3 to 4 hours until the ice cream layer is solid.
- Prepare the Whipped Topping: In a large mixing bowl, beat the heavy whipping cream along with powdered sugar and vanilla extract until soft peaks form. Spread this whipped cream evenly over the set ice cream layer, smoothing it out with a spatula.
- Garnish: Decorate the top of the whipped cream with additional crushed candy canes, peppermint candies, or mini chocolate chips and optionally some chocolate shavings. Freeze the entire cake for at least another 2 hours to ensure everything sets well.
- Serve: Prior to serving, let the cake sit at room temperature for a few minutes for easier slicing. Serve chilled and enjoy the refreshing festive flavors.
Notes
- For best results, use a springform pan for easy removal of the cake.
- Make sure the ice cream is soft enough to spread but not melted to avoid a runny layer.
- Can be prepared up to 2 days in advance and kept frozen until ready to serve.
- Substitute peppermint ice cream with a vegan or dairy-free alternative for dietary preferences.
- Adjust crushed candies on top based on desired sweetness and texture.


