

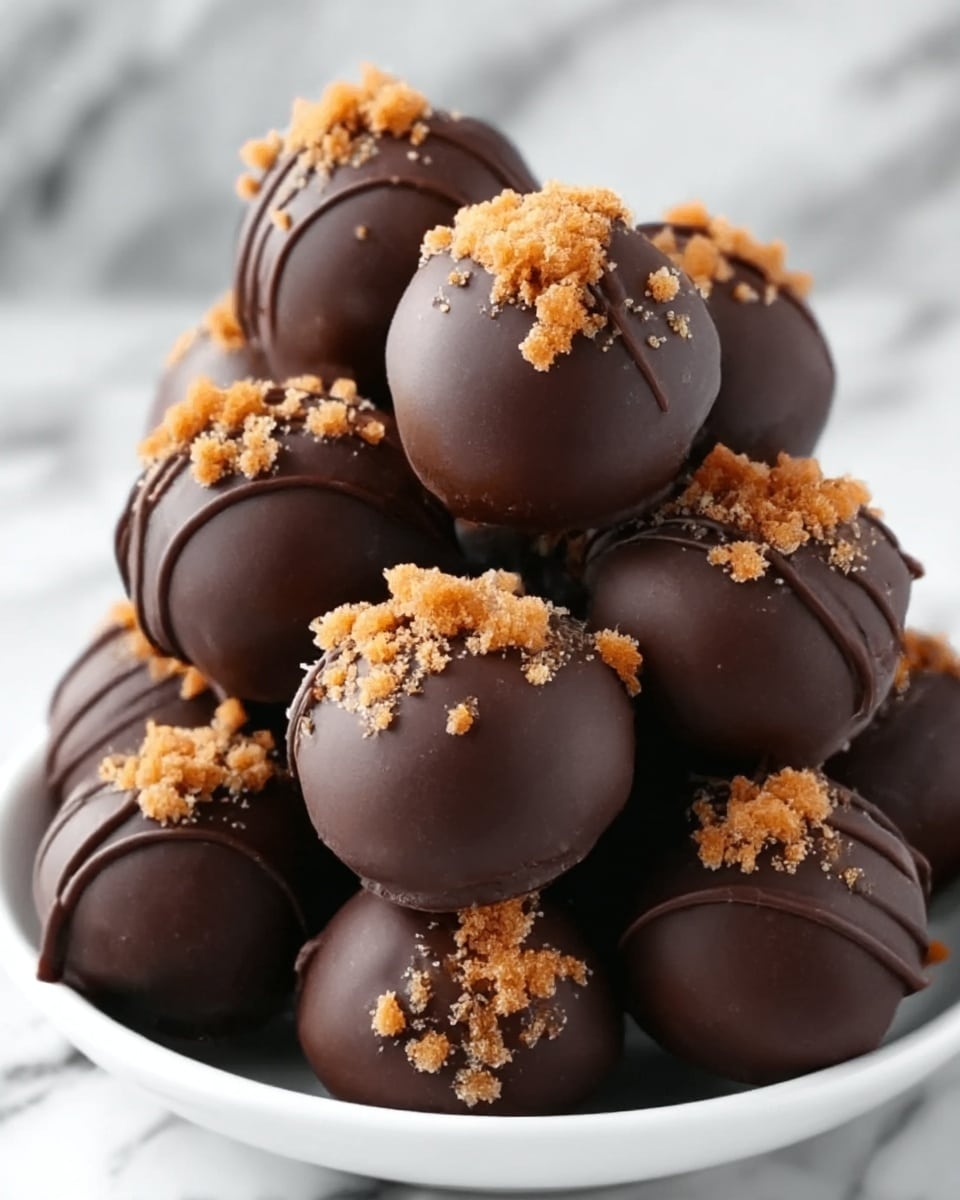
If you ever find yourself craving a sweet treat that feels like a little bite of candy-coated heaven, then you have to try this Easy Butterfinger Balls Recipe. It brings together the crunchy, buttery magic of Butterfinger candy bars with creamy, dreamy cream cheese and a luscious chocolate shell. These delightful little balls are not only irresistibly delicious but also surprisingly simple to make, perfect for impressing friends or treating yourself on any day that calls for something special.

Ingredients You’ll Need
These ingredients are straightforward and pantry-friendly, yet each plays a crucial role in delivering the perfect texture and flavor balance to your Butterfinger balls. From the crisp crunch of the candy bars to the smooth richness of the cream cheese and chocolate, every element works together to create a treat that’s pure joy.
- 2 cups crushed Butterfinger candy bars: Provides the signature crunchy, peanut-buttery flavor and texture that makes these balls stand out.
- 1 (8-ounce) package cream cheese, softened: Adds a creamy base that binds the candy and sugar together smoothly.
- 2 cups powdered sugar: Sweetens and firms the mixture, helping it hold shape when rolled into balls.
- 1 teaspoon vanilla extract: Enhances the overall flavor with a warm, fragrant touch.
- 2 cups semi-sweet chocolate chips: Creates a luscious chocolate coating that seals in the buttery goodness.
- 1 tablespoon coconut oil or vegetable oil (optional): Helps melt the chocolate evenly and gives the coating a nice shine and smoother texture.
How to Make Easy Butterfinger Balls Recipe
Step 1: Prepare the Filling
Start by softening your cream cheese; this is really important because it ensures the final mixture is creamy and easy to work with. Beat the cream cheese, powdered sugar, and vanilla extract together until the texture is beautifully smooth and no lumps remain. This base creates a sweet, rich canvas for the crunchy Butterfinger pieces.
Step 2: Fold in Crushed Butterfinger
Once the base is ready, gently fold in the crushed Butterfinger candy bars. Make sure the candy pieces are evenly distributed throughout the mixture to get that signature crunch in every bite. The mixture will become thick but pliable — perfect for shaping.
Step 3: Form the Balls
Using your hands or a small cookie scoop, roll the mixture into 1-inch diameter balls. This size strikes the perfect balance between bite-sized and satisfying. Place each ball on a parchment-lined baking sheet, giving them some space so they don’t stick together later. Pop the tray into the freezer for about 30 minutes to firm up the balls and make them easier to coat.
Step 4: Melt the Chocolate
While the balls chill, it’s time to prepare the chocolate coating. In a microwave-safe bowl, melt the chocolate chips in short 20-second bursts, stirring in between each interval to prevent burning. Adding a tablespoon of coconut or vegetable oil is optional but highly recommended for a silky, glossy finish that will make your Easy Butterfinger Balls Recipe look as good as they taste.
Step 5: Coat the Balls
Once the chocolate is melted and smooth, take the chilled Butterfinger balls and carefully dip each one into the chocolate, making sure it is completely covered. Use a fork or dipping tool to lift the balls out, letting excess chocolate drip back into the bowl. Place the coated balls back on the lined sheet and get ready for the final chill.
Step 6: Chill and Serve
Refrigerate the coated Butterfinger balls for about 10 to 15 minutes or until the chocolate shell is set and firm. And that’s it! They’re ready to be devoured immediately or stored to enjoy later. Simple, fun, and utterly delicious!
How to Serve Easy Butterfinger Balls Recipe
Garnishes
To make your Easy Butterfinger Balls Recipe even more eye-catching, consider drizzling a little white or dark chocolate over the top for contrast. You can also sprinkle crushed nuts or tiny candy bits for added texture and visual appeal. These little touches make the treat feel extra special, perfect for parties or holiday gatherings.
Side Dishes
These Butterfinger balls shine brightly on their own, but if you want to serve them with something else, think about light, complementary options like a fresh fruit plate or a small scoop of vanilla ice cream. The freshness of fruit or cool creaminess of ice cream balances the rich sweetness beautifully.
Creative Ways to Present
Presentation is part of the fun! Try arranging the balls on decorative trays lined with colorful parchment paper or in cupcake liners for portion control and charm. You could also serve them on skewers alongside other bite-sized desserts for a festive dessert platter that everyone will love.
Make Ahead and Storage
Storing Leftovers
If you have leftover Easy Butterfinger Balls Recipe treats (and you probably will!), keep them in an airtight container in the refrigerator. They’ll stay wonderfully fresh for up to a week, making a quick grab-and-go sweet snack whenever you need a little pick-me-up.
Freezing
These balls freeze beautifully! For longer storage, place them in a single layer on a parchment-lined baking sheet and freeze until firm, then transfer them to a freezer-safe container or bag. They can be kept frozen for up to 2 months without losing flavor or texture.
Reheating
Since these treats are best served chilled, there’s no need to reheat. Just allow frozen balls to thaw in the refrigerator for several hours before serving. This helps preserve the crisp chocolate coating and creamy interior to perfection.
FAQs
Can I use a different candy bar instead of Butterfinger?
Absolutely! While Butterfinger bars give a distinct peanut-buttery crunch, you can experiment with similar crunchy candy bars like Butterfinger Bites or other peanut butter and crispy candy bars if you like, but keep in mind the flavor and texture will vary slightly.
Do I have to use cream cheese for the filling?
Cream cheese is key to achieving that smooth, creamy texture and slight tang that balances the sweetness, but you could try mascarpone or even a whipped frosting if you want a different twist. Just expect a softer mixture and adjust powdered sugar accordingly.
Is it necessary to add oil to the chocolate?
Adding coconut or vegetable oil isn’t mandatory, but it helps make the melted chocolate smoother and shinier and prevents cracking when the coating sets. If you prefer a thicker shell, feel free to skip it.
How long do Butterfinger balls last outside the fridge?
Since these balls contain cream cheese, it’s best to keep them refrigerated and not leave them out at room temperature for more than two hours to ensure food safety and maintain freshness.
Can I make these gluten-free?
Yes, provided the Butterfinger candy bars and chocolate chips you use are certified gluten-free. Always check packaging labels to be sure, especially with processed candies.
Final Thoughts
This Easy Butterfinger Balls Recipe is genuinely one of those treasures that combines simplicity with spectacular flavor. Whether you’re making them for a holiday party, a family gathering, or just a weekend indulgence, these candy-filled balls bring a smile to everyone’s face. So go ahead, gather those ingredients, and treat yourself to a bite-sized piece of happiness you’ll want to make again and again.
Print
Easy Butterfinger Balls Recipe
- Prep Time: 15 minutes
- Cook Time: 0 minutes
- Total Time: 1 hour (includes chilling and freezing time)
- Yield: 24 servings
- Category: Dessert
- Method: No-Cook
- Cuisine: American
Description
These Easy Butterfinger Balls are a delightful no-bake treat combining crushed Butterfinger candy bars with a creamy mixture of cream cheese and powdered sugar, all coated in rich melted chocolate. Perfect as a bite-sized indulgence for parties or holiday celebrations.
Ingredients
Filling
- 2 cups crushed Butterfinger candy bars
- 1 (8-ounce) package cream cheese, softened
- 2 cups powdered sugar
- 1 teaspoon vanilla extract
Coating
- 2 cups semi-sweet chocolate chips
- 1 tablespoon coconut oil or vegetable oil (optional, for smoother coating)
Instructions
- Prepare the Filling: In a mixing bowl, beat the softened cream cheese, powdered sugar, and vanilla extract together until the mixture is smooth and creamy. Then carefully fold in the crushed Butterfinger candy bars until evenly combined.
- Form the Balls: Roll the candy mixture into 1-inch diameter balls and place them on a baking sheet lined with parchment paper. Pop the baking sheet into the freezer and chill the balls for 30 minutes to firm up.
- Melt the Chocolate: Place the semi-sweet chocolate chips in a microwave-safe bowl. Heat in the microwave in 20-second increments, stirring thoroughly after each interval until fully melted and smooth. Stir in the coconut oil or vegetable oil, if using, to create a glossy and easier-to-dip coating.
- Coat the Balls: Retrieve the chilled Butterfinger balls from the freezer and dip each ball into the melted chocolate, ensuring it is completely covered. Place each coated ball back onto the parchment-lined baking sheet to set.
- Chill and Serve: Refrigerate the chocolate-coated balls for 10-15 minutes or until the chocolate hardens. Serve immediately or store in an airtight container in the refrigerator for up to one week to maintain freshness.
Notes
- For best results, ensure the cream cheese is fully softened to avoid lumps in the filling.
- Use parchment paper to prevent sticking during freezing and dipping.
- The optional oil in the chocolate coating helps achieve a smoother, shinier finish but can be omitted if preferred.
- Store leftovers in an airtight container refrigerated to keep the balls fresh for up to 7 days.
- These treats are best enjoyed cold straight from the fridge for a firm texture.


