

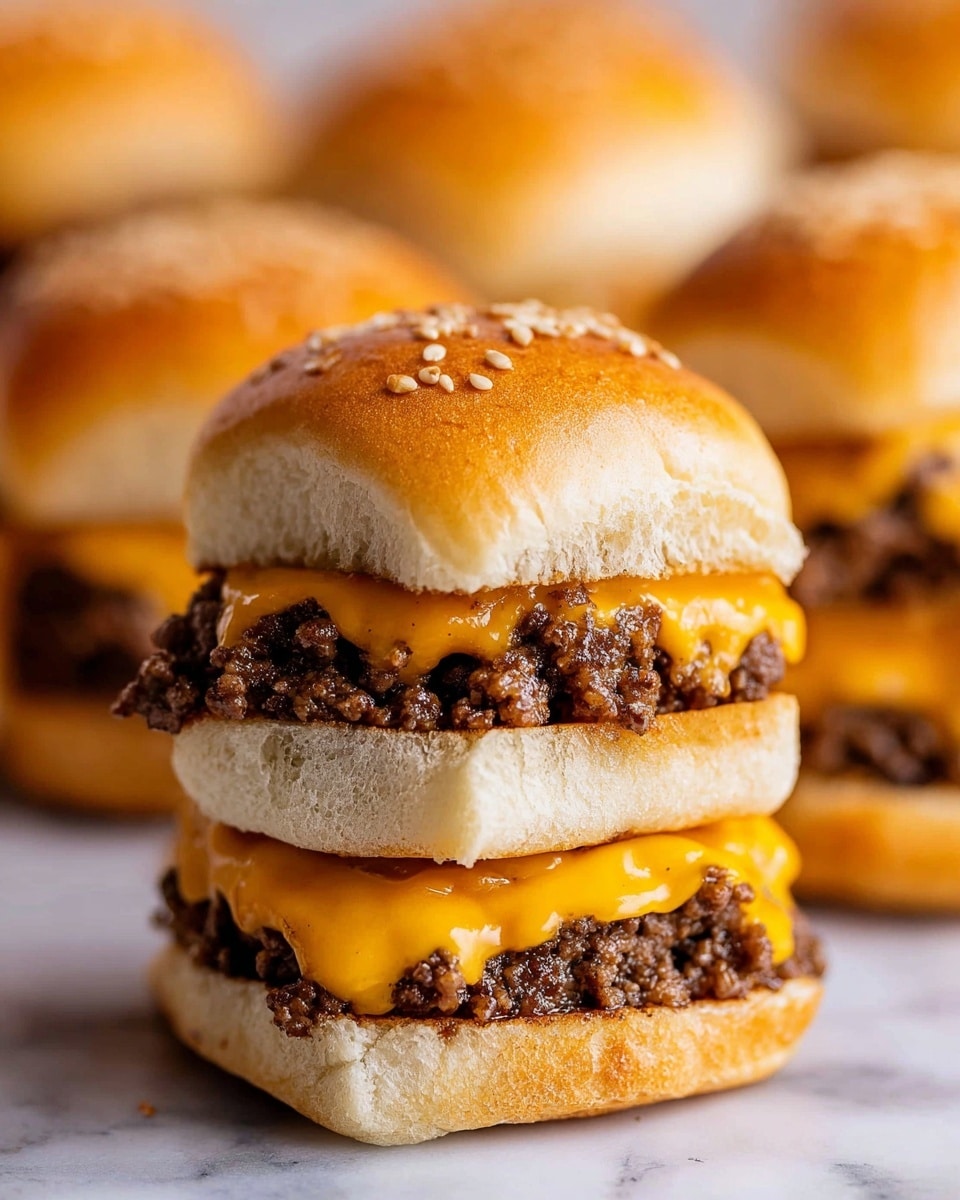
If you’re searching for the ultimate crowd-pleaser, look no further than this Cheeseburger Sliders Recipe. Picture this: mini sandwiches bursting with juicy, seasoned ground beef, melted cheddar cheese layered just right, and soft, buttery rolls with a golden, sesame-speckled top. These sliders are everything you crave from a classic cheeseburger, just in a perfectly portable, bite-sized form that’s perfect for parties, game days, or any casual get-together. The mix of textures and flavors makes every slider addictive, and trust me, once you try making these, they’ll become your go-to recipe for feeding a hungry crowd with minimal fuss and maximum deliciousness.

Ingredients You’ll Need
Gathering the right ingredients for this Cheeseburger Sliders Recipe is surprisingly simple, but each one plays a crucial role in crafting those melt-in-your-mouth flavors. From the lean ground beef providing juicy satisfaction to the sharp cheddar giving that classic cheeseburger tang, every item adds something special. These essentials ensure your sliders come together seamlessly without any complicated steps.
- Lean ground beef (2 lbs, 90/10 or 93/7 fat): The heart of the sliders, offering juicy and flavorful meat.
- Olive oil (½ tablespoon): Helps sauté onions without adding heaviness.
- Salt (1 teaspoon): Enhances the natural flavors of the beef and cheese.
- Black pepper (1 teaspoon): Adds a subtle kick and depth.
- Garlic powder (1 teaspoon): Infuses savory warmth into the meat.
- Yellow onion (½ large, finely diced): Adds sweet crunch and moisture to the filling.
- Mayonnaise (¼ cup): Blends into the beef for a creamy, juicy texture that keeps sliders moist.
- Medium cheddar cheese slices (8 slices): Layers of gooey, melty cheese for every bite.
- Shredded medium cheddar cheese (6 ounces): A generous sprinkle to boost cheesiness on top.
- Dinner rolls (24, split in half): Soft, pillowy buns that hold everything together perfectly.
- Unsalted butter (2 tablespoons, melted): Coats the buns, giving them that irresistible golden finish.
- Sesame seeds (1 tablespoon): Adds a subtle crunch and classic burger look.
How to Make Cheeseburger Sliders Recipe
Step 1: Prep Your Oven and Baking Sheet
Start by preheating your oven to 350 degrees Fahrenheit. Grab a rimmed baking sheet and generously grease it with melted butter. This simple prep ensures your sliders won’t stick and the bottoms toast up perfectly, setting the stage for the best texture.
Step 2: Sauté Onions and Cook the Beef
Heat olive oil in a large skillet over medium-high heat, then toss in the finely diced onions. Let them soften and become slightly golden, which adds a sweet, caramelized flavor. Add your ground beef, breaking it apart with a spatula, and season with salt, black pepper, and garlic powder. Cook everything through until the beef is browned and juicy, creating the flavorful filling that’s the star of this Cheeseburger Sliders Recipe.
Step 3: Drain Fat and Add Mayonnaise
Once the beef is cooked, carefully tilt the skillet to spoon off any excess fat—this keeps the sliders from becoming greasy. Next, stir in the mayonnaise. It might sound surprising, but this creamy touch enhances moisture and gives the beef a rich, tender bite that everyone will love.
Step 4: Assemble the Sliders
Slice the dinner rolls horizontally and place the bottom halves on the buttered baking sheet. Lay down a slice of cheddar on each bottom bun, then spread the beef mixture over evenly. Sprinkle shredded cheddar cheese generously on top of the beef to ensure gooey cheesiness in every mouthful. Finally, crown each slider with the top halves of the rolls, ready for that buttery finish.
Step 5: Butter, Seed, and Bake
Brush melted butter over the tops of all the rolls and sprinkle sesame seeds for that classic burger flair. Pop the whole tray into the oven and bake for 12 to 15 minutes. When the cheese has melted beautifully and the tops glow golden brown, you know your Cheeseburger Sliders Recipe is ready to delight!
How to Serve Cheeseburger Sliders Recipe
Garnishes
To elevate your sliders even more, add fresh garnishes like crisp lettuce, thin slices of pickles, or tangy ketchup and mustard on the side. These classic toppings add color and a fresh crunch that complements the rich meat and cheese perfectly, making each bite a perfect balance of flavors.
Side Dishes
Pairing your Cheeseburger Sliders Recipe with crispy french fries, zesty coleslaw, or even a fresh garden salad rounds out the meal nicely. These sides bring additional textures and flavors that enhance the overall dining experience without overshadowing the sliders themselves.
Creative Ways to Present
Make your slider platter pop by arranging them on a rustic wooden board or a colorful tray with small bowls of dipping sauces. Topping each slider with a decorative toothpick or mini flag adds a fun touch, perfect for parties or casual get-togethers where presentation sets the mood as much as the food.
Make Ahead and Storage
Storing Leftovers
If you have any leftovers from your Cheeseburger Sliders Recipe, wrap them tightly in foil or store in an airtight container in the refrigerator. They’ll keep fresh for up to three days, making for incredibly tasty next-day lunches or snacks that don’t feel like reheated fast food.
Freezing
These sliders freeze wonderfully, perfect for prepping ahead. After assembling but before baking, wrap the entire tray in plastic wrap and then foil, or freeze individual sliders in freezer bags. When ready, bake them straight from frozen, adding a few extra minutes to the baking time to ensure warmth all the way through.
Reheating
To reheat and revive your Cheeseburger Sliders Recipe leftovers, place them in a preheated oven at 350 degrees Fahrenheit for about 10 minutes or until heated through and the cheese becomes melty again. Avoid microwaving if possible to keep the rolls from getting soggy—oven reheating preserves that fresh-baked texture.
FAQs
Can I use other cheeses instead of cheddar?
Absolutely! While cheddar gives that classic cheeseburger flavor, feel free to swap in mozzarella, pepper jack, or even Swiss for a new twist. Just choose cheeses that melt well for the best texture.
What type of ground beef works best for this recipe?
Lean ground beef with 7-10% fat content is ideal. It’s juicy enough to stay tender but not too fatty to make the sliders greasy. This balance makes the flavors shine and keeps the texture just right.
Can I make these sliders vegetarian or vegan?
You can! Swap the beef for plant-based crumbles or grilled mushrooms and choose vegan cheese and butter substitutes. Adjust cooking times as needed and enjoy a delicious plant-based twist on this Cheeseburger Sliders Recipe.
How do I prevent the sliders from becoming soggy?
Greasing the baking sheet with butter and toasting the rolls before adding fillings helps. Also, avoid piling on too many wet toppings before serving to keep the buns tender but not soggy.
What’s the best way to serve these for a party?
Arrange the sliders on a large serving platter with a variety of dipping sauces nearby, along with side dishes like fries or salad. Using toothpicks makes them easy for guests to grab and enjoy without mess.
Final Thoughts
There’s something truly joyful about sinking your teeth into a batch of homemade Cheeseburger Sliders Recipe, especially when shared with friends or family. They’re quick to whip up, endlessly satisfying, and just downright fun to eat. Give this recipe a try soon—you might just find your new favorite way to enjoy classic cheeseburger flavors in a delightful, bite-sized package.
Print
Cheeseburger Sliders Recipe
- Prep Time: 8 minutes
- Cook Time: 22 minutes
- Total Time: 30 minutes
- Yield: 24 sliders
- Category: Appetizer
- Method: Baking
- Cuisine: American
Description
These Cheeseburger Sliders are a delicious and easy-to-make appetizer or party snack featuring juicy ground beef cooked with onions and spices, layered with melted cheddar cheese, and served on soft dinner rolls. Perfectly baked with a buttery, sesame seed topping, these sliders combine all the classic flavors of a cheeseburger in a convenient bite-sized form.
Ingredients
Beef Mixture
- 2 lbs lean ground beef (90/10 or 93/7 fat content)
- ½ tablespoon olive oil
- 1 teaspoon salt
- 1 teaspoon black pepper
- 1 teaspoon garlic powder
- ½ large yellow onion, finely diced
- ¼ cup mayonnaise
Cheese
- 8 slices medium cheddar cheese
- 6 ounces medium cheddar cheese, shredded (or use more sliced cheese)
Rolls and Topping
- 24 dinner rolls
- 2 tablespoons unsalted butter, melted, plus more to grease baking sheet
- 1 tablespoon sesame seeds
Instructions
- Preheat and Prepare: Preheat your oven to 350°F (175°C) and grease a rimmed baking sheet with some melted butter to prevent sticking.
- Cook the Beef and Onions: Heat olive oil in a large skillet over medium-high heat. Add the finely diced onion and ground beef. Use a spatula to break up the beef as it cooks. Season with salt, black pepper, and garlic powder. Cook thoroughly until the beef is no longer pink and the onions are tender.
- Drain Fat and Mix in Mayonnaise: Tilt the skillet carefully to spoon off and discard any excess fat. Then stir in the mayonnaise into the cooked ground beef mixture to add creaminess and enhance flavor.
- Assemble the Sliders: Cut each dinner roll in half horizontally. Place the bottom halves on the prepared baking sheet. Line each roll bottom with a slice of cheddar cheese, then spread the beef mixture evenly on top. Sprinkle shredded cheddar cheese over the beef and cover with the top halves of the rolls.
- Finish and Bake: Brush the tops of the rolls with the melted butter and sprinkle with sesame seeds for a golden, flavorful crust. Bake in the preheated oven for 12-15 minutes until the cheese is melted and the tops are golden brown.
Notes
- Using lean ground beef (90/10 or 93/7) helps reduce excess grease in the sliders.
- You can substitute mayonnaise with yellow mustard or BBQ sauce for a different flavor profile.
- For a spicy twist, add a pinch of cayenne pepper or chopped jalapeño to the beef mixture.
- These sliders can be assembled ahead and stored in the refrigerator unbaked for up to 24 hours before baking.
- Serve with pickles, ketchup, or your favorite dipping sauces for added enjoyment.


