
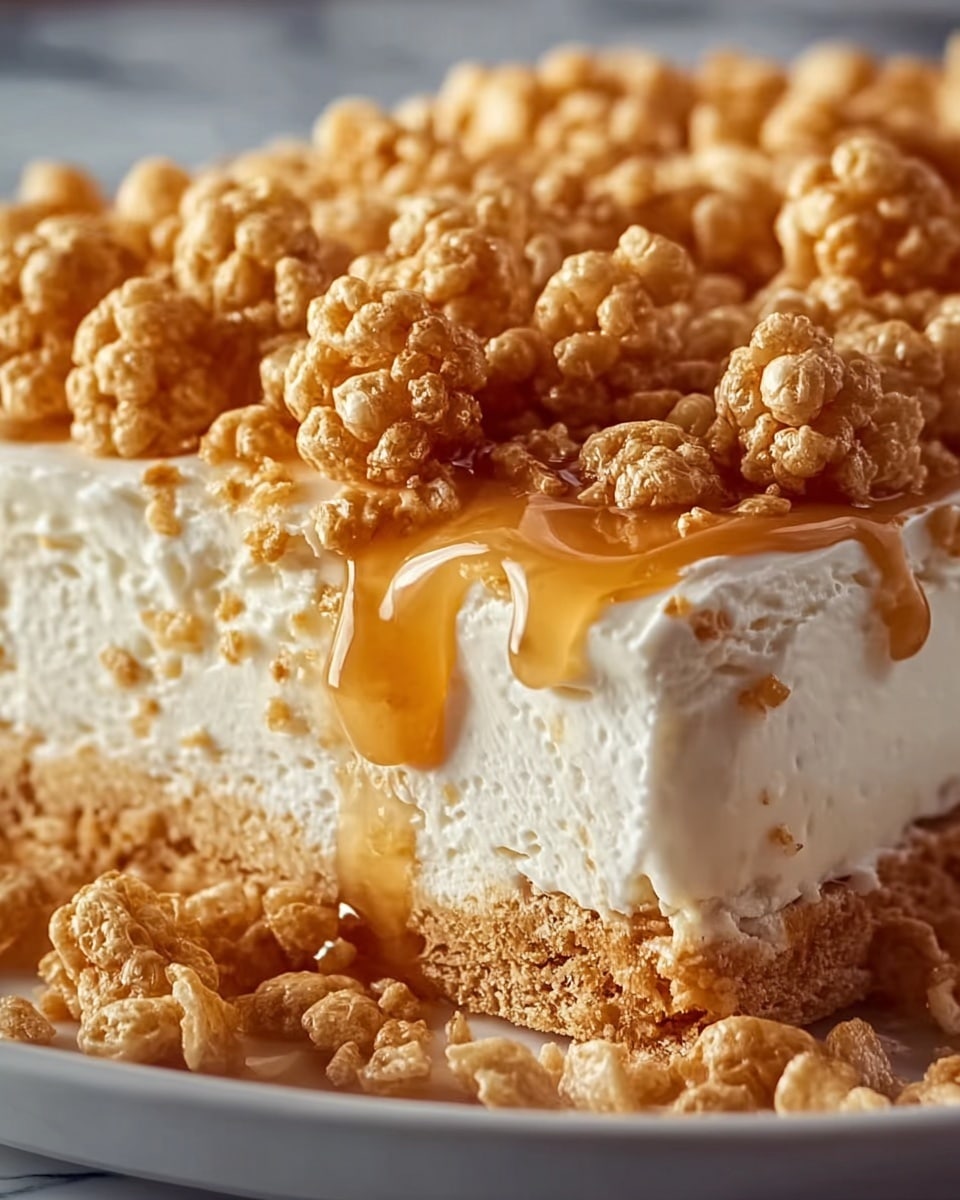
If you’re on the hunt for a dessert that perfectly balances fun childhood nostalgia with creamy indulgence, the Rice Krispie Treat Cheesecake Recipe is about to become your new obsession. Imagine the crisp, marshmallowy crunch of a classic Rice Krispies treat transformed into the sturdy, delicious crust for a luscious, no-bake cheesecake filling that’s both fluffy and rich. This delightful combination not only satisfies sweet cravings but also makes dessert time incredibly easy and impressively delightful for everyone gathered around. Trust me, once you try this Rice Krispie Treat Cheesecake Recipe, it’ll be your go-to for celebrations or whenever you need a comforting sweet treat with a twist.

Ingredients You’ll Need
This Rice Krispie Treat Cheesecake Recipe calls for simple, everyday ingredients that come together beautifully to create a dessert packed with textures and flavors. Each element plays its part, from the buttery marshmallow crust to the smooth, airy cream cheese filling that’s lightened with whipped cream, offering a luscious mouthfeel that is hard to resist.
- Rice Krispies cereal: The classic crispy base that provides a light crunch and sturdy texture for the crust.
- Mini marshmallows: Melts down to hold the crust together with gooey sweetness.
- Unsalted butter: Adds richness and helps the marshmallows melt evenly.
- Cream cheese (softened): The heart of the cheesecake, bringing creaminess and tangy depth.
- Powdered sugar: Sweetens the filling smoothly without any graininess.
- Vanilla extract: Enhances flavor with fragrant warmth.
- Heavy whipping cream: Whipped to stiff peaks to lighten and fluff up the cheesecake filling.
- Mini chocolate chips or sprinkles (optional): Adds a fun pop of texture and color if you’re feeling playful.
How to Make Rice Krispie Treat Cheesecake Recipe
Step 1: Create the Rice Krispie Crust
First things first, melt the butter gently in a large saucepan over low heat so it doesn’t brown. Once melted, stir in the mini marshmallows and keep stirring until they’re completely melted and glossy. This step is essential for that perfect gooey binding. Then, fold in the Rice Krispies cereal, making sure every bit is beautifully coated with that marshmallow magic. Press this mixture firmly into the bottom and up the sides of a greased 9-inch springform pan. This forms your crisp, sweet crust that’s going to be the sturdy foundation for the cheesecake filling. Let it cool and set completely before moving on to the next stage.
Step 2: Prepare the Cheesecake Filling
In a large bowl, beat the softened cream cheese with powdered sugar and vanilla extract until smooth and fluffy — this creates the luscious cheesecake base. Separately, whip the heavy cream until it forms stiff peaks; this is what gives the filling that light, airy texture that makes the cheesecake feel like a cloud once it’s chilled. Gently fold the whipped cream into the cream cheese mixture with a delicate hand to keep all that airiness intact. If you want to add an extra spark of fun, fold in mini chocolate chips or sprinkles at this stage to spread little surprises throughout the cheesecake.
Step 3: Assemble and Chill
Pour the dreamy cheesecake filling evenly over the set Rice Krispie crust, smoothing out the top with a spatula. Now comes the hardest part—refrigeration. Chill the cheesecake in your fridge for at least 4 hours until it’s fully set. This waiting time is key because it allows the flavors to meld and the texture to firm up beautifully. When it’s ready to serve, run a knife around the springform edges and carefully release the pan. Your Rice Krispie Treat Cheesecake Recipe is now perfectly set and ready for slicing!
How to Serve Rice Krispie Treat Cheesecake Recipe

Garnishes
Presentation is half the fun with this cheesecake. Brighten up slices with fresh berries or a dusting of powdered sugar for elegance. Drizzling some chocolate or caramel sauce over the top adds indulgence, while sprinkling extra mini chocolate chips or colorful sprinkles enhances the playful vibe of the dessert.
Side Dishes
Complement the richness of the cheesecake with light, refreshing side treats like a simple mixed berry salad or a tangy citrus sorbet. These fresh elements balance the sweetness and add a burst of natural flavor to your dessert spread.
Creative Ways to Present
Try serving the cheesecake in individual mini mason jars or clear cups layered with extra Rice Krispies and whipped cream for a casual yet charming presentation. You can also cut it into bite-sized bars for easy party finger food, making the Rice Krispie Treat Cheesecake Recipe an unstoppable crowd-pleaser wherever it’s served.
Make Ahead and Storage
Storing Leftovers
After enjoying your cheesecake, store any leftovers covered tightly in the refrigerator. The Rice Krispie crust stays crisp enough to enjoy for up to 3 days, making this dessert a convenient make-ahead option for busy weeks or events.
Freezing
This cheesecake freezes well, so if you want to prepare it in advance, wrap the entire cake securely with plastic wrap followed by aluminum foil. Freeze for up to a month. Thaw overnight in the fridge before serving to maintain its perfect texture.
Reheating
Because this is a no-bake cheesecake with a delicate crust, reheating isn’t necessary or recommended—serve it chilled for the best experience. Bringing it to room temperature for about 15 minutes before serving can soften the texture slightly without losing its charm.
FAQs
Can I use regular marshmallows instead of mini marshmallows?
Yes, regular marshmallows will work just fine, but mini marshmallows melt faster and more evenly, helping to create a smoother crust.
Is it possible to make this recipe gluten-free?
Absolutely! Rice Krispies cereal contains malt syrup which is not gluten-free, but you can substitute with a certified gluten-free crispy rice cereal to make the recipe safe for gluten-sensitive folks.
Can I add other mix-ins to the cheesecake filling?
Definitely! Chopped nuts, crushed cookies, or even small fruit pieces can be folded in to customize the cheesecake to your taste.
What’s the best way to prevent the crust from getting soggy?
Make sure the Rice Krispie crust is completely cooled and set before adding the cheesecake filling. Chilling the cheesecake fully before serving also helps keep the crust crisp.
Can I substitute the heavy cream with something lighter?
Heavy cream is key for achieving the fluffy texture, but you could try chilled coconut cream for a dairy-free alternative, though it will alter the flavor slightly.
Final Thoughts
This Rice Krispie Treat Cheesecake Recipe is a total winner, blending the best of crunchy, creamy, and sweet into one unforgettable dessert. Whether you’re impressing guests or satisfying your sweet tooth on a lazy afternoon, this recipe brings sheer joy with every bite. Give it a try and watch it become your favorite April-to-December dessert treat—fun, fast, and absolutely delicious!
Print
Rice Krispie Treat Cheesecake Recipe
- Prep Time: 20 minutes
- Cook Time: 10 minutes
- Total Time: 4 hours 30 minutes
- Yield: 10 servings
- Category: Dessert
- Method: No-Cook
- Cuisine: American
- Diet: Vegetarian
Description
This no-bake Rice Krispie Treat Cheesecake combines the nostalgic crunch of Rice Krispies cereal with a creamy, fluffy cheesecake filling. Featuring a marshmallow-infused cereal crust and a smooth cream cheese and whipped cream topping, this dessert is perfect for family gatherings or a fun kids’ treat. Easy to make and requiring no oven time, it’s a delightful American dessert that sets up in the fridge and offers a playful twist on traditional cheesecake.
Ingredients
Crust
- 5 cups Rice Krispies cereal
- 1 (10 oz) bag mini marshmallows
- 3 tablespoons unsalted butter
Cheesecake Filling
- 16 oz cream cheese, softened
- 1/2 cup powdered sugar
- 1 teaspoon vanilla extract
- 1 1/2 cups heavy whipping cream
- 1/2 cup mini chocolate chips or sprinkles (optional)
Instructions
- Prepare the Crust: In a large saucepan, melt the butter over low heat. Add the mini marshmallows and stir continuously until they are completely melted and smooth. Remove the pan from heat and fold in the Rice Krispies cereal, stirring until every piece is well coated with the marshmallow mixture. Transfer this mixture to a greased 9-inch springform pan, pressing it evenly across the bottom and slightly up the sides to form a firm crust. Allow it to cool and set completely.
- Make the Cheesecake Filling: In a large mixing bowl, beat the softened cream cheese with powdered sugar and vanilla extract until the mixture is smooth and fluffy. In a separate clean bowl, whip the heavy cream until stiff peaks form. Carefully fold the whipped cream into the cream cheese mixture, ensuring the mixture remains light and airy. Gently fold in mini chocolate chips or sprinkles if desired.
- Assemble the Cheesecake: Pour the cheesecake filling into the prepared Rice Krispie crust, smoothing the top with a spatula for an even surface. Cover and refrigerate the assembled cheesecake for at least 4 hours or until fully set and chilled.
- Serve: When ready to serve, run a thin knife around the edge of the springform pan to release the crust. Remove the sides of the pan, slice the cheesecake into 10 servings, and serve chilled for best flavor and texture.
Notes
- Ensure the Rice Krispie crust is completely cooled before adding the filling to prevent the cheesecake from melting or becoming soggy.
- For an extra layer of flavor and texture, consider adding a layer of melted chocolate between the crust and the cheesecake filling.
- Store any leftovers covered in the refrigerator and consume within 3 days for optimal freshness.


